 Skip to content
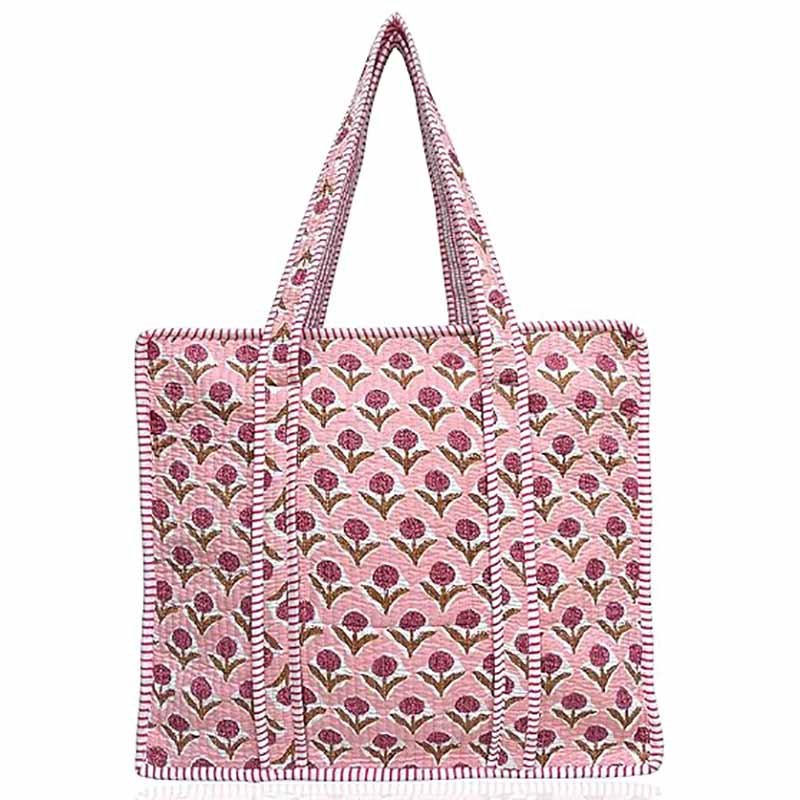
Reusable shopping bags are no longer just practical carriers—they’ve become lifestyle items. Among them, quilted shopping bags stand out for their soft structure, visual depth, and everyday comfort. Unlike flat canvas totes or rigid synthetic bags, a quilted shopping bag feels intentional: padded enough to protect contents, flexible enough to fold, and stylish enough to be reused daily. That’s why they are increasingly popular not only among DIY sewists, but also among fashion brands, sustainable labels, and premium private-label collections.
What many people don’t realize is that a quilted shopping bag sits at the intersection of craft and engineering. It looks simple, but its performance depends heavily on material choices, quilting structure, seam reinforcement, and handle construction. A poorly made quilted bag can stretch, sag, or fail under weight—while a well-designed one can last for years of groceries, travel, or daily errands. A quilted shopping bag is made by layering an outer fabric, batting, and lining, then quilting them together before assembling the bag. The process involves choosing durable fabrics, selecting appropriate padding, quilting evenly for structure, and reinforcing stress points like handles and seams. With the right materials and construction, quilted shopping bags can be strong, reusable, and suitable for both DIY projects and scaled production.
At Szoneier, we’ve seen countless designers start with a simple handmade quilted tote—only to later ask how to make it stronger, lighter, or production-ready. This article walks you through both worlds: how quilted shopping bags are made, and how thoughtful construction turns a soft bag into a reliable, scalable product.
What Is a Quilted Shopping Bag
A quilted shopping bag is a reusable bag constructed by stitching together multiple layers—typically an outer fabric, a padded batting layer, and an inner lining—using quilting techniques. This layered structure improves durability, comfort, insulation, and shape retention, making quilted shopping bags suitable for daily errands, grocery shopping, and branded reusable packaging.
What makes a bag “quilted”
A bag is considered quilted when its structure is formed by sewing through three or more layers at once—most commonly:
- an outer fabric (visual appearance and abrasion resistance),
- a batting or padding layer (softness, insulation, shock absorption),
- and an inner lining (clean finish and internal durability).
These layers are permanently joined using visible stitch patterns such as straight lines, grids, diamonds, or custom motifs. Unlike decorative topstitching, quilting stitches penetrate all layers, locking them together into a single composite material. This is what differentiates quilted shopping bags from standard tote bags with simple linings.
From a functional perspective, quilting prevents fabric shifting, controls stretching under load, and distributes weight more evenly across the bag body.
How a quilted shopping bag differs from a regular tote bag
A standard shopping tote is usually made from one or two fabric layers stitched at the edges. While simple and lightweight, this construction often lacks structure and comfort, especially when carrying heavier items.
In contrast, a quilted shopping bag:
- feels softer and more comfortable in hand or on the shoulder,
- maintains its shape better when loaded,
- provides light cushioning for fragile items,
- and often has a longer usable lifespan due to reinforced construction.
This difference becomes especially noticeable in repeated daily use, grocery shopping, or when the bag is folded and reused frequently.
Are quilted shopping bags good for everyday shopping
Yes—but only when they are designed correctly.
A well-made quilted shopping bag is excellent for everyday use because the padding reduces pressure on hands and shoulders, while the layered construction adds durability. However, not all quilted bags are equally strong. Bags made with decorative quilting alone—without reinforced handles or appropriate fabric weight—may fail under heavier loads.
In professional manufacturing, quilted shopping bags intended for daily use typically include:
- reinforced handle anchor points,
- optimized stitch density to prevent fabric distortion,
- and fabrics selected for load-bearing performance, not just appearance.
This is why many premium reusable bag brands favor quilted designs while relying on engineered construction rather than purely handmade methods.
Why quilted shopping bags are increasingly popular
The rise of quilted shopping bags is driven by both consumer behavior and brand strategy.
From the consumer side, quilted bags feel more intentional and personal than disposable or flat totes. They are often perceived as higher-quality, more comfortable, and more reusable—aligning with sustainability-conscious lifestyles.
From a brand perspective, quilting offers:
- strong visual differentiation,
- customizable stitch patterns as brand identifiers,
- and flexible seasonal updates without changing core structure.
For manufacturers like Szoneier, quilted shopping bags also offer scalable design opportunities—allowing brands to evolve collections while keeping production stable and cost-efficient.
Typical uses of quilted shopping bags
Quilted shopping bags are used across a wide range of scenarios, including:
- grocery and daily shopping bags,
- reusable retail packaging for fashion and lifestyle brands,
- gift and promotional shopping bags,
- eco-friendly alternatives to plastic or paper bags.
Their versatility comes from the balance between softness and strength—something that flat or rigid bags often struggle to achieve simultaneously.
Which Materials Are Best for Quilted Shopping Bags
The best materials for quilted shopping bags combine durability, stitch stability, and comfort. High-performing options include cotton canvas, recycled polyester (RPET), nylon, and blended fabrics for the outer layer; lightweight polyester or cotton batting for padding; and smooth, abrasion-resistant linings. The right material combination depends on load requirements, usage frequency, washability, and brand positioning.
What is the best fabric for quilting bags
The best fabric for quilting bags must hold stitches firmly without tearing or excessive distortion. This is why medium-to-heavy weight woven fabrics are preferred.
- Cotton canvas (10–14 oz) is widely used in DIY and entry-level products because it is easy to quilt, breathable, and visually natural. However, pure cotton can stretch, shrink, and fade over time if not treated.
- Cotton–poly blends improve dimensional stability while keeping a soft hand feel. These are often a better long-term choice than 100% cotton.
- Recycled polyester (RPET) fabrics are increasingly popular for quilted bags due to their strength, low stretch, and sustainability appeal.
From a manufacturing perspective, the key metric is stitch-holding capacity—the fabric must tolerate dense quilting without puckering or tearing. This is why factories like Szoneier test fabric samples under different stitch densities before approving them for production.
What is the best fabric for shopping bags
Shopping bags face a different set of stresses than decorative quilted items. They are pulled, folded, washed, and loaded repeatedly. The best shopping bag fabrics prioritize tensile strength, abrasion resistance, and low elongation.
Common high-performing options include:
- Nylon (210D–420D): Lightweight, strong, and resistant to wear. Quilted nylon shopping bags are ideal for heavier loads and frequent use.
- Polyester / RPET: Slightly stiffer than nylon but more cost-stable and colorfast. Excellent for branded reusable shopping bags.
- Treated canvas (coated or enzyme-washed): Offers a balance between natural aesthetics and improved durability.
For brands, the decision often comes down to whether the bag is positioned as eco-lifestyle, fashion-forward, or heavy-duty reusable—each category favors different fabric priorities.
Batting and padding options for structure and durability
Batting is what gives a quilted shopping bag its softness and volume, but it also directly affects performance.
- Polyester batting is the most commonly used option. It is lightweight, resilient, and recovers its shape after compression, making it ideal for shopping bags.
- Cotton batting feels softer and more natural but absorbs moisture and compresses over time, which can reduce lifespan.
- Foam padding adds structure but is generally too bulky for foldable shopping bags unless insulation is required.
In professional production, batting thickness for quilted shopping bags typically ranges from 2 mm to 5 mm. Thicker is not always better—excess padding increases weight and shipping cost without improving load capacity.
Best lining materials for quilted shopping bags
The lining is often overlooked, yet it directly impacts durability and user experience.
Good lining materials should be:
- smooth (to reduce friction),
- abrasion-resistant,
- and easy to clean.
Common choices include:
- Polyester taffeta or oxford lining
- Lightweight nylon
- RPET lining for eco-focused brands
A weak lining fabric can tear even if the outer quilted fabric remains intact. This is a common failure point in low-quality quilted bags.
How material choices affect weight, strength, and lifespan
Material selection is always a trade-off. Heavier fabrics increase durability but reduce portability. Softer fabrics improve comfort but may shorten lifespan if not reinforced.
Below is a simplified comparison:
| Material Type | Durability | Weight | Quilting Stability | Best Use Case |
|---|---|---|---|---|
| Cotton Canvas | Medium | Medium | High | Lifestyle, casual use |
| Cotton-Poly Blend | Medium–High | Medium | High | Daily shopping |
| RPET Polyester | High | Medium | Very High | Eco-brands, retail |
| Nylon | Very High | Light | High | Heavy-duty shopping |
For scalable production, material consistency across batches is as important as the material itself. This is why experienced manufacturers focus on repeatable fabric sourcing rather than one-off material choices.
How to Prepare Your Tools and Workspace
To prepare tools and workspace for making a quilted shopping bag, you need the correct sewing tools for multi-layer fabrics, properly pre-treated materials, and a stable, spacious work surface. Good preparation prevents quilting distortion, uneven stitches, weak seams, and early bag failure.
Quilted shopping bags place far more demands on tools and workspace than flat sewing projects. You are sewing through multiple layers, managing fabric bulk, and controlling stitch consistency over large panels. Poor preparation leads to puckering, broken needles, misaligned quilting, and weak load-bearing areas.
Professionally, this preparation stage is where quality is decided. In factories such as Szoneier, over half of early sampling adjustments relate not to design—but to tool setup and material handling.
Essential sewing tools for quilted shopping bags
A quilted shopping bag requires tools capable of handling thickness, friction, and stitch density.
Core tools include:
- Sewing machine with consistent feed power (walking foot preferred but not mandatory)
- Needles: size 90/14 or 100/16 for canvas, polyester, or nylon quilting
- Thread: high-tensile polyester thread (cotton thread breaks too easily under load)
- Cutting tools: rotary cutter or heavy-duty fabric scissors
- Clips instead of pins for thick layers (pins distort batting)
- Measuring tools: ruler, seam gauge, fabric marker or chalk
A common beginner mistake is using light needles and domestic thread intended for garments. Quilted shopping bags generate higher needle heat and thread tension, especially during long straight quilting lines.
How to prepare fabrics before quilting
Fabric preparation directly affects finished bag shape and long-term durability.
Key preparation steps:
- Pre-wash cotton fabrics to remove shrinkage and excess dye
- Heat-test synthetic fabrics (nylon, polyester) to confirm they tolerate ironing and stitching heat
- Iron all layers flat before layering—wrinkles become permanent once quilted
- Check fabric grain direction to prevent twisting after assembly
Batting must also be prepared. Polyester batting should be gently flattened; cotton batting should be aired and inspected for density consistency. Uneven batting thickness is a major cause of lumpy quilting.
In manufacturing, fabric rolls are conditioned in controlled environments before cutting. At home, simply allowing fabrics to rest flat for several hours significantly improves results.
How to layer and stabilize materials before sewing
Before quilting begins, layers must be stabilized so they behave as a single unit.
Best practices include:
- Laying outer fabric face-down, then batting, then lining
- Smoothing each layer from center outward
- Securing layers with temporary basting stitches or fabric spray
- Avoiding excessive pinning, which compresses batting unevenly
For shopping bags, stability matters more than decorative precision. Loose layers shift during quilting, causing misalignment that weakens seams and reduces visual quality.
Professional workshops often test multiple stabilization methods before locking production specs. This same mindset—test before sewing—saves time even for small projects.
Workspace setup for accurate quilting and clean seams
Workspace quality directly affects stitch consistency.
An effective workspace should provide:
- A large, flat surface that supports the full panel (not hanging off the table)
- Even lighting to track stitch lines
- Enough clearance behind the machine to prevent fabric drag
- A chair height that keeps fabric feeding level
Quilting large panels on a small table causes gravity pull, leading to uneven stitch length and distorted patterns. Many DIY quilting issues are not skill-related—they’re workspace-related.
Factories address this with extended tables and material supports. At home, even a temporary extension surface dramatically improves results.
Safety and efficiency tips for longer quilting sessions
Quilting shopping bags often involves long, repetitive stitching lines.
To work safely and efficiently:
- Change needles regularly (dull needles cause skipped stitches)
- Pause to let the machine cool during dense quilting
- Keep hands clear of needle paths—thick layers reduce reaction time
- Test stitch tension on scrap layers before each major step
Professionally, these practices reduce defect rates. For individual makers, they reduce frustration and rework.
How to Sew a Quilted Shopping Bag Step by Step
To sew a quilted shopping bag, quilt your fabric layers first, then cut panels to size, sew the bag body, reinforce handles, and finish seams cleanly. Quilting before assembly improves stability and prevents distortion. Reinforcing stress points—especially handle anchors and bottom corners—turns a soft quilted bag into a durable, load-bearing shopping bag.
Below is a clear, repeatable method used by many experienced makers—and it’s also the logic factories follow when developing production-ready quilted bags. You can adapt dimensions and styling, but the sequence should stay the same: quilt → cut → assemble → reinforce → finish.
Step 1: Choose your bag size and draft the panels
Before cutting fabric, decide the bag’s intended use. A “shopping bag” needs enough base depth to stand and carry weight without tipping.
Practical finished-size ranges (common for shopping use):
- Medium daily tote: 34–38 cm (W) × 32–36 cm (H) × 10–12 cm (D)
- Large grocery tote: 40–45 cm (W) × 35–40 cm (H) × 12–16 cm (D)
Recommended seam allowance: 1–1.5 cm for stronger seams.
Handle options (finished length):
- Hand-carry: 35–45 cm
- Shoulder carry: 55–70 cm
Tip: If you’re unsure, start with a medium tote size and test comfort with actual groceries before scaling up.
Step 2: Cut outer fabric, lining, and batting with control
Cutting cleanly is a performance step, not a cosmetic one. Uneven panels create twisting, puckering, and misaligned quilting.
Cut these components:
- Outer panels (front/back)
- Lining panels (front/back)
- Batting panels (front/back)
- Optional: base panel (for stronger bottom)
Best practice: Cut batting slightly larger (about 1–2 cm extra on edges) because quilting can “pull in” the layers. You will trim after quilting.
If using directional fabrics (printed, striped), align grain direction consistently—misaligned grain causes visible skew.
Step 3: Layer the panels and baste them to prevent shifting
Layer order matters:
Standard quilting sandwich:
- Outer fabric (right side down or up depending on method)
- Batting
- Lining
Smooth layers from center outward, then secure with:
- temporary basting stitches, or
- fabric clips + light pinning away from quilting paths
Skipping stabilization is the #1 reason quilting lines drift and bags warp during assembly.
Step 4: Quilt the panels (structure comes from stitch spacing)
Quilting is where your bag gets its “body.” For shopping bags, quilting must prioritize stability and strength.
Recommended quilting patterns for shopping bags:
- Straight-line quilting (most durable & easiest)
- Grid quilting (stable and modern-looking)
- Diamond quilting (popular but requires careful alignment)
Recommended stitch length: 3.0–3.5 mm Recommended stitch spacing:
- Light-duty tote: 4–6 cm
- Daily grocery tote: 3–5 cm (more stable)
Technique tip: Start quilting from the center line, then work outward. This reduces fabric distortion.
After quilting, trim panels to final dimensions, squaring corners carefully.
Step 5: Assemble the bag body (seams + bottom are load zones)
With quilted panels ready, sew the outer bag first.
Basic assembly:
- Place outer panels right sides together
- Sew side seams and bottom seam
- Repeat for lining panels (leave a turning gap in the lining bottom)
Reinforcement tip: Backstitch at the start/end of each seam. For shopping bags that carry weight, consider sewing the bottom seam twice.
Corner structure (boxed corners): Boxed corners add capacity and help the bag stand. A common method is to pinch the corner into a triangle and sew across at a set width.
Typical boxed corner depth: 5–8 cm depending on desired base depth.
Step 6: Add structure where it matters (optional but recommended)
Quilted bags feel soft—which is good—but shopping bags often need controlled structure.
Options:
- Add a base panel (extra quilted layer)
- Insert a removable bottom board (PP sheet, thin plastic, or EVA) inside a lining pocket
- Add internal binding tape for seam protection
If the bag is intended for groceries or heavy load, base reinforcement dramatically increases lifespan.
Step 7: Attach handles the “load-bearing” way
Handles are the most common failure point.
Reliable handle attachment methods:
- Box-X stitching (a square with an X inside)
- Extended handle wrap (handle ends extend down inside the bag)
- Internal webbing reinforcement (hidden)
Placement guide: Handles typically sit 8–12 cm inward from each side seam (depending on bag width).
For a shopping tote, handle anchors should be reinforced with:
- extra fabric patches inside
- multi-row stitching
- bar-tack stitches at stress ends (factory method)
At Szoneier, handle anchoring is treated as an engineering point, not an aesthetic detail—because repeated lifting stress can destroy a bag even if the body is strong.
Step 8: Join lining and outer bag, then finish cleanly
Insert the outer bag into the lining (right sides together), align top edges, and sew around the opening.
Then:
- turn the bag through the lining gap
- close the lining gap with topstitch or hidden stitch
- topstitch around the bag opening for stability (recommended)
Topstitching benefits: It reduces edge rolling and helps the bag keep a crisp opening shape—important for both usability and premium look.
Step 9: Final quality checks (the DIY step brands often skip)
Before calling it “done,” test the bag like a real user:
- Load test with 6–10 kg (books or groceries)
- Lift repeatedly 30–50 times
- Check handle seams, bottom corners, and quilting stability
- Inspect inside lining for tearing or seam strain
This simple stress test is one reason production-ready bags last longer. It’s also how brands spot failures early before mass production.
Do You Need a Pattern and How to Choose One
You don’t strictly need a pattern to make a quilted shopping bag, but a pattern helps you control proportions, seam allowances, boxed corners, handle placement, and lining fit. Beginners should use a proven pattern to avoid twisting, sagging, or weak stress points. Once you understand bag structure, you can draft your own pattern by defining finished size, seam allowance, base depth, and reinforcement zones.
A quilted shopping bag might look like a simple rectangle, but most problems happen because the “math” is missing: how much depth to add, where to place handles, how to size lining, and how to keep the bag balanced when loaded. A good pattern is basically a repeatable engineering plan.
In manufacturing, the pattern is treated like a technical document: it includes tolerances, stitch logic, reinforcement zones, and sometimes even material callouts. For DIY makers, the same idea applies—your pattern is what keeps the bag reliable.
Can I make my own quilted tote bag without a pattern
Yes, you can. But “no pattern” usually still means you are making a pattern—just in your head. That’s where mistakes creep in.
If you want to go pattern-free, use this simple approach:
- Define your finished bag size (W × H × D).
- Add seam allowance (typically 1–1.5 cm each edge).
- Decide corner boxing depth (to create the base).
- Mark handle placement and reinforcement areas.
Common failure when skipping a pattern:
- bag twists because front/back panels aren’t truly identical
- lining ends up too tight or too loose
- boxed corners don’t match, so the bag leans
- handles sit too close to the side seam and tear the seam line
If you’re building a bag for real shopping loads, a basic drafted pattern is strongly recommended even if you “don’t use patterns.”
What should a good quilted shopping bag pattern include
A reliable pattern should clearly specify:
- Finished dimensions (width, height, base depth)
- Cutting dimensions (including seam allowance)
- Boxed corner method (how to form depth)
- Handle length and placement (with measurements)
- Lining instructions (including turning gap)
- Reinforcement zones (handle anchors, bottom seam, corners)
- Suggested fabric weight and batting thickness
If a pattern doesn’t mention handle reinforcement or boxed corners, it’s usually designed for light use—more like a casual tote than a true shopping bag.
How to choose a pattern based on bag use
The fastest way to pick the right pattern is to start with the intended load and usage frequency.
Choose patterns like this:
- Light use / fashion tote: slimmer base, lighter batting, decorative quilting
- Daily shopping / grocery tote: boxed corners, reinforced handles, medium quilting density
- Heavy-duty reusable bag: stronger fabric (nylon/RPET), handle reinforcement, possibly base insert
A good shopping bag pattern always supports weight: it creates a stable base and reinforces stress points.
Free vs paid patterns: which is better
Free patterns are excellent for learning construction flow, but many prioritize simplicity over durability. They often omit:
- structural reinforcement
- load-bearing handle stitching
- long-term lining durability details
Paid patterns are more likely to include tested dimensions, reinforcement, and clear assembly logic—especially if created by experienced bag makers.
A simple rule: If you want the bag to carry groceries repeatedly, choose a pattern that explicitly mentions reinforced handles and boxed corners.
How to modify a pattern for the perfect shopping bag size
If you like a pattern but need different size, modify it using controlled changes (not random scaling).
Best way: adjust one variable at a time
- Increase width for capacity
- Increase base depth for stability
- Increase height for volume (but don’t go too tall without widening the base)
Basic sizing logic for stability: If you increase bag height, also increase base depth or width—otherwise the bag tips when loaded.
Handle rule of thumb:
- Wider bags need handles placed slightly farther from side seams
- Handles that are too close to seams cause seam tearing
How patterns change when you want to scale production
If you’re making quilted shopping bags for a brand, a “home pattern” often needs upgrades before OEM production.
Production-ready patterns typically include:
- seam allowance tolerance (so batches stay consistent)
- standardized quilting spacing (for speed and repeatability)
- reinforcement instructions (box-X stitch, bar-tacks, internal webbing)
- material spec notes (fabric type, thickness, lining performance)
This is where an experienced manufacturer matters. Szoneier often helps clients convert a handmade sample into a factory-ready pattern—keeping the same look, but improving durability and repeatable construction.
Are There Common Mistakes to Avoid
Yes. Common mistakes when making quilted shopping bags include choosing the wrong fabric or batting, under-reinforcing handles, mismanaging quilting alignment, using weak seams, and ignoring load testing. These issues often cause early failure even if the bag looks well made. Avoiding them requires understanding stress distribution, material behavior, and construction sequence.
Quilted shopping bags often fail not because of poor sewing skills, but because of design and construction misunderstandings. Below are the most frequent mistakes seen in DIY projects and early brand samples—along with practical ways to avoid them.
Choosing the wrong fabric or batting
The mistake: Using soft decorative fabrics or thick, plush batting simply because they “look nice.”
Why it happens: Beginners often prioritize appearance over performance. Quilting tutorials frequently focus on aesthetics rather than load-bearing behavior.
What goes wrong:
- Fabric stretches and deforms under weight
- Batting compresses and loses structure
- Bag sags after limited use
How to avoid it: Choose outer fabrics with low stretch and good stitch-holding capacity (canvas blends, RPET, nylon). Use medium-thickness polyester batting (2–5 mm) for shopping bags. Thicker padding does not increase strength—it usually reduces lifespan.
Weak handle attachment and poor load distribution
The mistake: Sewing handles with a single straight stitch or attaching them too close to the side seams.
Why it happens: Handles are often treated as decorative elements rather than structural components.
What goes wrong:
- Handles tear out of the bag
- Side seams split under load
- Bag fails suddenly even when body looks intact
How to avoid it: Handles must be reinforced using Box-X stitching, multi-row stitching, or extended handle wraps that run into the bag interior. Placement should be carefully measured so load is distributed across the bag body—not concentrated at one seam.
In professional production, handle anchor strength is one of the first points tested.
Incorrect quilting sequence or uneven stitch spacing
The mistake: Assembling the bag first and quilting afterward, or quilting with inconsistent spacing.
Why it happens: Quilting feels like a decorative step, so it’s often postponed.
What goes wrong:
- Fabric puckers and twists
- Bag panels warp and don’t align
- Quilting lines pull seams out of square
How to avoid it: Always quilt panels before assembly. Maintain consistent stitch spacing (typically 3–5 cm for shopping bags). Start quilting from the center outward to minimize distortion.
Factories standardize quilting parameters for this reason—consistency equals stability.
Insufficient seam allowance and seam reinforcement
The mistake: Using narrow seams (under 1 cm) or skipping backstitching.
Why it happens: Garment sewing habits are incorrectly applied to bag construction.
What goes wrong:
- Seams split under load
- Corners fail first
- Bag lifespan is drastically shortened
How to avoid it: Use 1–1.5 cm seam allowance for load-bearing seams. Reinforce bottom seams and corners with backstitching or double stitching. For boxed corners, ensure both sides are symmetrical to avoid imbalance.
Ignoring lining strength and interior finishing
The mistake: Using very thin lining fabrics or leaving raw interior seams.
Why it happens: The lining is “out of sight,” so it’s treated as less important.
What goes wrong:
- Lining tears before outer fabric
- Interior seams fray and weaken
- Bag feels low quality despite nice exterior
How to avoid it: Select linings with abrasion resistance (polyester or nylon). Bind or protect interior seams where possible. A durable lining significantly extends the usable life of a quilted shopping bag.
Skipping real load testing
The mistake: Judging the bag by appearance alone.
Why it happens: Testing feels unnecessary once the bag “looks finished.”
What goes wrong:
- Hidden weaknesses go unnoticed
- Bag fails after a few real shopping trips
- Customer complaints or product returns
How to avoid it: Always perform a load test:
- Fill the bag with 6–10 kg
- Lift repeatedly 30–50 times
- Inspect handles, seams, corners, and quilting
This simple test reveals most structural problems early.
Treating DIY construction as production-ready
The mistake: Assuming a successful handmade sample can be directly scaled.
Why it happens: Handmade success gives false confidence.
What goes wrong:
- Inconsistent batches
- Unexpected defect rates
- Rising costs and delays
How to avoid it: When scaling, patterns must be standardized, materials must be consistent, and reinforcement must be engineered—not improvised. This transition is where experienced manufacturers like Szoneier help brands turn good ideas into reliable products.
How Can Custom Makers Scale Production
Custom makers scale quilted shopping bag production by standardizing patterns, locking material specifications, engineering reinforcement points, validating samples through testing, and partnering with an experienced OEM manufacturer. Scaling is not about sewing faster—it’s about making construction repeatable, durable, and cost-controlled across batches.
Many quilted shopping bags begin as successful handmade pieces. Scaling fails when makers try to “do the same thing, just more.” In reality, production requires controlled inputs, fixed processes, and measurable outputs. Below is a practical, step-by-step framework used by brands that successfully move from DIY to OEM.
When handmade methods stop being efficient
Handmade methods become inefficient once quantities exceed 30–50 units per style. At that point, labor time, inconsistency, and fatigue drive defect rates up and margins down.
Typical symptoms you’ve outgrown DIY:
- Each bag takes noticeably different time to finish
- Quilting spacing or tension varies between pieces
- Handle attachment quality depends on who sews it
- Rework and fixes increase with quantity
Scaling requires replacing “craft intuition” with documented steps—so every unit is built the same way, regardless of who makes it.
Standardize patterns for repeatability
A production-ready pattern is not just a cutting template. It’s a technical document.
What must be standardized:
- Finished dimensions with tolerances (±2–3 mm)
- Seam allowance widths (fixed across all seams)
- Boxed corner depth and method
- Handle length, placement, and reinforcement zone
- Quilting stitch spacing and direction
Factories rely on these standards to keep batches consistent. Without them, even high-quality materials won’t prevent variation.
Lock material specifications early
Scaling fails when materials change mid-production. “Similar fabric” is not acceptable in manufacturing.
Production material specs should include:
- Fabric type (e.g., cotton-poly canvas, RPET, nylon)
- Weight (GSM or denier)
- Coating or finish (if any)
- Batting material and thickness (e.g., polyester, 3 mm)
- Lining fabric type and abrasion rating
Once locked, these specs should not change without re-testing. Material stability is one of the biggest differences between hobby projects and professional production.
Engineer reinforcement, don’t decorate it
In small batches, reinforcement is often improvised. In production, it must be engineered.
Critical reinforcement zones:
- Handle anchor points (Box-X, multi-row stitch, or bar-tack)
- Bottom seams and boxed corners
- Upper opening edge (topstitching or binding)
Each reinforcement method must be repeatable and time-efficient. Decorative stitching that slows production or varies by operator should be redesigned.
Validate samples with real performance testing
Before mass production, samples must pass functional tests—not just visual approval.
Common production tests for quilted shopping bags:
- Load test: 8–12 kg for 30–50 lift cycles
- Seam inspection after load testing
- Handle pull resistance check
- Quilting distortion check after handling
- Wash or wipe test (if bag is washable)
Factories use these tests to catch failures early—when changes are still cheap.
Control cost without weakening the bag
Scaling is also about protecting margins.
Smart cost controls include:
- Optimizing quilting spacing (fewer lines = faster sewing)
- Choosing durable but cost-stable fabrics
- Simplifying interior finishes where hidden
- Reducing unnecessary layers without reducing strength
Cost reduction should never come from removing reinforcement at stress points. That leads to higher return rates and brand damage.
Move from “making” to “managing” production
Once production begins, your role changes. You’re no longer sewing—you’re managing consistency.
Key production management elements:
- Pre-production samples (PPS) approval
- In-line quality checks
- Final random inspection
- Packaging and folding standards
- Batch traceability (materials + dates)
This is where an experienced manufacturing partner becomes essential. Szoneier helps brands translate handmade quilted bag designs into factory-ready products by refining patterns, validating materials, and controlling quality across batches—while preserving the original design intent.
Conclusion
A quilted shopping bag may begin as a personal project, but turning it into a reliable product requires more than sewing skills. Materials, structure, reinforcement, and repeatability define whether a bag survives daily use—or becomes a short-lived accessory.
If you’re developing quilted shopping bags for retail, private label, or brand collections, working with an experienced manufacturing partner reduces risk and accelerates growth.
Share your quilted bag idea, sketch, or sample with Szoneier. Our team can help you refine construction, optimize materials, and turn your design into a durable, market-ready product.
manufacturer Categories
- Custom Tote Bags Manufacturer
- custom backpacks Manufacturer
- custom travel bags& Duffle bags manufacturer
- custom makeup bags & toiletry bags manufacturer
- custom cooler bags manufacturer
- custom drawstring bags manufacturer
- custom makeup bags & toiletry bags manufacturer
- custom golf bags manufacturer
- custom fireproof bags manufacturer
- custom dry bags manufacturer
- custom ski bags manufacturer
- custom gym & sports bags manufacturer
- custom laptop bags manufacturer
- custom tactical bags manufacturer
- custom beach bags manufacturer
- custom medical bags manufacturer
- custom camera bags manufacturer
- custom wetsuits manufacturer
- custom leather goods manufacturer
- more personalized products

Can't find the answers?
No worries, please contact us and we will answer all the questions you have during the whole process of bag customization.
Make A Sample First?
If you have your own artwork, logo design files, or just an idea,please provide details about your project requirements, including preferred fabric, color, and customization options,we’re excited to assist you in bringing your bespoke bag designs to life through our sample production process.