Skip to content
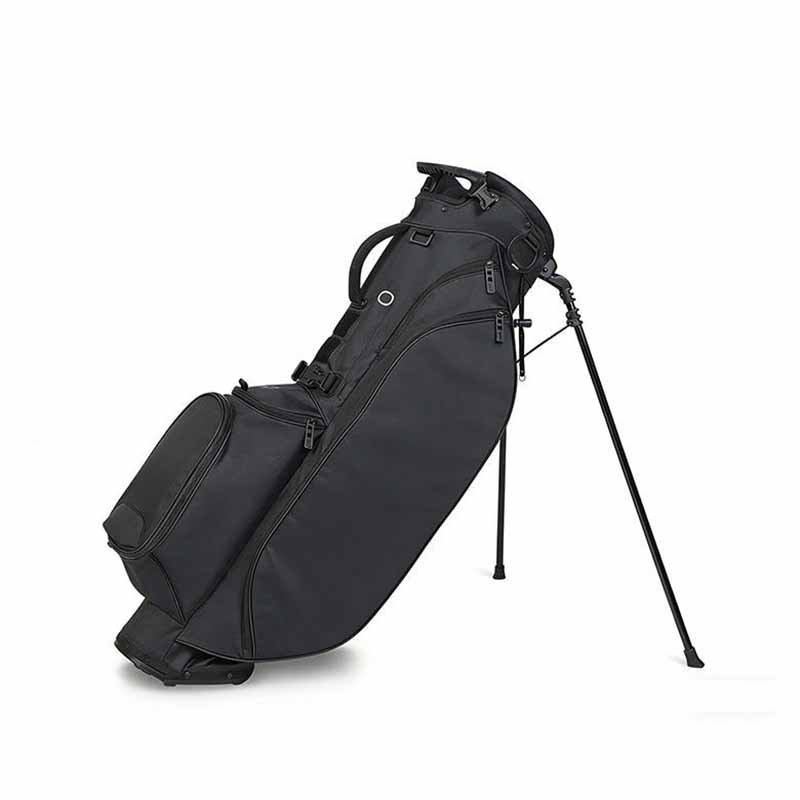
A stand golf bag looks straightforward until it is loaded with fourteen clubs, balls, apparel, water, valuables, gloves, a towel, and a rain hood. At that point, every design decision becomes visible. The legs must open evenly. The bag must rest at a stable angle. The shoulder straps must spread the weight without pulling the body backward. The dividers must prevent clubs from jamming, and the pockets must remain usable even when the bag is full.
Stand golf bag manufacturing combines soft-goods sewing with structural engineering. Production normally includes product planning, material selection, pattern development, panel cutting, pocket assembly, divider construction, frame installation, strap fitting, stand-system assembly, logo application, finishing, and repeated inspection. A dependable bag is created by making all these parts work as one unit rather than treating the shell, stand, straps, and base as separate components.
A bag can use expensive fabric and still fail because its leg brackets are misaligned. It can be light but uncomfortable because the strap anchors are positioned too high. It can look water-resistant in photographs but leak through zipper seams during a wet round.
The real test comes late in the day. After several hours of carrying, placing, lifting, and reopening the bag, small manufacturing details become the difference between a product golfers trust and one they stop using.
What Is a Stand Golf Bag?
A stand golf bag is a portable golf bag equipped with two retractable legs that open when the base contacts the ground. It is mainly designed for golfers who walk the course, although many models can also be secured to a push cart or riding cart. Its structure combines a club divider, fabric body, internal supports, shoulder straps, pockets, handles, base plate, and leg mechanism.
The product must perform in two positions. While being carried, it needs to remain close to the golfer’s body without swinging excessively. When placed on the ground, it needs to lean at a controlled angle and remain stable on grass, compact soil, slopes, and slightly uneven surfaces.
A practical stand golf bag is not designed around appearance alone. Weight, club capacity, pocket volume, stand angle, divider structure, strap balance, and reinforcement must be decided together. Increasing one feature often changes several others.
For example:
- Adding a larger apparel pocket increases storage but may pull the bag toward one side.
- Adding more club dividers improves organization but increases top weight and internal friction.
- Adding thicker foam improves comfort but can make straps bulky and slow to dry.
- Reducing base size lowers weight but may weaken standing stability.
- Using heavier shell fabric improves body structure but makes long-distance carrying less comfortable.
Many walking models are developed within a finished weight range of approximately 1.8 to 2.8 kilograms. More reinforced or feature-heavy designs may reach 3.0 kilograms or more. The right target depends on the intended retail position, pocket count, divider layout, fabric choice, leg material, and hardware level.
| Stand Golf Bag Type | Approximate Empty Weight | Common Divider | Pocket Count | Main Use |
|---|---|---|---|---|
| Ultralight walking bag | 1.5–2.0 kg | 2–4 way | 4–6 | Walking and short rounds |
| Standard stand bag | 2.0–2.6 kg | 4–6 way | 6–8 | Regular course use |
| Premium stand bag | 2.4–3.2 kg | 5–14 way | 7–10 | Full-feature retail collections |
| Hybrid stand bag | 2.8–3.8 kg | 6–14 way | 8–12 | Carrying and cart use |
The finished weight should be checked on a fully assembled sample, not estimated from fabric weight alone. Zippers, top dividers, foam, molded components, legs, webbing, rain hoods, embroidery, and internal boards can add much more weight than expected.
What Makes a Stand Golf Bag Unique?
The stand mechanism is the feature that defines the product. Two legs are connected to brackets positioned along the lower body. When the bag is placed down and the base is pressed against the ground, the mechanism pushes the legs outward. When the bag is lifted, spring tension or elastic force returns the legs toward the body.
This movement happens many times during a round. A golfer may set the bag down and lift it again more than 40 to 60 times over eighteen holes. The mechanism therefore needs to tolerate repeated movement, side pressure, dirt, moisture, and accidental impact.
The product also needs a specific body angle. A bag that stands too upright is easier to tip. A bag that leans too far places extra pressure on the leg pivots and can make club access awkward. Many designs aim for a resting angle in the approximate range of 15 to 25 degrees from vertical, although the final angle depends on body height, base geometry, leg length, and load distribution.
The shell must also retain its shape without becoming rigid. A stand bag normally uses a combination of fabric, internal stays, foam, plastic sheets, binding, molded parts, and reinforcement panels. These components prevent the body from collapsing while keeping the product flexible enough for carrying.
Unlike a cart bag, a stand bag is repeatedly handled from different points. It may be lifted by the top handle, lower grab handle, shoulder straps, side handle, or occasionally by the rim. Each lifting point must connect to an internal reinforcement area capable of carrying the loaded weight.
How Does a Stand Golf Bag Work?
Most stand systems use one of two structures: an external foot mechanism or an integrated base mechanism.
An external foot system includes a projecting pressure section near the bottom. When this foot touches the ground, it activates a rod or linkage that opens the legs. This design is easy to understand and can be adjusted during development, but the projecting section may catch on surfaces or affect the appearance.
An integrated base system places the activating structure within the bottom plate. It creates a cleaner look and can improve contact with the ground, but it requires more accurate tooling, closer assembly control, and better matching between the frame and molded base.
The leg system normally includes:
- Left and right legs
- Upper mounting brackets
- Lower linkage or activation rods
- Springs, elastic cords, or tension components
- Pivot pins or screws
- Leg-end caps
- Base or foot plate
- Internal reinforcement behind the brackets
The two legs must open at the same speed and stop at nearly the same angle. A small difference in bracket position can make one leg shorter in use, even when both rods have the same measured length.
During sample development, the factory should check the bag in several conditions:
- Empty
- Loaded with clubs only
- Loaded with clubs and accessories
- Placed on level concrete
- Placed on grass
- Placed on a moderate slope
- Opened and closed repeatedly
- Carried and set down from both shoulders
A stable empty bag may become unstable after the apparel pocket is filled. For that reason, balance testing should include realistic loads rather than only testing the unfilled sample.
Which Stand Golf Bag Features Matter?
Useful features should improve club access, carrying comfort, storage, weather protection, or course handling. Adding features only to increase the specification list can make the bag heavier, harder to sew, and more difficult to inspect.
The top divider is one of the first decisions. A four-way top keeps weight low and provides wider club openings. A six-way top offers more separation without becoming overly complex. A fourteen-way top gives each club a dedicated section but adds material, assembly time, and top weight.
| Divider Layout | Main Advantage | Main Limitation | Suitable Positioning |
|---|---|---|---|
| 2-way | Lowest weight and simple access | Limited club separation | Minimal walking bag |
| 4-way | Good balance of weight and access | Clubs may still cross internally | General walking bag |
| 5-way or 6-way | Better club grouping | Slightly heavier top | Mid-range stand bag |
| 14-way | Maximum organization | Higher weight and more friction risk | Premium or hybrid bag |
Full-length dividers are valuable when club grips tend to tangle. However, they need to be attached securely at both the top and lower structure. Loose divider fabric can twist inside the bag and create more friction instead of reducing it.
The shoulder system deserves the same level of attention as the stand system. Strap performance is influenced by:
- Strap width
- Foam thickness
- Foam density
- Mesh breathability
- Webbing strength
- Strap curve
- Anchor position
- Adjustment range
- Central balancing connector
- Distance between the bag and the golfer’s back
A strap that feels soft in the showroom may compress after several weeks. Foam density and recovery should therefore be considered, not only thickness. A common construction may combine 8 to 15 millimeters of foam with breathable spacer mesh and woven reinforcement inside the anchor section.
Pocket planning should reflect course use. A well-organized stand bag may include:
- Large apparel pocket
- Ball pocket
- Valuables pocket
- Insulated bottle pocket
- Rangefinder pocket
- Accessory pocket
- Rain-hood pocket
- Umbrella sleeve
- Towel ring
- Glove patch
- Scorecard section
- Pen holder
Pocket depth and opening direction matter more than pocket count. A bottle pocket should remain accessible while the bag is standing. A valuables pocket should not be placed where clubs press against it. A ball pocket should open wide enough for quick access without weakening the front panel.
Handles should be tested with the bag fully loaded. The top handle is often used for short lifts, while the lower handle helps place the bag into a car trunk or cart well. Both areas should be reinforced with internal webbing, plastic board, or multiple fabric layers.
Which Stand Golf Bag Materials Work Best?
Stand golf bag materials need to control five priorities: weight, abrasion resistance, shape retention, water protection, and visual quality. Polyester and nylon are the main shell choices. Neoprene, mesh, spacer fabric, webbing, foam, lining, plastic, aluminum, fiberglass, and metal hardware are added according to the function of each area.
A fabric name alone does not define performance. Two fabrics both described as 600D polyester can behave very differently because of yarn density, weave quality, coating thickness, backing adhesion, and finishing.
Material approval should include measurable requirements such as:
- Fabric weight in grams per square meter
- Yarn denier
- Tear strength
- Tensile strength
- Abrasion resistance
- Water-repellency level
- Hydrostatic pressure when required
- Coating adhesion
- Colorfastness
- UV resistance
- Surface appearance after folding
- Sewing performance
- Odor level
- Restricted-substance compliance
The main body usually needs enough structure to stand cleanly without excessive internal support. Lightweight fabric may need foam lamination or backing panels, which can remove some of the expected weight savings.
Higher-wear areas need stronger construction. These include the bottom corners, stand-bracket area, lower side panels, handle points, strap anchors, zipper ends, and sections that rub against carts.
| Bag Section | Material Range | Suggested Function | Key Inspection Point |
|---|---|---|---|
| Main body | 300D–600D polyester | Structure, color, decoration | Abrasion and coating adhesion |
| Lightweight body | 210D–420D nylon | Reduced weight | Tear strength and creasing |
| Bottom panels | 600D–900D fabric | Ground and cart abrasion | Scuffing and seam wear |
| Top cuff | Molded plastic, foam, wrapped fabric | Club separation and shape | Cracking and fabric wrapping |
| Shoulder straps | Foam, spacer mesh, webbing | Cushioning and load support | Compression and anchor strength |
| Bottle pocket | Neoprene or stretch mesh | Flexible bottle storage | Recovery and snag resistance |
| Divider lining | Brushed polyester or smooth woven fabric | Shaft and grip protection | Friction and loose fibers |
| Stand legs | Aluminum or composite rod | Lightweight support | Bending and symmetry |
| Base | PP, ABS, TPR, or combined molded parts | Stability and activation | Impact resistance |
| Reinforcement | PE sheet, webbing, EVA, extra fabric | Load distribution | Position and edge finishing |
Water protection should be discussed by level. “Water-resistant” can mean anything from resisting light splashes to handling prolonged rain. A fabric may repel water while the finished bag still leaks through seams and zipper tracks.
For a stronger rain-resistant design, the material system may include:
- PU-coated or TPU-laminated shell fabric
- Durable water-repellent surface treatment
- Water-resistant zipper tape
- Zipper garages
- Folded pocket openings
- Seam sealing in selected areas
- Bonded or welded pocket sections
- Water-shedding base design
- Drainage holes where water may collect
- Fitted rain hood
Every added waterproofing process changes cost, weight, sewing speed, and repair difficulty. The required protection level should be defined before sampling.
Is Polyester Good for a Stand Golf Bag?
Polyester is widely used because it offers stable color, broad fabric availability, reasonable cost, coating compatibility, and strong printing performance. It can be woven in smooth, textured, ripstop, dobby, twill, or Oxford structures.
For lightweight body panels, 300D polyester can provide a clean appearance without excessive weight. For lower panels and high-contact zones, 600D polyester gives more body and abrasion resistance. 900D fabric may be used selectively around the bottom or cart-contact side, but using it across the entire bag can make the product stiff and heavy.
A strong polyester specification should cover more than denier. Useful requirements may include:
- Fabric weight: approximately 180–350 gsm, depending on construction
- Water-repellent finish
- PU backing or other selected coating
- Colorfastness to rubbing
- Colorfastness to light
- Abrasion target
- Seam-slippage resistance
- Coating peel strength
- Approved color tolerance
Polyester is also practical for color matching. Shell fabric, zipper tape, binding, webbing, embroidery thread, and lining can be coordinated more easily when the material supply chain is controlled.
Problems often come from weak backing or loose weaving. Poor coating may crack near folded seams. Low-density fabric may fray during cutting. Dark colors may show white stress marks after abrasion. These risks should be checked on sewn samples rather than only on flat fabric swatches.
Is Nylon Better for a Stand Golf Bag?
Nylon is a strong choice for performance-focused bags where low weight and tear resistance are priorities. It is often used in compact walking bags, premium technical collections, and designs that need a smoother or more refined surface.
Ripstop nylon includes a reinforced grid that helps prevent small cuts from spreading. High-density nylon can also provide a clean, modern look with less bulk than a heavier polyester construction.
However, nylon is not automatically superior. It often costs more, and some finishes show creasing, surface shine, or abrasion marks more clearly. Nylon can also absorb more moisture than polyester, depending on yarn type and treatment.
The decision should be based on the finished bag, not the fiber name. A dense 420D polyester with a stable backing may provide better shape and coating durability than a loosely woven nylon.
Mixed construction is often more effective than using one fabric throughout. For example:
- Nylon on the upper body to reduce weight
- Polyester on large printed panels
- 600D or 900D reinforcement near the base
- Synthetic leather around handles
- Molded plastic at the bottom
- Neoprene on bottle and accessory pockets
This approach places each material where it performs best.
Where Is Neoprene Used in a Stand Golf Bag?
Neoprene is mainly used in flexible, padded, or water-resistant details rather than as the main load-bearing shell. It works well in bottle holders, handle wraps, protective sleeves, stretch pockets, padded trims, and selected accessory sections.
A neoprene bottle pocket can expand around different bottle sizes and hold the container more securely while walking. It also provides a softer contact surface than plain mesh.
Common thickness choices may include:
- 1.5–2.0 mm for light stretch panels
- 2.0–3.0 mm for bottle pockets and handle wraps
- 3.0–4.0 mm for heavier cushioning
- Above 4.0 mm only where bulk is acceptable
The selected thickness must match the sewing method. Thick neoprene creates bulky overlaps, especially when combined with binding, lining, and reinforcement. Raw-cut edges can create a clean technical finish, while bound edges provide more protection in high-friction areas.
Neoprene quality should be checked for:
- Foam density
- Thickness tolerance
- Stretch direction
- Recovery after extension
- Jersey lamination strength
- Odor
- Colorfastness
- Compression resistance
- Edge stability
- Printing or embossing performance
Szoneier can adjust neoprene thickness, surface fabric, color, print, embossing, lamination, and logo treatment to suit different stand golf bag designs.
Which Stand Golf Bag Parts Need Reinforcement?
Reinforcement should be concentrated where force enters the bag. Adding heavy material everywhere increases weight without solving the real stress points.
The most important areas are:
- Shoulder-strap anchors
- Top handle
- Lower grab handle
- Stand-leg brackets
- Base connection
- Top-cuff connection
- Pocket corners
- Zipper ends
- Umbrella-holder anchors
- Towel-ring attachment
- Lower side panels
- Divider attachment points
Strap anchors should spread the load across a broad internal area. A narrow patch may hold during a short pull test but begin tearing after repeated walking motion. Internal webbing can be extended well beyond the visible stitching line to distribute force.
Stand brackets need both fabric reinforcement and structural backing. The bracket should not pull directly against one layer of shell fabric. A stronger arrangement may include an outer patch, internal plastic board, webbing, washers, and multiple rows of stitching.
Handle areas often use box stitching, cross stitching, or bar tacks. The stitch pattern should match the direction of force. Stitching that looks dense is not always stronger if it perforates the fabric too closely and creates a tear line.
Pocket corners also deserve attention. A fully loaded pocket creates outward tension at the zipper ends and lower corners. Small triangular patches, bar tacks, folded webbing ends, or internal backing can prevent early tearing.
Reinforcement should be checked after the finished bag is assembled because overlapping seams, foam, piping, and internal boards can change how force moves through the structure.
How Is a Stand Golf Bag Made?
A stand golf bag is made through product planning, structural engineering, pattern development, material preparation, cutting, sewing, divider assembly, frame installation, stand fitting, branding, finishing, and inspection. The order of these operations matters. If the internal frame, pockets, straps, and stand mechanism are not planned together, the finished bag may look correct but carry poorly, lean unevenly, or fail under repeated use.
Production begins long before fabric reaches a cutting table. The factory first needs to understand how the bag will be used, how much it should weigh, how many clubs it should carry, which pockets are required, and where the customer wants logos or decorative details.
A clear product brief should define:
- Finished bag dimensions
- Target empty weight
- Divider layout
- Number and type of pockets
- Stand-system style
- Carry-strap configuration
- Fabric and color requirements
- Waterproofing level
- Logo methods and positions
- Handle locations
- Hardware finish
- Rain-hood design
- Packaging method
- Testing requirements
- Target production quantity
Missing information at the start often creates extra revisions later. For example, changing from a four-way top to a fourteen-way top affects the top mold, internal dividers, bag diameter, weight, sewing sequence, and cost. Adding a large magnetic rangefinder pocket may change the side-panel balance and the location of the leg bracket.
The sample stage is therefore used to confirm both appearance and function. A development sample should be evaluated with real clubs, balls, apparel, bottles, and accessories rather than inspected only as an empty product.
How Is a Stand Golf Bag Designed?
Stand golf bag design begins with the body profile and top opening. The designer must decide the overall height, upper width, lower width, body taper, resting angle, and location of the stand system.
Many stand bags have a finished height of approximately 85 to 95 centimeters, although the exact size depends on club length, top construction, and target market. The top opening may range from about 7 to 10 inches. A smaller top saves weight, while a larger top gives clubs more room and supports additional dividers.
The design team should establish several key measurements:
| Design Area | Common Development Range | Main Effect |
|---|---|---|
| Finished height | 85–95 cm | Club protection and overall proportion |
| Top diameter | 18–25 cm | Club capacity and divider options |
| Base width | 20–28 cm | Stability and internal space |
| Resting angle | 15–25 degrees | Stand stability and club access |
| Shoulder strap width | 6–10 cm | Comfort and pressure distribution |
| Strap foam thickness | 8–15 mm | Cushioning and finished bulk |
| Leg length | 60–80 cm | Ground contact and resting angle |
| Pocket depth | 4–12 cm | Storage volume and side balance |
These values are not fixed rules. A compact walking bag may use a narrow top and fewer pockets. A hybrid bag may require a larger body, stronger base, and broader cart-contact section.
The designer should also map the weight distribution. Heavy items such as balls, drinks, and rangefinders should not all sit on one side. Pocket location affects how the bag hangs while walking and how it rests on the legs.
Shoulder-anchor positions are often tested through physical fitting. Moving an anchor only a few centimeters can change the carrying angle noticeably. The bag should sit close to the golfer’s back without striking the legs or pulling the top backward.
The top divider, internal frame, and base must align vertically. Poor alignment can cause the bag body to twist. This may not be obvious when the bag is empty, but it becomes visible once clubs are loaded.
A complete design package may include:
- Front, back, left, and right views
- Top and bottom views
- Cross-section drawings
- Pocket measurements
- Divider construction
- Strap construction
- Stand-mechanism details
- Logo dimensions
- Material callouts
- Stitching instructions
- Reinforcement locations
- Hardware specifications
- Color references
- Packaging instructions
A physical mock-up can be useful before expensive molds or tooling are opened. Cardboard, foam, fabric, and temporary supports can help confirm pocket access, body volume, handle placement, and carrying balance.
How Are Stand Golf Bag Panels Cut?
Once the patterns are approved, each fabric and reinforcement component is prepared for cutting. A stand golf bag can contain dozens of individual pieces, including body panels, pocket panels, zipper gussets, lining sections, divider pieces, strap layers, binding strips, reinforcement patches, and rain-hood components.
The factory first checks the material for width, shade, surface defects, coating quality, and direction. Fabrics with a visible texture, grain, print, or ripstop pattern must be placed consistently. Incorrect direction can cause color differences or visual mismatch between panels.
Cutting methods may include:
- Manual knife cutting
- Straight-knife cutting
- Band-knife cutting
- Die cutting
- CNC cutting
- Laser cutting
- Computer-controlled oscillating-knife cutting
Manual cutting is suitable for early samples and low-volume development because changes can be made quickly. Computer-controlled cutting improves repeatability for larger orders and complicated shapes.
Laser cutting can create clean edges on some synthetic materials, but heat may melt, darken, harden, or distort coated fabrics. It should be tested before being approved for production.
Pattern nesting is used to reduce material waste. Large curved panels, small reinforcement patches, and long binding strips need to be arranged carefully. Fabric use can change significantly depending on panel shape and roll width.
Cutting tolerance should be controlled because small errors accumulate during sewing. A difference of 2 to 3 millimeters across several connected panels can distort the bag body, move a pocket opening, or affect stand alignment.
Each cut bundle should be labeled by:
- Style number
- Color
- Size or version
- Panel name
- Quantity
- Production line
- Bundle number
Shade control is especially important for dark navy, black, gray, green, and other colors where different dye lots may appear similar under factory lighting but show variation outdoors.
Foam, plastic board, PE sheet, and internal reinforcements are often cut separately. Their edges should not be so sharp that they wear through the shell fabric. Corners may be rounded to reduce pressure points.
Before sewing begins, the cutting team should verify:
- Panel count
- Left and right orientation
- Logo placement marks
- Pocket positioning marks
- Strap-anchor marks
- Bracket-hole marks
- Notches and alignment points
- Reinforcement dimensions
A missing internal patch may not be visible after sewing, so bundle checking is one of the most important controls before assembly.
How Is a Stand Golf Bag Sewn?
Stand golf bag sewing is usually completed in sections rather than assembling the whole bag at once. Pockets, straps, dividers, handles, and body panels are prepared separately and then joined in a controlled sequence.
A common sewing sequence may include:
- Preparing pocket fronts and gussets
- Installing zippers
- Attaching pocket linings
- Sewing logo panels
- Making shoulder straps
- Building the top cuff
- Sewing internal dividers
- Adding reinforcement patches
- Joining side and front panels
- Installing handles
- Connecting the lower body
- Fitting internal supports
- Closing lining sections
- Attaching the base
- Installing the stand system
Pocket sewing must be accurate because zipper curves and gussets can easily become uneven. The zipper should open without pulling the surrounding fabric. Corners should be shaped smoothly, and the pocket volume should match the approved sample.
Stitch density depends on fabric type and stress level. Too few stitches may create weak seams. Too many stitches can perforate coated fabric and create a tear line.
Common sewing ranges may include 7 to 10 stitches per inch for many body seams, with tighter or looser settings depending on material thickness. Heavy reinforcement areas may use larger thread, multiple stitch rows, box stitching, cross stitching, or bar tacks.
Thread should be selected for strength, abrasion resistance, colorfastness, and appearance. Polyester thread is widely used because it performs well with synthetic shell materials. Bonded nylon thread may be selected for high-load areas, although it can be more visible and may require different machine settings.
Needle size must match the fabric stack. A needle that is too large leaves visible holes and increases water entry. A needle that is too small may break or skip stitches when passing through webbing, foam, fabric, and plastic reinforcement.
Seam allowances should remain consistent. Uneven seam allowance can change the bag width and create twisting. Internal bindings should fully cover raw edges without catching the lining or reducing pocket space.
Important sewing controls include:
- No skipped stitches
- No loose thread loops
- No broken stitches
- No exposed raw edges
- No twisted webbing
- No trapped lining
- No zipper distortion
- No uneven piping
- No missing bar tacks
- No visible needle damage
- No puckering on display panels
Strap anchors and handles should be sewn through their reinforcement layers, not only through the visible shell. The operator needs clear positioning marks because the internal patch may be hidden.
Foam-laminated panels require careful pressure control. Excessive presser-foot pressure can leave marks or compress the foam unevenly. Curved areas may need notches or controlled stretching to prevent wrinkles.
A finished bag should have a clean external shape, but internal workmanship matters just as much. Loose threads, sharp plastic edges, exposed fasteners, and poorly finished divider seams can damage club shafts, grips, or stored items.
How Are Stand Golf Bag Legs Installed?
Stand-leg installation begins after the body structure and bracket reinforcement are ready. The leg brackets must be positioned symmetrically and connected to a strong internal support system.
The factory usually checks the following before installation:
- Left and right bracket height
- Distance from the center line
- Bracket angle
- Reinforcement position
- Hole spacing
- Leg length
- Rod shape
- Spring or cord tension
- Base compatibility
The legs may be made from aluminum tubing, fiberglass rods, composite sections, or other lightweight structural materials. Aluminum offers a good balance of weight and stiffness. Composite rods can reduce weight further, but impact behavior and long-term bending resistance need to be checked.
Leg diameter and wall thickness influence strength. A thinner tube saves weight but may bend under side load. A thicker tube increases stiffness but adds weight and may require larger brackets.
Leg ends are normally fitted with plastic or rubber caps. These caps protect the tube, improve ground contact, and reduce slipping on hard surfaces. Caps should be secured firmly because they can loosen after repeated contact.
During installation, the two legs must retract close to the body without rubbing against pockets or decorative panels. They should not strike the golfer while walking.
The activation rod or linkage should move freely. Too much tension makes the bag difficult to set down. Too little tension allows the legs to open while carrying.
After installation, the bag should be opened and closed repeatedly. The factory should listen for unusual noise, check for bracket movement, and confirm that both legs reach the ground together.
Fasteners may include screws, rivets, pins, washers, or molded locking parts. These should be chosen to resist loosening. Sharp ends must be covered or positioned away from the fabric.
A good stand mechanism should:
- Open without hesitation
- Retract fully
- Keep both legs aligned
- Avoid side wobble
- Hold the approved resting angle
- Remain stable under realistic load
- Avoid scraping the shell
- Resist repeated impact
Stand installation should not be accepted based only on appearance. Small alignment problems can become much worse after the bag is loaded.
How Are Stand Golf Bag Logos Added?
Stand golf bag logos can be applied through embroidery, screen printing, heat transfer, woven patches, rubber badges, TPU labels, silicone labels, metal plates, debossing, or molded parts.
The right method depends on the logo size, fabric, design detail, production quantity, surface shape, and desired appearance.
Embroidery provides a durable and premium finish. It works well on flat fabric panels and can use raised, flat, or mixed stitching. However, dense embroidery can stiffen lightweight fabric and cause puckering.
The embroidery backing should support the panel without creating excessive bulk. Large logos may require internal stabilization or a separate patch construction.
Screen printing works well for larger graphics and solid colors. It is cost-effective for repeated designs but requires proper ink selection and curing. Coated or water-repellent fabrics may reduce ink adhesion.
Heat transfer supports detailed artwork, gradients, and small text. The factory must test temperature and pressure because some coated fabrics may discolor, flatten, or become glossy.
Rubber, silicone, and TPU badges create a technical appearance. They can include raised text, recessed detail, color filling, or transparent sections. Attachment methods include sewing, heat bonding, adhesive, or combinations of these methods.
Metal plates offer a premium look but add weight and may scratch nearby surfaces. Their corners should be rounded, and the internal fasteners should not contact clubs or pocket contents.
Logo approval should cover:
- Finished dimensions
- Color reference
- Position tolerance
- Stitch or print quality
- Edge shape
- Surface finish
- Attachment strength
- Resistance to rubbing
- Resistance to moisture
- Appearance after flexing
Logo placement should be checked on a fully shaped bag. A logo centered on a flat panel may appear tilted once the bag is filled or placed on its stand.
For multi-logo programs, the factory should create a placement chart showing each decoration area, method, size, and distance from nearby seams.
How Is a Stand Golf Bag Tested?
A stand golf bag should be tested for carrying strength, stand stability, zipper performance, seam quality, water resistance, abrasion, hardware reliability, colorfastness, and finished appearance. Testing should reflect how the bag is used on a course: fully loaded, repeatedly carried, placed on uneven surfaces, exposed to moisture, and handled from multiple lifting points.
Visual inspection alone cannot confirm long-term performance. Many problems appear only after repeated loading or movement.
A practical testing plan may include three stages:
- Material testing before production
- Functional testing on approved samples
- Finished-product inspection during and after bulk production
Material testing checks whether the shell fabric, webbing, foam, lining, zippers, thread, hardware, and molded parts meet the approved requirements.
Sample testing confirms the complete bag structure. Bulk inspection checks whether production remains consistent with the approved sample.
The exact test limits should match the product position and customer requirements. A lightweight promotional bag and a premium waterproof stand bag should not use the same performance targets.
How Is Stand Golf Bag Strength Tested?
Strength testing focuses on straps, handles, seams, brackets, base connections, and high-load pocket areas. These parts are subjected to static loads, repeated lifting, pulling, and impact.
A simple loaded-hang test may fill the bag to a defined weight and suspend it by the shoulder straps or handles. The test checks whether stitching opens, fabric tears, webbing slips, or reinforcements shift.
Depending on the design, a test load may range from 15 to 30 kilograms. The load should be selected carefully because the empty bag weight is much lower than the real carrying weight once clubs and accessories are added.
The bag may be held under load for several hours. After the test, the factory checks:
- Strap-anchor movement
- Stitch opening
- Fabric deformation
- Handle elongation
- Webbing slippage
- Bracket movement
- Base separation
- Permanent shape change
Repeated lift testing is also valuable. The bag is loaded and lifted by the top handle, lower handle, and shoulder straps hundreds or thousands of times.
A drop test may be performed from a controlled height, often around 50 to 100 centimeters, depending on the requirement. The loaded bag is dropped on its base, side, or reinforced corner to check impact resistance.
Pocket strength can be tested by filling the pocket and repeatedly opening, closing, and pulling it. Zipper-end reinforcement and lower pocket corners are common failure points.
The factory should record test conditions rather than reporting only “passed.” Useful records include load weight, duration, cycle count, drop height, failure location, and post-test appearance.
How Is Stand Golf Bag Stability Checked?
Stability testing is carried out with the bag empty, partially loaded, and fully loaded. The bag should remain steady when the legs are open and should not collapse under normal side movement.
Testing should be completed on several surfaces:
- Flat concrete
- Short grass
- Artificial turf
- Compact soil
- Mild slope
- Side slope
- Damp ground
A bag that stands well on a smooth factory floor may behave differently on a course.
The factory should check:
- Resting angle
- Leg-opening symmetry
- Distance between leg ends
- Base contact
- Side-to-side movement
- Forward tipping resistance
- Backward tipping resistance
- Leg retraction
- Bracket movement
- Stability with loaded pockets
Pocket loading is important. A heavy bottle or large number of balls can move the center of gravity. The test should include uneven loading to identify weak balance points.
Leg-cycle testing can repeat opening and closing hundreds or thousands of times. After cycling, the legs should still open evenly and retract close to the body.
A stability test may also apply a gentle side push at the top of the bag. The purpose is not to force failure but to compare how easily different structures tip.
Common causes of unstable standing include:
- Base too narrow
- Legs too short
- Legs opening at different angles
- Brackets installed unevenly
- Body frame twisting
- Heavy pockets placed too far from the center
- Incorrect spring tension
- Weak base connection
- Excessive resting angle
These issues should be corrected during sampling, not after bulk production begins.
Is the Stand Golf Bag Waterproof?
Most stand golf bags are water-resistant rather than fully waterproof. The level depends on the shell fabric, coating, zipper construction, seam treatment, pocket design, and rain hood.
A fabric water test alone does not prove the finished bag is protected. Needle holes and zipper tracks remain common entry points.
Water testing may include:
- Spray testing
- Shower testing
- Hydrostatic-pressure testing on fabric
- Wet-cloth surface checks
- Pocket leakage testing
- Zipper exposure testing
- Rain-hood fitting tests
During a shower test, the loaded bag may be exposed to controlled water spray for a defined time. After testing, the interior, pockets, lining, and divider areas are checked for moisture.
Critical areas include:
- Shoulder-anchor seams
- Zipper curves
- Pocket corners
- Top-cuff connection
- Stand-bracket openings
- Base seams
- Logo stitching
- Handle attachments
Water-resistant zippers reduce water entry but are not always fully waterproof. Their coated tape can wear over time, and tight curves may prevent complete closure.
Seam tape can improve protection, but stand golf bag construction includes many curved and multi-layer seams that are difficult to seal. The factory should identify which seams can be taped effectively and which require structural redesign.
A fitted rain hood should cover the club opening without interfering with handles or straps. Its snaps, zipper, or elastic closure should be easy to use.
The product description should match the tested level. Terms such as water-repellent, rain-resistant, seam-sealed, and waterproof should not be used interchangeably.
How Are Stand Golf Bag Zippers Tested?
Zippers are tested for smooth movement, alignment, pull strength, abrasion, repeated opening, and resistance to seam distortion.
Pocket zippers are operated many times during a round, so poor quality becomes noticeable quickly. The slider should move without catching the lining or pulling the pocket panel inward.
Common zipper tests include:
- Repeated opening and closing
- Slider pull test
- Zipper-chain strength test
- Tape-seam strength test
- Water-spray test
- Corrosion test for metal components
- Abrasion check
- Locking-slider check
Cycle testing may range from several hundred to several thousand operations, depending on the zipper and product requirement.
The zipper should be tested on the finished curved pocket, not only as a straight loose component. Curved installations create additional resistance.
Pullers should be large enough for use with gloves or wet hands. Rope pullers, molded pullers, metal pullers, and rubberized tabs are common options.
Zipper ends require reinforcement because the slider creates repeated impact at the stop. Bar tacks, folded webbing, internal patches, or covered zipper garages can reduce damage.
Lining should be secured away from the chain. Loose lining is one of the most common causes of zipper jamming.
Which Stand Golf Bag Defects Are Common?
Common defects include uneven legs, weak strap anchors, twisted bodies, zipper jamming, loose dividers, poor pocket alignment, leaking seams, scratched hardware, color variation, and inaccurate logos.
These defects are easier to prevent when each production stage has its own inspection points.
Frequent structural defects include:
- One leg opening earlier than the other
- Bag leaning too far
- Base rocking on flat ground
- Stand bracket pulling away
- Internal frame bending
- Divider fabric twisting
- Shoulder straps hanging unevenly
- Handles shifting under load
Frequent sewing defects include:
- Skipped stitches
- Loose thread
- Broken seams
- Uneven binding
- Puckered logo panels
- Misaligned piping
- Missing bar tacks
- Exposed raw edges
- Trapped lining
Frequent appearance defects include:
- Fabric shade difference
- Dirty light-colored panels
- Scratched molded parts
- Crooked logos
- Uneven embroidery density
- Glue marks
- Denting in foam panels
- Deformed packaging
Inspection should compare the product with the approved sample, measurement chart, color standard, logo artwork, and packaging instructions.
A useful inspection process checks:
- Incoming materials
- Cut panels
- Sewing sections
- Stand assembly
- Finished dimensions
- Functional operation
- Final appearance
- Packaging
- Carton markings
Defects should be classified by severity. Safety risks, structural failure, incorrect branding, missing components, and major functional problems require immediate correction. Minor cosmetic issues should still be controlled because they affect retail presentation and customer trust.
How Do You Customize a Stand Golf Bag?
A custom stand golf bag can be developed by changing its body shape, divider system, materials, colors, pockets, straps, stand mechanism, hardware, logos, rain protection, and packaging. Successful customization begins with clear performance targets rather than decoration alone. The factory needs to understand who will use the bag, how it will be carried, what it must hold, and where it will be sold.
A golf bag for a course pro shop may need refined colors, quiet hardware, clean embroidery, and premium pocket lining. A tournament bag may require large sponsor logos, fast production, and strong visibility from a distance. A walking-focused model may place more value on low weight, breathable straps, easy bottle access, and stable legs. A hybrid model may need stronger cart-contact panels, a cart-strap channel, a wider base, and more storage.
Customization decisions should therefore be made in a practical order:
- Confirm the user and sales channel
- Set the target retail position
- Define empty weight and capacity
- Choose the top-divider layout
- Confirm pocket count and function
- Select shell and reinforcement materials
- Set the required rain protection
- Design the strap and handle system
- Select the stand and base structure
- Confirm logos and color standards
- Build and test samples
- Approve bulk-production specifications
- Confirm packaging and shipping method
The first sample should not be treated as a finished answer. It is used to identify imbalance, difficult pocket access, excessive weight, sewing risks, weak reinforcement, and visual issues. A second sample may refine the structure, while a pre-production sample confirms the exact materials, logo methods, hardware, dimensions, and workmanship required for the production order.
Customers should evaluate a sample with real golf equipment. Clubs should be inserted and removed repeatedly. Pockets should be filled. The bag should be carried for at least 20 to 30 minutes, opened on different surfaces, placed into a vehicle, and secured to a cart. These practical checks reveal more than a quick tabletop inspection.
Which Stand Golf Bag Style Should You Choose?
The right stand golf bag style depends on how much equipment the user carries, how often the bag is walked, the desired retail price, and whether the product will also be used on carts.
An ultralight walking bag should keep the structure simple. A four-way top, limited pocket count, compact base, light nylon or polyester shell, and streamlined stand system can help control weight. Every added feature should justify the extra grams.
A standard course bag can support more storage and a stronger divider layout. Six to eight pockets, a four-way or six-way top, dual shoulder straps, a bottle pocket, a valuables pocket, and a full-length apparel pocket create a useful balance for regular play.
A premium stand bag may include:
- Waterproof or laminated fabric
- Magnetic rangefinder pocket
- Velour-lined valuables pocket
- Full-length dividers
- Molded top handle
- High-density strap foam
- Metal or custom-molded hardware
- Embroidered and molded logos
- Cart-strap channel
- Removable pocket panel
- Matching rain hood
A hybrid stand bag needs to work both on the shoulder and on a cart. It usually has a wider base, stronger side panels, more pockets, and a cart-compatible body shape. The added structure may increase the finished weight by 500 grams to more than 1 kilogram compared with a lightweight walking model.
| Style | Suggested Weight Target | Divider | Pockets | Best Fit |
|---|---|---|---|---|
| Ultralight | 1.5–2.0 kg | 2–4 way | 4–6 | Frequent walking |
| Standard | 2.0–2.7 kg | 4–6 way | 6–8 | General course use |
| Premium | 2.4–3.3 kg | 5–14 way | 7–10 | Retail collections |
| Hybrid | 2.8–3.8 kg | 6–14 way | 8–12 | Carry and cart use |
The style should be chosen before materials are finalized. Starting with a heavy feature list and then trying to force the finished bag into an ultralight weight target usually leads to weak panels, undersized hardware, or reduced reinforcement.
Which Stand Golf Bag Divider Works Best?
A four-way or six-way divider works well for most walking bags because it gives clubs enough separation without making the top too heavy. A fourteen-way divider provides stronger organization, but it requires more material, more sewing, and more internal space.
The divider decision affects:
- Top diameter
- Top-mold construction
- Bag weight
- Club access
- Grip friction
- Internal sewing
- Finished cost
- Body balance
A two-way divider is suitable for very light bags where minimum weight is the main goal. Clubs are easy to insert, but they are grouped together and can cross inside the body.
A four-way top is widely used because it divides woods, irons, wedges, and putters without excessive complexity. A six-way top gives more grouping options and can still remain comfortable for walking.
Fourteen-way tops are popular with golfers who want a dedicated position for each club. However, narrow openings can make oversized grips difficult to insert. The full divider system may also increase friction if the internal tubes are too tight, twisted, or poorly attached.
The top cuff should include suitable padding around the club-contact areas. Foam density and fabric choice matter because constant rubbing can wear the surface. Soft brushed fabric protects shafts, but loose fibers and rough seams should be avoided.
Full-length dividers should be secured so they remain straight inside the bag. Their lower ends may be attached to an internal support, divider base, or organized fabric structure. Unsecured dividers can bunch together and block grips.
During sample inspection, each club should be inserted and removed with the other sections already filled. A divider that performs well with only one or two clubs may feel very different once the bag holds a full set.
How Can a Stand Golf Bag Be Branded?
A stand golf bag can be branded through embroidery, printing, woven labels, rubber badges, TPU patches, silicone logos, metal plates, custom zipper pullers, molded top parts, branded lining, and custom packaging.
The main side panel usually offers the largest visible logo area. The ball pocket is useful for a secondary logo, club emblem, event mark, player name, or collection graphic. Smaller branding can be added to the straps, top cuff, rain hood, zipper pullers, or bottle pocket.
Embroidery is suitable for names, crests, text, and premium logo applications. Logo density must be controlled so the panel does not become stiff or wrinkled. Large embroidery areas may need an internal stabilizer and should be completed before the panel is joined to the bag.
Screen printing is effective for bold graphics and larger areas. The ink system must match the fabric coating. Adhesion should be checked after rubbing, folding, and water exposure.
Heat transfer supports fine details and multiple colors. It works well for modern graphics, but the application temperature must not damage PU coating, lamination, foam, or water-repellent finishes.
Rubber, TPU, and silicone badges create a more technical appearance. They can include raised lines, recessed text, matte surfaces, transparent details, and several colors. Tooling cost should be considered for small custom quantities.
Branding can also be integrated into functional components:
- Custom-shaped zipper pullers
- Embossed top handles
- Printed shoulder webbing
- Woven divider labels
- Branded leg caps
- Molded base logos
- Custom lining patterns
- Logo rain hoods
- Printed carton and retail packaging
Logo color should be matched using Pantone or another approved color system. Screen appearance alone is not reliable. The same color may look different on embroidery thread, rubber, fabric, metal, and printed ink.
A logo approval sheet should show the method, location, dimensions, colors, material, surface finish, and position tolerance. This reduces inconsistent placement across different production lines.
What Affects Stand Golf Bag Cost?
Stand golf bag cost is affected by materials, divider design, pocket count, stand hardware, sewing complexity, branding, testing, packaging, order quantity, and delivery requirements. The cheapest material is not always the lowest-cost solution because difficult fabrics can slow sewing and increase rejection rates.
The main cost areas include:
- Main shell and lining
- Foam and reinforcement
- Molded top and base
- Aluminum or composite legs
- Zippers and hardware
- Shoulder straps
- Divider system
- Logo processes
- Sewing labor
- Mold or tooling charges
- Testing
- Packaging
- Freight volume
Material usage changes with bag size and pocket construction. Large gusseted pockets require more shell fabric, lining, zipper length, and sewing time. A removable ball pocket adds zippers or hook-and-loop material, reinforcement, and extra assembly operations.
A fourteen-way divider costs more than a four-way divider because it needs more top sections, fabric tubes, attachment points, and assembly time. A molded top may also require new tooling when the shape or logo is unique.
Waterproof construction can increase cost through laminated fabric, coated zippers, seam tape, welding, and slower sewing. It can also require additional testing.
Logo cost depends on size, color count, method, and quantity. Large embroidery uses more stitches and machine time. Molded rubber or metal logos may require tooling. Several small logos placed across different panels can cost more than one large logo because each panel requires separate handling.
Order quantity influences:
- Material purchasing efficiency
- Cutting efficiency
- Logo setup cost
- Mold cost allocation
- Production-line setup
- Packaging cost
- Inspection cost
- Freight cost per unit
Price comparisons should be based on the same specification. A quote for a 2.0-kilogram four-way polyester bag cannot be compared fairly with a 3.2-kilogram waterproof fourteen-way bag using premium hardware.
Customers can control cost without weakening the product by simplifying low-value details. For example, reducing decorative piping, combining small pockets, using a standard top mold, limiting logo methods, or concentrating premium materials in visible and high-wear areas can create meaningful savings.
How Do You Choose a Stand Golf Bag Factory?
A suitable stand golf bag factory should understand both sewn-bag production and the structural demands of the stand system. It should be able to manage fabrics, foam, webbing, dividers, molded parts, metal legs, reinforcement, branding, testing, and final assembly as one coordinated project.
Factory evaluation should begin with product experience. Ask to review stand golf bag samples, material options, stand mechanisms, divider structures, reinforcement methods, and quality records.
Important questions include:
- Has the factory produced stand golf bags before?
- Can it develop patterns from drawings or reference samples?
- Can it create custom top and base molds?
- How does it test stand stability?
- How are strap anchors reinforced?
- Can it source nylon, polyester, neoprene, and laminated fabrics?
- Can it control custom colors across materials?
- Which logo methods are completed in-house?
- How are bulk materials approved?
- What inspections occur during production?
- Can it provide test reports when required?
- How does it manage defective products?
- What is the sample revision process?
- How is packaging tested for shipment?
The factory should be willing to explain why a construction method is selected. Vague answers such as “strong enough” or “waterproof fabric” do not provide useful control. Better answers include material specifications, reinforcement layers, stitch methods, test loads, cycle counts, and inspection standards.
Sample accuracy is another important sign. The sample should follow the approved measurements, materials, colors, logos, and functions. Frequent unapproved substitutions may indicate weak material control.
Production control should cover incoming materials, cutting, sewing, stand assembly, finished inspection, and packaging. Quality should not depend only on a final check after all bags are completed.
Communication also affects the result. A capable factory should identify risks before production. It should point out when a pocket interferes with the stand bracket, when an embroidery design is too dense for the fabric, or when a target weight conflicts with the requested feature list.
A reliable manufacturer does more than reproduce a drawing. It helps turn the design into a bag that can be manufactured consistently, packed safely, and used repeatedly on the course.
Custom Stand Golf Bags with Szoneier
Szoneier has more than 18 years of experience in material development and custom product manufacturing. Our work covers neoprene fabrics and finished products, including bags, koozies, sports supports, medical supports, wetsuits, and other sewn or laminated products.
For stand golf bag projects, we can support development from the first concept through sample approval and bulk production. Customers may provide a tech pack, drawing, reference sample, logo file, material direction, or product idea.
We can also help review the relationship between weight, structure, storage, material, and cost before sampling. This allows design risks to be identified early, when changes are easier and less expensive.
To begin a stand golf bag project, prepare the following information when available:
- Product drawings or reference images
- Target dimensions
- Divider requirement
- Pocket list
- Target weight
- Preferred materials
- Color references
- Logo files
- Estimated order quantity
- Required testing
- Target delivery date
- Destination market
Contact Szoneier to discuss your custom stand golf bag. Our team can help develop the materials, structure, sample, branding, quality requirements, and production plan for your private-label, OEM, or ODM collection.