 Skip to content
How Do You Design Your Own Bag:Cost, MOQ & OEM Guide
- Eric
- February 25, 2026
- 8:59 am
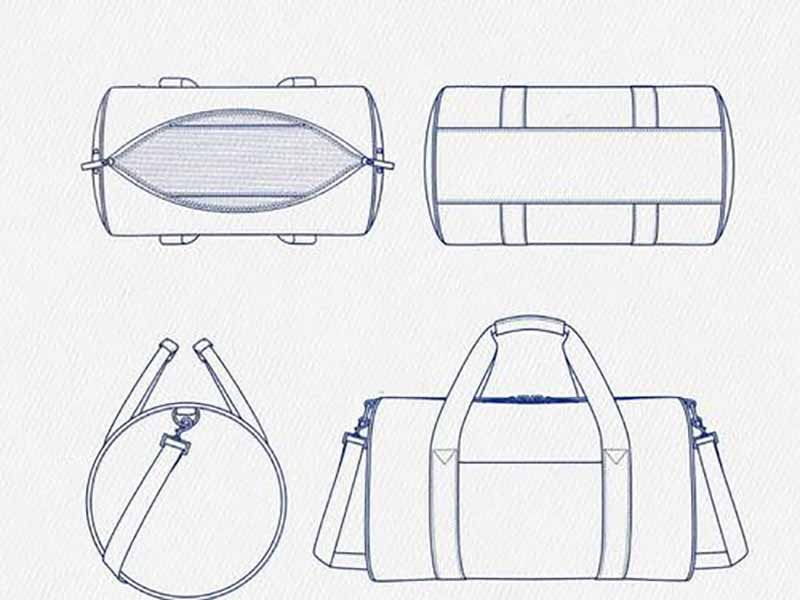
Many entrepreneurs believe designing a bag is simply about choosing a color and printing a logo. In reality, designing your own bag is a structured process that combines creativity, engineering, cost control, and manufacturing feasibility. Whether you are launching a new brand, expanding a product line, or developing a private label collection, understanding how to design your own bag properly can save you thousands of dollars and months of development time.
To design your own bag successfully, you must define your product type, choose the right structure and materials, finalize size and function, calculate cost and MOQ, prepare clear specifications, and work with an experienced OEM factory that can transform your concept into scalable production.
Many new brands rush into production without proper planning. They approve a beautiful sample but struggle with bulk cost, delivery delays, or quality inconsistency. Others over-design features that increase price but do not improve real customer value. If you want to avoid those mistakes and design your own bag professionally, the next sections will guide you step by step.
What Is Design Your Own Bag?
“Design your own bag” means creating a customized bag product from scratch — based on your own brand idea, functional requirements, material preferences, and price positioning — instead of selecting a ready-made stock bag from a catalog.
In simple terms, it means you control the structure, material, size, logo, features, and production details, and a manufacturer produces the bag specifically for your brand.
But in real business practice, design your own bag is more than creativity. It is a combination of:
- Product development
- Cost planning
- Material engineering
- Manufacturing feasibility
- Brand positioning
When done properly, it allows brands to build differentiated products with stronger margins and long-term market value.
Design Your Own Bag Is Product Development, Not Just Decoration
Many beginners misunderstand “design your own bag” as simply adding a logo to an existing style. That is partial customization — not full product design.
True bag design usually involves:
- Choosing the bag category (tote, backpack, travel bag, etc.)
- Defining functional purpose (daily use, gym, outdoor, waterproof, fireproof, etc.)
- Selecting material type and thickness
- Determining dimensions
- Designing pocket layout and structure
- Choosing hardware (zippers, buckles, D-rings)
- Adding brand identity (logo, label, patch, embroidery)
Each decision affects cost, durability, and usability.
For example:
| Decision | Business Impact |
|---|---|
| Thicker fabric | Higher durability, higher cost |
| More pockets | Better function, more labor cost |
| Waterproof coating | Expanded use case, material upgrade |
| Embroidery logo | Premium look, increased setup cost |
Designing your own bag means balancing these elements intelligently.
What Makes Design Your Own Bag Different from Buying Stock Bags?
Buying stock bags means:
- Limited material options
- Standard sizes only
- Shared designs with other sellers
- Low differentiation
Designing your own bag allows:
- Exclusive design structure
- Customized materials
- Brand-controlled sizing
- Targeted cost planning
- Competitive differentiation
In highly competitive markets like Amazon, Shopify, and retail chains, stock designs often lead to price competition. Custom bag design allows higher perceived value and better profit margins.
Who Typically Designs Their Own Bag?
Design your own bag is common among:
- Start-up brands launching private label products
- E-commerce sellers wanting unique listings
- Fitness brands creating custom gym bags
- Outdoor brands designing waterproof or dry bags
- Corporate buyers developing promotional bags
- Fashion brands expanding accessory lines
It is especially valuable when brand identity matters.
What Level of Customization Is Involved?
There are three common levels of bag customization:
Level 1: Logo Customization Only
- Existing stock design
- Add printed or embroidered logo
- Lowest development time
- Lowest design flexibility
Level 2: Structural Modification
- Modify size
- Adjust pocket layout
- Change fabric thickness
- Add functional upgrades
Level 3: Full Custom Design
- New structure developed
- Custom materials selected
- Exclusive pattern cutting
- Unique hardware components
The deeper the customization, the more planning and sampling required.
What Does Design Your Own Bag Require from a Manufacturing Perspective?
From a factory’s perspective, design your own bag means:
- Creating a new pattern (bag blueprint)
- Calculating fabric consumption
- Testing structural stability
- Estimating labor time
- Planning MOQ based on materials
Factories must consider production feasibility before confirming pricing.
For example:
A design that looks simple in drawings may require complex stitching internally, increasing production time by 20–30%.
Understanding manufacturing limitations early prevents cost surprises later.
How Long Does It Take to Design Your Own Bag?
Typical development timeline:
| Stage | Estimated Time |
|---|---|
| Concept discussion | 2–5 days |
| Sample development | 7–15 days |
| Sample revision | 5–10 days |
| Bulk production | 20–35 days |
Total development may range from 30 to 60 days, depending on complexity.
What Are the Main Risks When Designing Your Own Bag?
Without structured planning, common issues include:
- Oversized dimensions increasing cost
- Incorrect GSM selection
- Weak reinforcement at stress points
- MOQ misunderstanding
- Delayed sampling due to incomplete specifications
Designing your own bag requires structured communication between brand and factory.
Why Design Your Own Bag Creates Higher Business Value
When executed properly, custom bag design provides:
- Stronger brand differentiation
- Higher perceived product value
- Better control over cost structure
- Long-term repeat production stability
- Increased customer loyalty
Instead of competing purely on price, brands compete on identity and quality.
How Do You Design Your Own Bag Step by Step?
Designing your own bag is a structured development process that moves from idea to scalable production. It involves defining your market goal, building the right structure, selecting materials, calculating cost, testing samples, and confirming manufacturing details before bulk production.
If you follow a clear step-by-step process, you reduce risk, control cost, and increase your chances of launching a profitable product. If you skip steps, small mistakes in sizing, fabric thickness, or structure can increase cost by 10–30% or lead to quality problems in bulk.
Below is a practical development roadmap used by professional brands and OEM buyers.
Step 1: Define the Purpose of the Bag
Before sketching anything, answer three questions:
- Who is the target customer?
- What problem does the bag solve?
- What price level will it sell at?
For example:
| Target Market | Design Direction |
|---|---|
| Gym users | Durable fabric, shoe compartment |
| Students | Lightweight, multiple pockets |
| Outdoor users | Waterproof materials |
| Premium fashion | Clean structure, premium finish |
The purpose determines structure, fabric choice, and cost ceiling.
If your retail target is $25, your bag cannot be designed like a $120 luxury backpack. Positioning guides every design decision.
Step 2: Choose the Bag Category and Structure
Next, determine the structural type:
- Tote bag
- Backpack
- Duffel bag
- Drawstring bag
- Travel bag
- Cooler bag
- Dry bag
Structure affects labor cost more than most people expect.
| Structure Type | Labor Complexity | Cost Impact |
|---|---|---|
| Simple tote | Low | Lowest |
| Backpack | Medium | Moderate |
| Multi-pocket travel bag | High | Higher |
| Waterproof welded dry bag | Specialized | High |
Each additional zipper, compartment, or lining increases sewing time and material usage.
Good design simplifies structure while maintaining function.
Step 3: Select the Right Materials
Material selection directly influences:
- Durability
- Weight
- Cost
- Brand perception
Common material choices:
| Material | Strength | Cost Level | Best Use |
|---|---|---|---|
| Cotton | Medium | Medium | Apparel totes |
| Canvas | High | Medium-High | Premium bags |
| Polyester | High | Low-Medium | Sports bags |
| Nylon | High | Medium | Travel bags |
| Neoprene | Shock resistant | Medium | Tech bags |
| TPU/PVC | Waterproof | Higher | Dry bags |
Fabric thickness (GSM or Denier) must match function.
For example:
| Product Weight | Suggested Fabric |
|---|---|
| <500g items | 120–150 GSM |
| 0.5–1kg | 150–200 GSM |
| >1kg | 200–300 GSM |
Over-specifying thickness increases cost unnecessarily. Under-specifying reduces durability.
Step 4: Confirm Dimensions Precisely
One of the most common mistakes is oversizing.
Oversized bags:
- Increase fabric consumption by 15–40%
- Increase shipping volume
- Raise production cost
Best practice:
- Product size + 1–2 cm margin for fit
- Add closure allowance (zipper or drawstring area)
Example for apparel:
| Product | Recommended Bag Size |
|---|---|
| T-shirt | 30×40 cm |
| Hoodie | 35×45 cm |
| Jacket | 40×50 cm |
Precision reduces waste.
Step 5: Add Functional Details
Functional features must align with user needs.
Examples:
- Interior pockets
- Laptop compartments
- Reinforced base panels
- Adjustable straps
- Waterproof lining
- Shoe compartment
Each feature increases:
- Fabric usage
- Sewing time
- Hardware cost
Adding one zipper pocket can increase labor cost by 5–10%.
Only include features that create real value.
Step 6: Design Branding and Logo Placement
Logo application options:
| Method | Cost | Durability |
|---|---|---|
| Screen print | Low | Medium |
| Heat transfer | Medium | Medium |
| Embroidery | Higher | High |
| Rubber patch | Medium | High |
| Woven label | Medium | Very High |
Consider:
- Logo size
- Print color count
- Placement location
- Seam interference
Large multi-color logos increase setup cost significantly.
Simple branding often delivers stronger margins.
Step 7: Estimate Cost and MOQ Early
Before sampling, ask for rough quotation.
Cost depends on:
- Fabric cost
- Labor complexity
- Logo method
- Hardware
- Order quantity
Unit Cost vs Order Quantity
| Quantity | Cost Trend |
|---|---|
| 300 pcs | Highest |
| 1000 pcs | Balanced |
| 3000 pcs | Lower |
| 5000+ pcs | Most competitive |
Low MOQ increases unit price because setup costs are distributed across fewer pieces.
Plan MOQ according to:
- Market demand
- Budget capacity
- Inventory risk tolerance
Step 8: Develop and Evaluate Sample
Sampling reveals real product quality.
Check:
- Stitch density
- Seam alignment
- Fabric feel
- Logo clarity
- Hardware strength
- Weight
Test by:
- Filling with weight
- Pulling straps
- Zipping repeatedly
- Checking color under light
Small defects should be corrected before bulk production.
Step 9: Confirm Production Specifications
Before bulk, finalize:
- Fabric GSM
- Color code (Pantone)
- Size measurement tolerance
- Stitch standard
- Logo artwork
- Packing method
- Carton dimensions
Written confirmation avoids later disputes.
Step 10: Plan for Bulk Production and Quality Control
Ensure factory has:
- Stable fabric supplier
- Production capacity
- QC checkpoints
- AQL inspection standard
Typical QC includes:
| Stage | Inspection Focus |
|---|---|
| Fabric incoming | GSM & defects |
| In-line sewing | Stitch quality |
| Final inspection | Overall defects |
| Packing | Quantity accuracy |
Good QC reduces return rate and protects brand reputation.
Timeline Overview for Designing Your Own Bag
| Phase | Time Estimate |
|---|---|
| Concept planning | 3–7 days |
| Sample development | 10–20 days |
| Revision | 7–10 days |
| Bulk production | 20–35 days |
Total: Approximately 40–70 days depending on complexity.
What Do You Need Before You Design Your Own Bag?
Before you design your own bag, preparation determines whether your project moves smoothly or becomes expensive and delayed. Many new brands jump directly into sampling without defining specifications, target price, or production requirements. That usually leads to repeated revisions, unclear quotations, and unexpected cost increases.
Designing your own bag successfully requires clarity in five key areas:
- Product positioning
- Technical specifications
- Budget framework
- Target quantity (MOQ strategy)
- Development timeline
Without these foundations, even a skilled factory cannot provide accurate pricing or efficient sampling.
1. Define Your Market Position Before You Design Your Own Bag
Before discussing materials or structure, clarify:
- Who will buy this bag?
- What problem does it solve?
- What retail price range do you target?
For example:
| Target Market | Design Direction |
|---|---|
| Budget e-commerce | Simple structure, cost-focused |
| Gym brand | Durable fabric, shoe compartment |
| Outdoor brand | Waterproof materials |
| Fashion retail | Clean structure, premium finish |
Retail price influences cost tolerance.
If your target retail price is $20, your production cost must stay within a certain range. If your target is $80, you have more flexibility for premium materials.
Clear positioning prevents over-design and protects profit margins.
2. Prepare Basic Technical Specifications
Factories cannot quote accurately based only on inspiration photos. You should prepare basic technical details.
Essential Technical Information
| Item | Example |
|---|---|
| Bag type | Canvas tote |
| Dimensions | 35×40 cm |
| Fabric | 180 GSM cotton |
| Lining | None / polyester lining |
| Logo method | 1-color screen print |
| Target quantity | 1000 pcs |
| Target FOB price | $2.00–$2.50 |
Even if details are not final, approximate information improves quotation accuracy.
3. Decide Your Budget Range Early
Many delays happen because buyers request designs that exceed their budget.
Cost depends mainly on:
- Fabric thickness
- Structural complexity
- Logo method
- Hardware components
- Order quantity
Example Cost Impact
| Design Change | Cost Impact |
|---|---|
| Increase GSM by 50 | +10–20% material cost |
| Add inner zipper pocket | +5–10% labor cost |
| Switch from print to embroidery | +10–30% logo cost |
| Add waterproof zipper | +15–25% hardware cost |
Setting a budget range allows the factory to optimize structure accordingly.
4. Prepare Logo Files Properly
Logo artwork should be provided in vector format (AI, EPS, or high-resolution PDF).
Common mistakes:
- Low-resolution JPEG files
- No Pantone color reference
- Unclear logo size
Provide:
- Vector logo file
- Desired print size
- Color codes
- Placement preference
Clear branding files reduce sampling revisions.
5. Estimate Initial MOQ Strategy
MOQ influences unit cost significantly.
Factories have setup costs including:
- Pattern making
- Cutting layout
- Printing plate setup
- Labor scheduling
Quantity vs Unit Cost Trend
| Quantity | Cost Trend |
|---|---|
| 300 pcs | Highest |
| 1000 pcs | Balanced |
| 3000 pcs | More competitive |
| 5000+ pcs | Most efficient |
Plan quantity based on:
- Sales forecast
- Storage capacity
- Cash flow tolerance
Low MOQ is possible but price increases accordingly.
6. Prepare Size Planning Carefully
Dimension errors are expensive.
Oversizing increases:
- Fabric consumption (15–40%)
- Freight cost
- Carton volume
Example:
| Bag Size | Fabric Usage Difference |
|---|---|
| 30×40 cm | Baseline |
| 40×50 cm | +40–60% material |
Measure your product accurately before finalizing bag size.
7. Understand Material Expectations
If you want:
- Soft and natural feel → cotton
- Strong and durable → canvas
- Lightweight and affordable → polyester
- Waterproof performance → TPU/PVC
Clarify performance expectations before sampling.
Do not assume all fabrics perform the same.
8. Plan Your Development Timeline
Typical timeline:
| Stage | Time |
|---|---|
| Concept confirmation | 3–5 days |
| Sampling | 10–20 days |
| Revision | 7–10 days |
| Bulk production | 20–35 days |
Total project cycle: 40–70 days.
If you need product before a selling season, plan backward from your launch date.
9. Prepare for Sample Evaluation
When you receive a sample, check:
- Stitch density
- Fabric weight
- Logo clarity
- Zipper smoothness
- Strap strength
- Overall finish
Test by:
- Loading weight
- Pulling handles
- Simulating daily use
Sampling is not only for appearance; it confirms production feasibility.
10. Clarify Communication and Factory Expectations
Before production, confirm:
- Revision limits
- Payment terms
- QC standards
- Lead time guarantees
- Packaging method
Clear communication reduces misunderstandings.
How Much Does It Cost to Design Your Own Bag?
The cost to design your own bag depends on five main factors:
- Material type and thickness
- Bag structure complexity
- Logo and branding method
- Hardware and accessories
- Order quantity (MOQ)
There is no universal price. A simple cotton tote may cost under $1.50 in bulk, while a multi-pocket waterproof travel bag can exceed $12–$18 per unit depending on specification.
1. Material Cost — The Largest Cost Driver
Material usually accounts for 40–65% of total production cost.
Different fabrics vary significantly in price:
| Material | Estimated Cost Level | Common Use |
|---|---|---|
| Non-woven | Lowest | Promotional bags |
| Polyester 210D | Low | Sports, drawstring |
| Cotton 150–200 GSM | Medium | Tote bags |
| Canvas 12oz–16oz | Medium-High | Premium totes |
| Nylon 600D | Medium | Backpacks |
| Neoprene | Medium | Tech or fashion |
| TPU laminated fabric | High | Waterproof bags |
| Genuine leather | Very high | Premium brands |
Thickness Matters
Increasing fabric thickness increases cost directly.
Example:
| Fabric Change | Cost Impact |
|---|---|
| 150 GSM → 200 GSM | +10–15% material cost |
| 12oz canvas → 16oz canvas | +15–20% |
Choosing thicker fabric than necessary reduces profit margin.
Match material strength to real usage needs.
2. Structure Complexity — Labor Cost Impact
Labor usually accounts for 20–35% of total cost.
The more complex the bag, the higher the sewing time.
| Structure Type | Labor Level |
|---|---|
| Simple tote (no lining) | Low |
| Tote with inner pocket | Medium |
| Backpack with padding | Medium-High |
| Multi-compartment travel bag | High |
| Waterproof welded dry bag | Specialized |
Each added feature increases labor cost:
- Extra zipper: +5–10%
- Inner lining: +8–15%
- Reinforced base: +5–8%
- Shoe compartment: +10–20%
Simple design often produces better margins.
3. Logo & Branding Cost
Logo application affects both unit cost and setup cost.
| Method | Unit Cost Impact | Setup Fee |
|---|---|---|
| 1-color screen print | Low | Low |
| Multi-color print | Medium | Medium |
| Embroidery | Higher | Medium |
| Rubber patch | Medium | Medium |
| Woven label | Low-Medium | Low |
Large embroidery or multi-color prints significantly increase cost.
For example:
Switching from 1-color print to embroidery can increase unit cost by $0.30–$0.80 depending on size.
Keep branding strong but practical.
4. Hardware and Accessories
Zippers, buckles, D-rings, straps, lining, and padding add cost.
| Component | Cost Level |
|---|---|
| Nylon zipper | Low |
| Waterproof zipper | High |
| Plastic buckle | Low |
| Metal buckle | Medium |
| Padded shoulder strap | Medium |
Upgrading hardware improves perceived quality but increases cost quickly.
Balance functionality with budget.
5. Order Quantity (MOQ) — The Biggest Pricing Lever
Factories distribute setup cost across total units.
Lower quantity = higher unit cost.
Example: Canvas Tote (Simple Structure)
| Quantity | Estimated Unit Cost |
|---|---|
| 300 pcs | $2.10 |
| 1000 pcs | $1.50 |
| 3000 pcs | $1.30 |
| 5000 pcs | $1.15 |
Higher quantity reduces:
- Cutting waste
- Setup frequency
- Labor scheduling cost
However, ordering too much increases inventory risk.
Plan quantity based on realistic sales forecast.
6. Sampling Cost
Sampling is usually charged separately.
Typical sampling fee:
- Simple bag: $30–$80
- Complex bag: $80–$200
Sampling cost may be refunded after bulk order depending on factory policy.
Skipping sampling is risky and may cause large losses later.
7. Packaging and Shipping Cost
Often underestimated.
Packaging includes:
- Individual polybag
- Custom printed packaging
- Carton boxes
Shipping cost depends on:
- Weight
- Volume
- Destination
- Shipping method
Example:
Oversizing bag dimensions by 5 cm may increase carton volume by 20–30%, increasing sea freight cost.
Always consider shipping during design stage.
8. Hidden Cost Factors Many Buyers Overlook
- Fabric color customization (small batch dyeing cost)
- Mold development for custom hardware
- Printing plate setup
- QC inspection fee
- Payment transfer fees
- Import duties
Understanding total landed cost is essential.
9. Example Cost Scenarios
Scenario A: Simple Promotional Tote (1000 pcs)
| Item | Estimated Cost |
|---|---|
| 150 GSM cotton | $0.60 |
| Sewing labor | $0.50 |
| 1-color print | $0.20 |
| Packaging | $0.10 |
| Total | ~$1.40 |
Scenario B: Mid-Range Gym Duffel (1000 pcs)
| Item | Estimated Cost |
|---|---|
| 600D polyester | $2.50 |
| Lining + pockets | $1.20 |
| Labor | $2.00 |
| Zippers & hardware | $1.00 |
| Logo embroidery | $0.80 |
| Packaging | $0.30 |
| Total | ~$7.80 |
Scenario C: Waterproof TPU Dry Bag (1000 pcs)
| Item | Estimated Cost |
|---|---|
| TPU laminated fabric | $3.50 |
| Welding labor | $2.50 |
| Roll-top closure | $1.20 |
| QC testing | $0.50 |
| Packaging | $0.30 |
| Total | ~$8.00–$9.00 |
10. How to Control Cost When Designing Your Own Bag
Practical strategies:
- Optimize size to reduce fabric waste
- Use stock fabric colors
- Limit unnecessary compartments
- Simplify logo application
- Increase MOQ slightly for better pricing
- Avoid frequent design revisions
Cost control is about smart engineering, not cheap materials.
How Do You Choose a Factory to Design Your Own Bag?
Choosing a factory is one of the most important decisions when you design your own bag. A strong factory partner can help you reduce cost, improve structure, prevent production mistakes, and scale your business. A weak factory can cause delays, quality problems, and financial loss.
Many buyers focus only on price. In reality, price is only one small part of factory evaluation. You need to assess capability, consistency, communication, and long-term stability.
Below is a structured way to evaluate a factory before committing to production.
1. Check Manufacturing Experience and Specialization
Experience matters because bag production is not simple sewing — it involves material behavior, stress distribution, reinforcement engineering, and hardware compatibility.
Ask:
- How many years has the factory been producing bags?
- What types of bags do they specialize in?
- Do they regularly produce your category (tote, backpack, waterproof, etc.)?
Example:
If you want to design a waterproof dry bag, a factory that mainly produces cotton tote bags may not understand high-frequency welding or waterproof seam sealing.
Experience reduces development mistakes.
Signs of a Professional Factory
- Can explain material pros and cons clearly
- Suggest improvements to your design
- Provide technical feedback instead of just accepting everything
Factories that only say “OK” to all requests without discussion often lack engineering depth.
2. Evaluate Technical Capability
Designing your own bag requires pattern development, material testing, and structural reinforcement.
Ask about:
- Pattern-making team
- Sampling timeline
- Material sourcing ability
- Machinery type (industrial sewing, welding, edge binding, etc.)
Example:
A factory producing backpacks should have:
- Heavy-duty sewing machines
- Bartack reinforcement capability
- Skilled technicians for shoulder strap stress points
If they cannot describe their process, that is a warning sign.
3. Inspect Quality Control Structure
Quality consistency is more important than one perfect sample.
Ask:
- What inspection stages are used?
- Is there in-line inspection during sewing?
- What AQL standard is followed?
- Is there a final pre-shipment inspection?
Standard QC Flow Example
| Stage | What Is Checked |
|---|---|
| Incoming fabric | GSM, color consistency |
| Cutting | Size accuracy |
| Sewing | Stitch density, alignment |
| Logo | Clarity and positioning |
| Final inspection | Overall defects |
Factories without structured QC often deliver unstable bulk quality.
Request photos or videos of production lines.
4. Analyze Pricing Transparency
Professional factories can explain pricing breakdown clearly.
Instead of only giving total price, they should explain:
- Material cost portion
- Labor cost portion
- Logo cost
- Hardware cost
- Packaging cost
If a factory refuses to clarify cost components, you may face unexpected changes later.
Price differences between factories usually reflect:
- Material grade
- Labor skill
- Quality standards
- Production capacity
Extremely low quotes often indicate lower material quality or reduced QC control.
5. Assess Communication Efficiency
Communication quality predicts production success.
Good factories:
- Respond within 24 hours
- Ask clarifying questions
- Provide technical suggestions
- Confirm specifications in writing
Poor communication often leads to:
- Wrong dimensions
- Wrong color
- Delayed sampling
- Misunderstood logo details
Language clarity and documentation habits matter.
6. Confirm MOQ Flexibility
MOQ influences your launch strategy.
Ask:
- What is the minimum order quantity?
- Is lower MOQ possible for first order?
- Does MOQ change for custom colors?
Example:
For common fabrics, MOQ may be 500–1000 pcs. For custom-dyed fabric, MOQ may increase to 2000–3000 pcs.
Understanding MOQ helps you manage inventory risk.
7. Evaluate Sampling Speed and Revision Policy
Sampling reveals factory efficiency.
Typical sampling time:
| Bag Type | Sampling Time |
|---|---|
| Simple tote | 7–10 days |
| Backpack | 10–15 days |
| Waterproof bag | 12–20 days |
Ask:
- How many sample revisions are allowed?
- Is sample fee refundable?
- Can they provide sample photos before shipping?
Factories that delay sampling often delay bulk production.
8. Verify Production Capacity
Your factory should handle growth.
Ask:
- Monthly production capacity?
- Number of production lines?
- Peak season lead time?
Example:
If capacity is 20,000 pcs/month and your brand grows to 50,000 pcs/month, delays may occur.
Capacity stability supports scaling.
9. Check Export Experience
If you sell internationally, the factory should understand:
- Carton packing optimization
- Shipping marks
- Compliance labeling
- Customs documentation
Poor export handling can cause shipping delays and extra costs.
10. Look for Long-Term Cooperation Potential
You are not just ordering once — you are building a supply chain.
Choose a factory that:
- Keeps production records
- Maintains fabric consistency
- Offers improvement suggestions
- Supports product line expansion
Long-term cooperation reduces development cost for future designs.
11. Red Flags to Avoid
Be cautious if a factory:
- Gives unrealistically low price
- Avoids detailed answers
- Has no factory photos
- Cannot provide sample quickly
- Refuses video call or factory tour
Short-term savings often create long-term loss.
Conclusion: Design Your Own Bag with Strategy, Not Guesswork
Designing your own bag is not just about choosing a color or adding a logo. It is a structured process that connects product positioning, material selection, cost planning, technical development, sampling, and long-term production strategy.
When you clearly define:
- Your target market
- Your price range
- Your material expectations
- Your structural requirements
- Your MOQ strategy
—you reduce development risk and increase the probability of building a profitable product.
The cost of designing your own bag depends on practical decisions: fabric thickness, structure complexity, branding method, hardware quality, and order quantity. Small design changes can shift production cost by 10–30%. Smart planning protects margins and avoids unnecessary upgrades that customers may not even notice.
Equally important is choosing the right factory. A reliable manufacturing partner provides:
- Technical guidance
- Transparent pricing
- Stable quality control
- Efficient sampling
- Scalable production capacity
The right factory does not simply produce your bag — it supports your brand growth.
Whether you are launching your first private label product or expanding an established line, designing your own bag gives you control over differentiation, cost structure, and long-term brand value.
If you are ready to turn your idea into a well-engineered, scalable product, working with an experienced OEM manufacturer makes the process smoother and more predictable.
Szoneier, with over 18 years of experience in bag R&D and manufacturing, supports custom materials, low MOQ development, fast sampling, and stable quality control for brands worldwide.
Your idea deserves more than a stock solution.
It deserves structured development and reliable production.
When you design your own bag the right way, you are not just creating a product — you are building a foundation for long-term growth.
manufacturer Categories
- Custom Tote Bags Manufacturer
- custom backpacks Manufacturer
- custom travel bags& Duffle bags manufacturer
- custom makeup bags & toiletry bags manufacturer
- custom cooler bags manufacturer
- custom drawstring bags manufacturer
- custom makeup bags & toiletry bags manufacturer
- custom golf bags manufacturer
- custom fireproof bags manufacturer
- custom dry bags manufacturer
- custom ski bags manufacturer
- custom gym & sports bags manufacturer
- custom laptop bags manufacturer
- custom tactical bags manufacturer
- custom beach bags manufacturer
- custom medical bags manufacturer
- custom camera bags manufacturer
- custom wetsuits manufacturer
- custom leather goods manufacturer
- more personalized products

Can't find the answers?
No worries, please contact us and we will answer all the questions you have during the whole process of bag customization.
Make A Sample First?
If you have your own artwork, logo design files, or just an idea,please provide details about your project requirements, including preferred fabric, color, and customization options,we’re excited to assist you in bringing your bespoke bag designs to life through our sample production process.
