Skip to content
Laptop sleeves are one of the most purchased accessories in the global tech and travel market—but surprisingly, one of the most returned items as well. Why? Because many buyers rely solely on the screen size advertised by laptop brands—13”, 14”, 15.6”—and assume the sleeve size must match it. In reality, the diagonal screen measurement does not reflect the laptop’s true physical size, and this misunderstanding results in sleeves that are too tight, too loose, or simply impractical. Whether you’re a shopper, a business traveler, a student, or a brand planning an OEM sleeve project, knowing how to measure your laptop correctly is essential.
To measure your laptop for a sleeve, measure its width, depth, and thickness using a ruler or caliper. Do not rely on the laptop’s screen size—the diagonal inch measurement does not represent the device’s outer dimensions. Compare your measurements to the sleeve’s internal size, leaving 0.3–0.8 inches of extra space depending on material and padding. This ensures a secure, comfortable fit without excessive tightness or movement.
But here’s the problem: different laptop manufacturers shape devices differently. A 14-inch MacBook, a 14-inch Lenovo ThinkPad, and a 14-inch gaming laptop may vary by up to 20–30 mm in width and thickness. Sleeves are not standardized either—some list external dimensions, some internal, and some include flexible stretch materials that adjust to form. Years ago, when Szoneier began manufacturing custom laptop sleeves for major electronics brands, we discovered that 40% of customer complaints across the industry were linked to mismeasurement.
Today’s guide will walk you through the exact process of measuring your laptop, interpreting sizing charts, understanding padding variations, and choosing the right sleeve style for everyday use or OEM production.
What Measurements Do You Need to Size a Laptop Sleeve?
Choosing a laptop sleeve is not as simple as matching the sleeve to the screen size. A “13-inch laptop” can vary up to 25 mm in width and 20 mm in height depending on brand, model, and bezel design. This is why so many buyers end up with sleeves that are too loose or too tight. The only reliable method is taking three-dimensional measurements—width, height, and thickness—using a flat surface and a measuring tool such as a tape measure or caliper.
Below is the complete guide of what to measure, how to measure, and why each value matters.
1. Width — The Most Important Dimension
Width is the horizontal distance from the left edge to the right edge when the laptop is closed.
Why width matters:
- It determines whether the laptop can physically slide into the sleeve.
- Laptops with rounded corners may look narrower than they actually are.
- Devices with large side vents or flared aluminum edges often require extra space.
How to measure width precisely:
- Place the laptop against a vertical object (e.g., a book) to create a flat reference point.
- Measure from the widest left point to the widest right point.
- If your laptop has curved sides, measure the outermost curve, not the inner chassis.
Ideal allowance for sleeves:
- Stretch sleeves: +0.1–0.3 inches
- Structured sleeves (EVA, leather): +0.2–0.4 inches
2. Height (Depth)
Height (also called depth) is the vertical measurement from the front edge to the hinge edge.
Why height matters:
- Many users underestimate hinge bulges on gaming or business laptops.
- Some laptops taper at the front but are thick at the hinge—this must be measured.
- Sleeves with limited opening (L-shaped zippers, top-only zippers) require more clearance.
How to measure accurately:
- Align the back hinge with a straight object.
- Measure to the farthest point on the front bezel.
- If your hinge sticks out or has rubber feet, include them in the measurement.
Recommended allowance:
- Slim sleeves: +0.1–0.25 inches
- Padded sleeves: +0.3–0.5 inches
3. Thickness — The Critical Factor for Padded or Hard Shell Sleeves
Thickness determines whether the sleeve will zip comfortably without compressing the laptop.
Challenges with measuring thickness:
- Modern laptops taper—front thickness is often much thinner than hinge thickness.
- Rubber feet add 1–3 mm but must be included.
- If you use a case or keyboard cover, include them too.
How to measure thickness accurately:
- Use a caliper for best precision.
- If using a tape measure, hold it against the thickest hinge area.
- Do not measure at the thin front edge—it gives misleading results.
Recommended thickness allowances:
| Sleeve Type | Additional Space Needed |
|---|---|
| Neoprene stretch | +0.1–0.15 in |
| Fabric padded | +0.15–0.3 in |
| EVA hard shell | +0.3–0.6 in |
| Leather sleeve | +0.1–0.2 in (leather softens over time) |
If the thickness is miscalculated, the zipper may press against the laptop edges, causing scratches or damage over time.
4. Should You Add Extra Allowance?
Adding extra space is essential because sleeve interiors are smaller than they appear due to:
- foam padding
- fabric lining
- corner buffers
- zipper tape
- reinforced seams
General allowance guidelines:
- Light padding: +5–8 mm total
- Moderate padding: +8–12 mm
- Hard shell EVA: +12–20 mm
- Waterproof TPU: +10–18 mm
If buying online, always compare your laptop’s true size with the internal size of the sleeve, not the external dimensions provided by sellers.
5. Why You Should Ignore Inch Labels Like 13″, 14″, 15.6″
A “13-inch laptop sleeve” is simply marketing language and does not represent universal sizing.
Examples:
- A 13-inch MacBook Air may fit into a 14-inch sleeve.
- A 14-inch gaming laptop may not fit into a sleeve labeled “14 inch.”
- Two 13-inch models can differ in size by nearly 2 cm.
Thus, inch labels are only reference categories—always prioritize real measurements over labels.
How Do You Measure a Laptop Correctly at Home?
To measure a laptop at home, place it on a flat surface and use a ruler or caliper to measure its width, height (depth), and thickness at the widest points. Measure from outer edge to outer edge—including any hinge curves, rubber feet, or camera bumps. Record all values in millimeters for accuracy. Compare these dimensions to a sleeve’s internal size, adding 0.3–0.8 inches for padding depending on sleeve type.
Measuring a laptop correctly at home is simple, but accuracy matters. Even a 3–5 mm difference can determine whether a sleeve fits comfortably or becomes too tight. This is especially important because many buyers own ultrathin laptops with tapered edges or gaming laptops that are thick only at the hinge. Below is a step-by-step procedure used by professional bag manufacturers—including Szoneier—when preparing CAD patterns for OEM sleeves.
Step 1 — Prepare a Flat, Hard Measuring Surface
Before you begin, place the laptop on a flat, stable surface such as a desk or table. This prevents curvature distortion and helps you measure the device’s true footprint.
Recommended setup:
- A table with clear edges
- A notebook or book to act as a right-angle reference
- A metal ruler, tape measure, or digital caliper
- Optional: a phone with a measurement app (for quick checks)
Avoid measuring on soft surfaces such as beds, couches, or carpets. These surfaces cause the laptop to sink slightly, skewing width or height by several millimeters.
Tip for precision: Always measure at the laptop’s widest points—not just the center.
Step 2 — Measure the Laptop Width (Left to Right)
To measure width accurately:
- Place a book or straight object against the laptop’s left side.
- Align another straight object on the right side if needed.
- Measure from the far left edge to the far right edge.
- If the laptop has a curved or angled edge, measure from the outermost curve—not the flat inner surface.
Common mistakes to avoid:
- Measuring only the keyboard deck instead of the full chassis
- Ignoring curved edges that add extra millimeters
- Measuring the top cover only (some laptops flare outward at the bottom)
Why accuracy matters: Width is the primary limiting dimension for sleeve entry. If width is too large by even 0.5–1 cm, the laptop may not slide in at all.
Ideal tolerance to add later:
- Soft (neoprene) sleeve: +0.2–0.4 cm
- Rigid (EVA or leather) sleeve: +0.5–1.2 cm
Step 3 — Measure Height / Depth (Front to Back)
This measurement determines whether the laptop can sit fully inside the sleeve without forcing the zipper or stretching the fabric.
How to measure height correctly:
- Line up the hinge side against a book or straight line.
- Measure from the hinge to the frontmost point of the laptop.
- Include any parts that extend outward, such as rubber feet, hinge bulges, or chamfered edges.
Special considerations:
- Gaming laptops often have protruding hinges—always include the largest dimension.
- Some ultrabooks taper toward the front; however, measure the maximum value.
- If the laptop lid or screen extends forward due to design, include that extension.
Incorrect height is one of the most common causes of sleeves creating pressure on laptop hinges.
Step 4 — Measure Thickness (Top to Bottom) at the Thickest Point
Thickness determines whether the sleeve will zip without stress and whether padding can compress safely.
To measure thickness:
- Close the laptop completely.
- Place the ruler or caliper at the thickest hinge area.
- Measure from the bottom rubber feet to the top casing.
- Document the measurement in millimeters, as sleeve tolerances are small.
Thickness challenges:
- Many laptops are wedge-shaped (thin at the front, thicker at the back).
- Rubber feet add a few millimeters but significantly affect sleeve fit.
- Screen protectors and keyboard covers can increase thickness by 1–2 mm.
- If the laptop has ventilation fins, measure around them—not through them.
If thickness is miscalculated, zippers may scrape edges or the sleeve may compress the laptop too tightly, risking long-term damage.
Step 5 — Record Measurements in Both Inches and Millimeters
Sleeve manufacturers frequently list internal dimensions in millimeters, while consumers think in inches. Maintaining both allows you to:
- Compare sleeve size charts accurately
- Avoid conversion errors
- Ensure compatibility across brands
Useful conversions:
- 1 inch = 25.4 mm
- Round your values to one decimal place for precision
- Always compare your numbers to the internal dimensions of a laptop sleeve, not external ones
Step 6 — Re-measure Once to Ensure Accuracy
Even professionals repeat measurements. Variations of 1–2 mm are normal, but variations of 5 mm or more indicate human error. Re-measure:
- Width at top and bottom
- Height at center and corners
- Thickness at hinge and front edge
If both sets of measurements match closely, you now have reliable numbers for selecting or custom-designing a laptop sleeve.
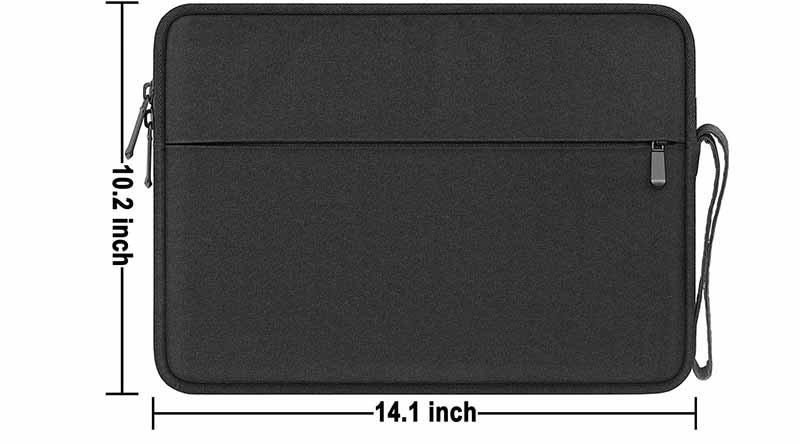
Which Laptop Sleeve Sizes Correspond to Your Measurements?
Laptop sleeve sizes correspond to your laptop’s physical width, height, and thickness—not the screen size. To choose the right sleeve, compare your laptop’s measurements with the sleeve’s internal dimensions, ensuring the sleeve is 0.2–0.8 inches larger depending on padding and material. Standard sizes such as “13-inch,” “14-inch,” and “15.6-inch” are only category labels and do not guarantee a perfect fit. Always prioritize internal dimensions over inch labels.
Understanding Internal vs External Sleeve Dimensions
When brands list sleeve dimensions, they may list either:
- Internal dimensions (usable interior space)
- External dimensions (overall outer shape)
For sizing, only the internal dimensions matter.
Here’s why internal dimensions differ from external ones:
- Padding reduces internal space by 3–20 mm
- Lining fabric thickness varies (microfiber vs. velvet vs. neoprene)
- EVA shells create rigid edges that cannot stretch
- Zippers and seams occupy 2–5 mm of interior clearance
- Corner bumpers and foam inserts reduce usable interior volume
A sleeve with external measurements of 35 × 25 × 3 cm may only have internal space of 33.8 × 23.5 × 2.2 cm.
This is why comparing only external dimensions results in incorrect sizing, leading to returns or zipper stress.
Standard Sleeve Size Categories and Their Typical Internal Dimensions
Note: These are industry averages; actual sleeves vary by brand and padding type.
Industry-Standard Laptop Sleeve Size Chart
| Category Label | Typical Internal Width | Height | Thickness Capacity | Fits Most Laptops With… |
|---|---|---|---|---|
| 11–12 inch | 28–30 cm | 20–22 cm | 1.0–2.0 cm | 11″/12″ MacBooks, Surface Pro-sized ultrabooks |
| 13 inch | 30–32.5 cm | 21.5–23.5 cm | 1.2–2.2 cm | 13″ MacBook Air/Pro, thin 14″ Windows models |
| 14 inch | 32.5–34.5 cm | 23–25 cm | 1.5–2.5 cm | Most 14-inch laptops (business + ultrabook) |
| 15 inch | 34–36 cm | 24–26 cm | 1.6–2.8 cm | Older 15″ ultrabooks |
| 15.6 inch | 36–38.5 cm | 25–27.5 cm | 1.8–3.2 cm | Most 15.6″ consumer laptops |
| 16 inch | 36–39 cm | 25–28 cm | 2.0–3.0 cm | MacBook Pro 16″ + premium workstation laptops |
| 17 inch | 39–42 cm | 27–30 cm | 2.0–3.5 cm | Large gaming or workstation models |
This table allows users to match their measurements directly to the sleeve range.
How Much Extra Space Should You Add?
A sleeve must be slightly larger than your laptop’s physical dimensions. But how much larger?
Here are the recommended tolerances:
Soft or Stretch Fabric Sleeves (Neoprene, Lycra, Elastic Blends)
Add 0.1–0.3 inches (3–8 mm) These materials stretch and compress naturally.
Fabric Padded Sleeves (Polyester, Nylon, Canvas)
Add 0.2–0.4 inches (5–12 mm) Padding thickness varies between brands.
EVA Hard Shell Sleeves
Add 0.3–0.8 inches (8–20 mm) Rigid materials cannot stretch, so extra allowance is essential.
Leather Sleeves
Add 0.1–0.2 inches (3–5 mm) Leather softens over time but is initially snug.
If the laptop is too tight inside the sleeve, repeated pressure may deform:
- corners
- zippers
- foam padding
- laptop casing itself
If too loose, the laptop may move inside and reduce mechanical protection.
Do 13”, 14”, 15.6” Sleeves Fit All Laptops?
Definitely not.
Three laptops with “14-inch” labels can have completely different physical sizes:
- A 14″ Lenovo ThinkPad X1 Carbon: Slim & compact
- A 14″ HP Pavilion: Wider and deeper footprint
- A 14″ gaming laptop: Much thicker and heavier
This is why:
- A 13″ sleeve can fit some 14″ laptops
- A 14″ laptop might require a 15″ sleeve
- A 15.6″ laptop may not fit a “15 inch” sleeve due to hinge design
Thus, inch labels are only “categories”—never rely on these labels without comparing actual dimensions.
What Factors Affect Sleeve Fit (Material, Padding, Design)?
Laptop sleeve fit is influenced by the sleeve’s material, padding thickness, internal lining, zipper construction, and structural design. Stretch fabrics allow tighter fits, while rigid EVA or leather sleeves require extra clearance. Padding thickness, seam allowance, and corner reinforcements reduce internal space. Zipper style and opening angles also affect how easily the laptop slides in. All these factors must be considered alongside the laptop’s physical measurements to achieve a precise fit.
Most users assume laptop sizing is simple: measure the laptop and pick a slightly bigger sleeve. But in manufacturing, sleeve fit depends on multiple structural and material variables, not just dimensions. Two sleeves with identical “internal dimensions” may fit completely differently due to padding density, foam type, lining friction, zipper compression, and even the corner-shaping method.
Szoneier—as an OEM sleeve manufacturer—engineers sleeves using fit calculations that account for how fabric compresses, how EVA shells resist bending, and how seams reduce usable space. Below is the complete breakdown of the factors that determine fit accuracy.
1. Material Type — Stretch vs Non-Stretch Determines Tolerance
Stretch Materials (Neoprene, Lycra, Spandex Blend)
These materials compress and expand, allowing a tight fit without stressing the laptop. They accommodate small measurement errors (2–5 mm) and are forgiving for corner or hinge protrusions.
Characteristics:
- Offers elasticity → fits slender and rounded laptops well
- Suitable for snug-fit sleeves
- Common for budget, lightweight, or soft feel sleeves
- Requires less internal allowance (0.1–0.3 inches)
Non-Stretch Materials (Polyester, Nylon, Canvas, Leather)
Rigid materials do not flex and must be designed with more internal allowance.
Challenges:
- Zipper pressure increases when space is too tight
- Rigid edges restrict corner expansion
- Leather sleeves soften over time but start snug
EVA Hard Shell
- Zero stretch; shape cannot deform
- Requires 8–20 mm extra space depending on foam density
- Provides the highest shock protection
2. Padding Thickness & Density — A Primary Fit Reducer
Padding takes up internal space, but padding types vary dramatically:
Common padding options:
- 3mm–5mm Foam → light protection
- 6mm–8mm High-density Foam → better shock absorption
- 8mm–12mm EVA Foam → rigid anti-impact protection
- Memory Foam → conforms to shapes, reduces internal volume
Why padding affects fit:
- All padding compresses inward
- Double-sided foam reduces interior size by twice the foam thickness
- Firmer foams compress less, reducing available space
Example: A sleeve advertised as 34 × 25 cm internal size but using 8mm EVA foam may actually provide only 32.4 × 23.4 cm usable space.
Padding must always be included in your tolerance calculation.
3. Internal Lining Material — Friction Alters Fit Feel
Internal lining determines how easily a laptop slides into the sleeve.
Low-Friction Linings:
- Microfiber
- Smooth velvet
- Satin polyester
Benefits:
- Laptop slides in easily
- Better user experience
High-Friction Linings:
- Fleece
- Thick, fluffy lining
- PU-coated waterproof linings
Challenges:
- Requires more internal space
- Creates resistance around corners
- May compress padding unevenly
Some waterproof linings shrink slightly during heat sealing, making the sleeve tighter than expected.
4. Zipper Type & Opening Angle — Affects Entry, Not Just Fit
Sleeve usability is heavily influenced by how the zipper is constructed.
Zipper variables that affect fit:
- Coil vs. Metal Zippers: metal zippers take more space
- Zipper Tape Width: 8–12 mm can reduce entry clearance
- Zipper Position: top-only vs. L-shaped vs. full-side opening
- Zipper Curve Radius: sharp corners reduce insertion space
Common issues:
- A sleeve may match dimensions but still be difficult to insert due to zipper angle
- Metal zippers can scratch laptop edges
- Tight zipper placements compress the padding inward
Therefore, a sleeve with excellent measurements can still be frustrating if the zipper design is poor.
5. Seams, Corners & Construction Design — The Hidden Fit Variables
Manufacturing details significantly influence interior capacity.
Seam allowances reduce internal room:
- Sewing seams → typically 7–12 mm
- Bound seams → thicker and stiffer
- Reinforced corner seams → reduce diagonal entry room
Corner structure affects fit:
- Rounded corners allow smoother insertion
- Square corners restrict laptop edge entry
- EVA molded corners are rigid and cannot stretch
Extra reinforcement features also impact fit:
- Shock bumpers
- Corner airbags
- Internal frame stiffeners
6. Additional Features That Alter Fit
Certain add-ons reduce interior space:
- Waterproof welded seams
- Magnetic flap linings
- Accessory pockets sewn into the main sleeve
- Internal cable organizers
- Thick logo patches or embroidery backing
Even decorative elements can impact fit by compressing the interior.
How to Select the Best Laptop Sleeve for Your Needs?
Selecting the right laptop sleeve is not simply a matter of picking a size—it requires evaluating how you use your device, the environment you work in, and the level of protection you need. Two people with the same laptop may require very different sleeves: a corporate professional commuting in the city needs slim elegance, while a photographer traveling by plane requires rugged shock absorption.
Szoneier works with thousands of buyers—from e-commerce brands to corporate IT departments—and the most successful sleeve designs always follow a structured selection framework: fit, protection level, material, features, and purpose.
Below is a professional guide to selecting the perfect sleeve, based on real OEM development standards.
1. Determine Your Required Level of Protection
Protection level is the most important factor in sleeve selection. Consider:
Light Protection (Daily Office Use)
Suitable for: office workers, students, minimal travel Recommended sleeve type:
- Neoprene soft sleeve
- Polyester padded sleeve (3–5 mm foam) Benefits:
- Slim profile
- Lightweight
- Easy to pack
Medium Protection (Commuting & Light Travel)
Suitable for: backpack users, café workers, freelancers Recommended sleeve type:
- 5–8 mm padded polyester sleeve
- Soft EVA shell sleeve Benefits:
- Good shock absorption
- Better corner protection
Heavy Protection (Frequent Travelers / Photographers / Professionals)
Suitable for: airplanes, outdoor travel, equipment bags Recommended sleeve type:
- EVA hard shell
- Molded corners
- Waterproof coated nylon Benefits:
- Impact resistance
- Water repellent
- Anti-crush structure
Selecting the correct protection level prevents unnecessary weight or insufficient durability.
2. Choose a Material Based on Your Lifestyle
Each sleeve material behaves differently:
Neoprene (Flexible + Stretchy)
Best for: snug fit lovers Pros:
- Stretchy → forgiving with measurements
- Lightweight
- Affordable Cons:
- Limited shock resistance
Polyester/Nylon Fabric Sleeves
Best for: commuters & general users Pros:
- Durable
- Water-resistant
- Wide color options Cons:
- Requires internal padding for protection
Canvas
Best for: casual users Pros:
- Rugged aesthetic
- Eco-friendly options Cons:
- Less water-resistant unless coated
Leather Sleeves
Best for: executives, premium branding Pros:
- Luxury feel
- Ages beautifully
- Thin padding needed Cons:
- Limited stretch → requires precision sizing
EVA Hard Shell
Best for: maximum protection Pros:
- Crush-proof
- Highly structured Cons:
- Bulkier
Material determines appearance, durability, fit tolerance, and protection.
3. Evaluate Sleeve Opening Style and Zipper Design
The opening structure affects ease of use:
Top-Loading Zippers
Pros: simple, slim, easy for backpacks Cons: limited opening → requires accurate width sizing
L-Shaped Zippers
Pros: wide access, easier insertion Cons: larger zipper footprint reduces internal space
Full Perimeter Zippers (Clamshell)
Pros: best accessibility Cons: adds weight; not ideal for minimalist designs
Magnetic or Envelope Opening
Pros: premium, silent Cons: limited protection
OEM Insight: For corporate clients or busy travelers, we recommend L-shaped zippers for easier daily insertion.
4. Decide Whether You Need Extra Storage
Some sleeves come with additional pockets for:
- chargers
- cables
- mouse
- notebooks
- power banks
However, pockets increase bulk and may reduce laptop compartment space.
Guidelines:
- For backpack users: simple sleeve, no pockets
- For solo sleeve carriers: pockets recommended
- For business travelers: internal organizers + zip-secured pockets
5. Consider Your Work Environment & Travel Habits
Different environments require different sleeve configurations:
Commuters (Metro, Bus, Walking)
- Medium padding
- L-shaped zipper
- Water-resistant material
- Shock-absorbing corners
Students
- Lightweight materials
- Slim fit
- Optional accessory pocket
Outdoor or Frequent Air Travelers
- EVA hard shell
- Waterproof zippers
- Drop-tested padding
- Reinforced corners
Office/Business Professionals
- Leather or premium nylon
- Minimalist slim design
- No bulging pockets
Matching sleeve style to lifestyle ensures practical daily use.
6. Check Sleeve Fit Against Your Measured Dimensions
Before purchasing or manufacturing a sleeve, confirm:
- Sleeve internal width is 0.2–0.8 inches bigger than your laptop
- Sleeve internal height is 0.3–1.0 inches bigger
- Sleeve internal thickness accommodates 3–12 mm padding
- Zipper design does not compress corners
- Lining friction matches your preference (smooth vs. cushioned)
- Laptop fits without forcing or bending the sleeve
A sleeve that is too tight risks long-term zipper stress and edge abrasion. A sleeve that is too loose reduces protection because the laptop moves inside.
Conclusion
Choosing the right laptop sleeve is not just about finding a size that fits—it is about matching your device, your lifestyle, and your protection needs with the right materials, padding, structure, and craftsmanship. A sleeve that fits perfectly can extend your laptop’s lifespan, reduce daily wear, and elevate your personal or brand identity. Whether you prefer a slim minimalist sleeve for daily commuting or a shockproof EVA hard-shell sleeve for heavy travel, the key is understanding how laptop measurements and sleeve engineering work together to create a secure and comfortable fit.
For brands, wholesalers, and product developers, precision becomes even more important. An incorrectly sized sleeve can increase customer return rates, damage brand reputation, and lead to unnecessary inventory losses. This is why professional OEM manufacturers rely on detailed laptop measurements, structural tolerances, padding density, lining friction levels, zipper clearances, and CAD-based pattern adjustments before producing a new sleeve.
Whether you need neoprene sleeves, padded polyester sleeves, EVA hard-shell designs, leather executive sleeves, waterproof sleeves, or backpack-compatible sleeves, our team can create custom specifications tailored to your device dimensions, brand aesthetics, and target market.
Whether you’re an electronics brand, e-commerce seller, corporate buyer, or promotional supplier, Szoneier can help you launch a complete laptop sleeve collection with low MOQ, fast sampling, and assured quality.
Ready to Create Your Laptop Sleeve Line?
Contact Szoneier today to start your custom laptop sleeve project. We can discuss materials, dimensions, designs, and pricing—then produce a tailored solution that meets your market’s needs.