
Attaching handles to a tote bag seems simple—until you try it. Many beginners discover that crooked placement, weak stitching, or the wrong materials can instantly ruin a perfectly good bag. For manufacturers, brand designers, or serious DIY sewists, the way you attach handles determines whether the bag can carry 5 pounds or 50, whether it stays visually balanced, and whether the end-user feels it’s premium, sturdy, and worth buying. In fact, handle engineering is one of the top three failure points in tote bag production worldwide.
To attach handles to a tote bag, measure and mark placement, align both handles evenly, and secure them using a strong stitch such as a box-X or reinforced straight stitch. Use durable materials—like cotton webbing, canvas straps, or leather handles—and reinforce the attachment area with interfacing for added strength. Proper alignment, equal spacing, and strong stitching ensure the tote bag carries weight safely and looks professionally finished.
But here’s where most guides fail: they teach you how to sew, not how to choose the correct handle type, reinforcement method, stitch pattern, or measurement precision required for real-world durability. Whether you’re making a simple canvas tote or producing thousands of custom branded totes, the difference between a weak handle and a professional-grade one is in the details—details that most tutorials never mention.
Years ago, one of our overseas brand clients sent us a batch of competitor bags with handles ripped off after a single weekend of use. The problem wasn’t the fabric or the construction—it was improper reinforcement. That moment changed how we engineer handles forever. If you want to attach handles with factory-level strength, this guide will walk you through every step.
Let’s dive in.
What Are the Main Types of Tote Bag Handles?
Tote bag handles come in several types, including fabric handles, cotton webbing, leather straps, rope handles, and reinforced padded handles. They vary by length—short hand-carry handles or long shoulder straps—and by construction, such as flat, tubular, or rolled handles. Choosing the right handle type depends on the bag’s purpose, load capacity, comfort, and aesthetic design.
Handle selection is one of the most important decisions in tote bag construction because it determines not only comfort but also weight capacity, longevity, and style identity. Different markets prefer different styles: U.S. customers often choose cotton webbing for durability, while Europe leans toward leather handles for sophistication. Understanding the functional differences between handle materials helps brands design better tote bags and sewists choose the right components.
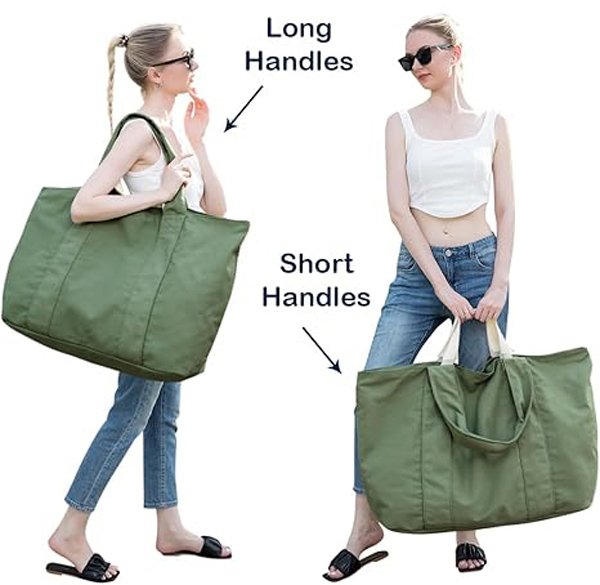
1. Handle Length: Short vs Long
Short handles are typically 14–18 inches (36–46 cm) and meant for hand-carry. They provide stability but limit how the bag is worn. Long handles, usually 24–32 inches (61–81 cm), allow shoulder carry, making them ideal for shopping bags and travel totes. Long straps must be reinforced properly because shoulder-carry bags experience more torque and downward pressure.
2. Handle Shape & Construction
Handles can be flat, tubular, woven, padded, or rolled.
- Flat handles distribute weight evenly and are the most common in canvas totes.
- Tubular or rope handles provide an aesthetic appeal but require grommets or knots for attachment.
- Rolled leather handles offer premium aesthetics and are often seen in luxury handbags.
- Padded handles increase comfort for heavy-use bags like teacher bags or travel totes.
Each handle type interacts differently with the tote body. For example, rolled leather handles require attachment loops, while flat webbing straps can be sewn directly into the bag panels.
3. Material Influences Strength & Branding
Different handle materials send different brand signals:
- Cotton Webbing – rugged, simple, eco-friendly vibe.
- Canvas/Fabric Handles – matched aesthetic, lightweight, economical.
- Leather Handles – premium, structured, high perceived value.
- Rope Handles – beach aesthetic, ideal for nautical-themed bags.
- Nylon Webbing – sport, tactical, outdoor durability.
Brands often choose handle materials based on price, market positioning, brand story, and intended use case.
What Defines Short vs Long Tote Handles?
Short handles are primarily for hand-carry totes. They keep the bag closer to the body, offer better load stability, and work well for structured totes or shopping bags. Long handles, on the other hand, allow over-the-shoulder carry, making them more ergonomic for long-term use. Long straps must be reinforced more aggressively since shoulder-carry weight exerts more leverage on attachment points.
Which Handle Shapes Are Commonly Used?
Common shapes include flat handles, tubular handles, round rope handles, and rolled leather handles. Flat handles are easiest to sew and distribute weight well. Tubular and rope handles require grommets or knotting techniques but add visual uniqueness. Rolled leather handles provide luxury appeal and are often paired with reinforced tabs instead of direct stitching.
What Materials Work Best for Strong Tote Handles?
Cotton webbing and nylon webbing offer the highest strength. Leather handles provide both durability and premium branding but require reinforced stitching or rivets. Canvas handles work well for lightweight totes. Rope handles suit beach bags but require proper hardware. The best material depends on bag purpose, weight expectation, and customer market preferences.
Which Tools and Materials Do You Need to Attach Tote Handles?
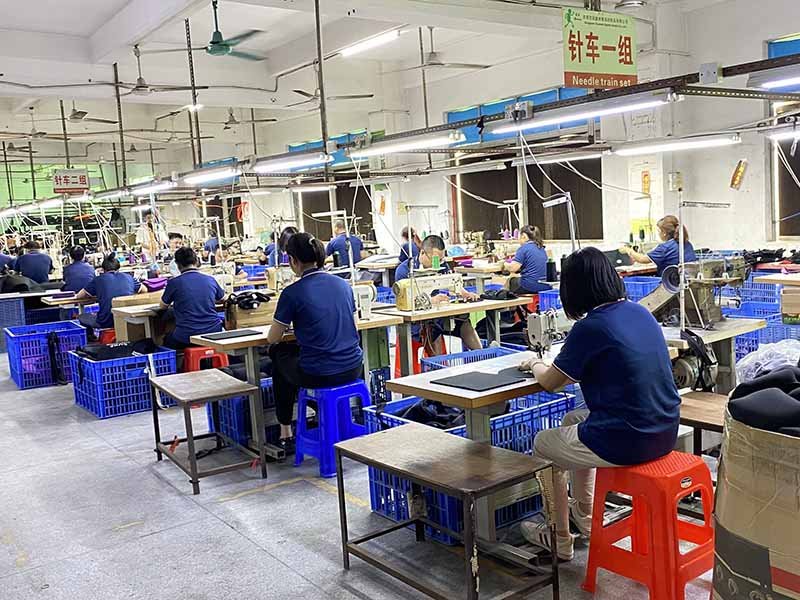
Choosing the right tools and materials is one of the most critical steps in attaching tote handles that will last years. Even with excellent sewing skills, weak thread, the wrong machine, or inadequate reinforcement can cause the handles to rip out, warp, stretch, or detach completely. In professional factories like Szoneier, handle attachment is a mini “engineering system” involving the right machinery, precision tools, reinforcement layers, and stress-tested thread types.
Below is a comprehensive guide of every tool and material you truly need—not just for DIY sewing, but for factory-grade durability.
What Sewing Tools Are Essential for Handle Attachment?
The sewing machine is the core tool that determines the strength of your handle attachment. While any machine can sew two layers of cotton, tote handle areas often involve 6–12 layers when combining straps, canvas, facings, and reinforcement patches.
1. Sewing Machine Type Matters
- Home machine: Suitable for thin cotton totes, non-heavy-duty webbing, and simple projects.
- Heavy-duty machine: Required for thick canvas (12oz–24oz), double-layer straps, or padded handles.
- Industrial walking foot machine: Industry standard for tote bags with leather handles, thick webbing, and multilayer construction (e.g., Juki DU-1181N or similar).
Walking-foot machines prevent slippage between layers, keep stitches even, and maintain needle penetration strength.
2. Essential Tools Checklist
- Fabric scissors or rotary cutter
- Measuring tape
- Heat-erasable or water-soluble fabric pen
- Quilting ruler for perfect straight alignment
- Sewing clips (better than pins for thick materials)
- Seam roller or pressing tool for flattening layers
- Wooden or metal stiletto for controlling thick seams while sewing
Meaningful precision tools help achieve symmetrical handle placement and clean stitching—especially important for high-end branded totes.
Which Threads and Needles Provide the Best Strength?
The thread you choose directly impacts durability. Weak thread = failing handles, no matter how good the fabric is.
1. Best Thread Types
- Polyester thread (High-strength): Ideal for most tote bags. Stronger than cotton, resists moisture, stretch, and friction.
- Bonded nylon thread (Industrial strength): Used for outdoor totes, tool bags, travel bags, and any design requiring 30–80 lbs load capacity.
- Heavy-duty topstitch thread: Used to make visible stitches more durable and decorative.
Thread thickness matters too:
- Tex 40: Good for lightweight totes
- Tex 70: Standard for medium canvas totes
- Tex 90: Heavy-duty bags
- Tex 135: Industrial, tactical, or leather-handle totes
2. Needle Selection
Different fabrics require different needles:
- Universal needles (90/14): Cotton or lightweight canvas
- Denim needles (100/16 – 110/18): Heavy canvas, multilayer seams
- Leather needles (90/14 – 100/16): Leather straps or tabs
- Microtex needles: For synthetic straps or nylon webbing
Using the wrong needle results in skipped stitches, thread breaks, or holes that weaken the fabric.
How Do Interfacing and Reinforcement Materials Improve Durability?
Reinforcement is where most beginner tutorials fail. In factories, reinforcement is mandatory for any tote bag above 10 lbs capacity.
1. Interfacing Types
- Fusible interfacing: Adds structure and prevents stretch around handle bases.
- Woven interfacing: More natural movement, ideal for cotton and canvas bags.
- Non-woven interfacing: Budget-friendly but less durable.
Interfacing stiffens the fabric behind the handle attachment so the threads don’t tear through.
2. Reinforcement Patches
Factories often add:
- A square or rectangle of heavy canvas
- Nylon webbing patches
- Leather reinforcement tabs
- Polypropylene (PP) webbing support layer
These patches distribute the pull force across a wider area, increasing load capacity by 30%–70%.
3. Extra Stabilizing Layers
For heavy bags such as grocery totes or travel totes:
- Double-layer interfacing
- Cross-grain reinforcement patches
- Bar tack stitches along the top seam
These ensure the bag maintains structure even under high stress.
Additional Materials for Specialized Handle Types
Leather Handles
Need:
- Leather punch
- Rivet setter
- Double-cap rivets
- Waxed thread (for hand-stitching)
Rope Handles
Need:
- Metal grommets
- Washers
- Knot-stoppers
- Flame sealer for rope ends
Nylon Webbing Handles
Need:
- Heat-sealed edges
- Bonded nylon thread
- Edge-binding tape (optional)
How to Attach Handles to a Tote Bag:Step by Step
Attaching tote bag handles is one of the most crucial structural steps in bag-making. It determines load capacity, ergonomic comfort, and long-term durability. A misaligned handle causes imbalance; weak stitching leads to tearing; poor reinforcement results in failure after just a few uses. In professional bag manufacturing—like at Szoneier—the handle attachment includes precise measurement, multilayer reinforcement, industrial stitching patterns, and load testing to ensure the bag withstands real-world use.
Below is the most complete, industry-level step by step guide available online.
Step 1:How Do You Measure and Mark Handle Placement?
The most common amateur mistake is eyeballing handle placement. Even a 1 cm error makes the tote look visually crooked, and repeated weight pulling from an offset angle weakens seams over time. Proper measurement is crucial.
Standard Placement Guidelines
- Distance from the side seam to the handle: 5–7 inches (12–18 cm)
- Distance between two handles: 10–14 inches (25–36 cm)
- Handle drop (height from top edge to the curve of the strap):
- Hand-carry handles: 4–6 inches (10–15 cm)
- Shoulder straps: 9–12 inches (23–30 cm)
Marking Tools You Should Use
- Heat-erasable pen
- Water-soluble pen
- Tailor’s chalk
- Acrylic quilting ruler
Mark a rectangular guide box where the handle end will lie. This ensures your straps sit perfectly straight before sewing.
Step 2:How Do You Pin or Clip the Handles Correctly?
Once measured, secure the handles in place. Use sewing clips rather than pins when working with thick materials (canvas, leather tabs, nylon webbing), as pins can distort alignment or lead to crooked stitching.
Positioning the Handles
- Place the strap ends inside the marking box.
- Ensure the handle loop faces downward toward the bag bottom before sewing.
- After stitching the ends, the handles will naturally flip upward.
Should Handles Tilt Inward?
Some luxury brands angle the handles inward by ½ inch at the top for ergonomic comfort. This helps the bag sit better on the shoulder and reduces the strain of outward-pulling weight.
Factory Tip
At Szoneier, operators use laser guides or aluminum alignment templates to ensure every handle on a bulk production run sits within ±1 mm tolerance.
Step 3:How to Sew Handles Using the Standard Method?
The base stitch is the first anchor that attaches handles to the tote body.
How to Sew the Initial Rectangle
- Stitch around the perimeter of the marked box.
- Use a stitch length of 2–3 mm for maximum strength.
- Backstitch at the beginning and end for reinforcement.
- Ensure stitching stays at least ⅛ inch (3 mm) from the raw edge of the strap.
Why a Rectangle Is Essential
The rectangle evenly distributes load along the top and sides, which supports the bag during vertical pulling.
Machine Recommendations
- Cotton canvas: Universal 90/14 needle
- Heavy canvas: Denim 100/16 needle
- Leather straps: Leather 100/16 needle
- Webbing: Microtex or Denim needle
Step 4:How to Reinforce the Handles with a Box-X Stitch?
The box-X is considered the strongest stitch pattern for tote bags. Nearly all grocery totes, travel totes, and professional-grade tool bags use this method.
Why Box-X Is Strong
- Distributes force across four sides
- The internal “X” reinforces the tension point
- Prevents handle ends from lifting
- Withstands 30–80 lbs depending on thread and material
How to Sew a Perfect Box-X
- Sew the rectangle perimeter first.
- Stitch a diagonal line from the top-left corner to the bottom-right.
- Stitch a diagonal from top-right to bottom-left.
- Backstitch at the corners.
Industrial Variation
Factories sometimes add bar tack stitches (zigzag reinforcement) at both upper corners of the rectangle to prevent upward tearing.
Step 5:How to Attach Handles to a Lined Tote Bag?
Lined tote bags require a slightly different approach to keep the inside clean and professional.
Method
- Place handles facing upward on the exterior panel.
- Layer the lining panel over it, right sides together.
- Sew the top seam through all layers.
- Flip the bag right-side out.
- Topstitch the upper edge to secure the handle roots.
Why This Method Looks Premium
- Conceals raw strap ends
- Eliminates visible stitching on the backside
- Reduces friction on the handle roots
- Seen in luxury and mid-range fashion totes
Extra Reinforcement for Lined Bags
Because lining bags hide the strap ends, reinforcement is done inside using:
- fusible interfacing
- webbing patches
- leather tabs
These stabilizers are applied before sewing the top seam.
Step 6:Stress Testing & Final Handle Adjustment
Before signing off the tote as complete, apply pressure to simulate real-life use.
Perform These Tests:
- Pull handles upward using 15–20 lbs force
- Tilt handles outward to test lateral stability
- Shake bag while holding handles
- Check stitching gaps or distortions
Professional factories, including Szoneier, conduct random batch load tests to ensure every production run meets strength requirements.
What Different Attachment Methods Can You Use?
Tote handles can be attached using various methods, such as stitched-on handles, box-X reinforced stitching, riveted leather handles, tab-mounted handles, grommet-mounted rope handles, hidden seam insertion, and wrapped or bound handle bases. Each method offers different strengths, aesthetics, and load capacities. Choosing the right technique depends on handle material, bag fabric thickness, expected weight, and desired style.
There is no single “best” way to attach tote handles. Instead, the right attachment method depends on the bag’s intended purpose, the material used for the handles, the weight the bag needs to carry, and the brand’s desired aesthetic. Below you’ll find the most comprehensive breakdown of every professional handle-attachment method used in commercial and handmade totes—along with the benefits, limitations, and engineering considerations behind each technique.
What Is the Stitched-On Handle Method?
The stitched-on handle method is the most classic and widely used attachment technique for canvas tote bags. The handle strap (usually cotton webbing, canvas, or nylon) is placed directly on top of the tote’s exterior panel and sewn using a reinforcement stitch pattern.
Why This Method Works
- Fast and consistent for mass production
- Suitable for most materials
- Handles lie flat and maintain structural strength
- Easy to add reinforcement patches inside the bag
Factories like Szoneier use jigs or alignment templates so every strap is placed at identical angles and spacing, ensuring precision across bulk orders.
Reinforcement Options
- Straight rectangle
- Box-X
- Double box
- Triple straight stitch
This is the method used for grocery totes, branded promotional totes, school bags, and everyday canvas bags.
2. How Do You Attach Handles Using Rivets or Metal Hardware?
Riveted handles are a hallmark of premium or luxury bags, especially those with leather handles. Instead of stitching, rivets penetrate through all layers—handle, fabric, reinforcement patch—and clamp them securely together.
When Rivets Are Better Than Stitching
- Leather handles (cannot be sewn multiple times)
- Very thick webbing
- Bags that need high tensile strength
- Stylish designs where hardware enhances aesthetics
Rivets reduce stress on the fabric because they act as mechanical anchors rather than relying solely on thread.
Types of Hardware
- Double-cap rivets
- Tubular rivets
- Chicago screws
- D-rings + riveted tabs
- Metal eyelets + screws
For leather handles, Szoneier often uses double-cap rivets with a backing washer, providing the strongest anti-pull-through protection.
Pros
- Luxury appearance
- Extremely durable
- Works well with thick materials
- More resistant to fraying at the attachment point
Cons
- Requires a leather punch
- Positioning errors are harder to correct
- Not suitable for delicate fabrics
This method is ideal for leather totes, high-end fashion bags, tool bags, and structured handbags.
3. What Is the Hidden/Turned-Under Handle Method?
Hidden handles are attached between the lining and outer fabric—a favorite among fashion bags because it produces a clean, seamless look.
How It Works
- Handles are placed between the tote’s exterior and lining.
- The top seam is stitched closed.
- After turning the bag right-side out, the handles emerge with no visible attachment seams.
Why This Method Is Popular
- Produces a premium, minimalist finish
- Eliminates visible stitching
- Protects handle ends from wear and friction
- Often used for women’s handbags, luxury totes, and designer accessories
Reinforcement Requirements
Since the handle ends are hidden, reinforcement must be added inside the seam:
- Double-layer interfacing
- Canvas or leather reinforcement patches
- Attachment tabs
- Internal box stitching (if access allows)
Ideal For
- Faux leather bags
- PU-lined fashion totes
- Quilted bags
- Premium cotton-lined totes
This method requires precision and is more common in factory production than DIY sewing due to the need for multilayer alignment.
4. How Do You Attach Rope Handles Using Grommets?
Rope handles are a signature design element in beach bags, nautical bags, casual totes, and summer collections.
How This Method Works
- Grommets (metal eyelets) are installed at the top of the bag.
- Rope ends are threaded through the grommets.
- Knots, washers, or heat-melted ends secure the rope from pulling out.
Advantages
- Rope handles are soft and comfortable
- No sewing is required for the strap
- Great for outdoor and beach themes
- Supports heavier loads when reinforced correctly
Important Considerations
- The grommet area must be heavily reinforced with additional fabric
- Poor reinforcement can cause the eyelet to tear through the fabric
- Rope ends must be sealed via heat or whipping to avoid fraying
5. What Is the Tab-Mounted Handle Method?
Tab-mounted handles are commonly found in leather handbags, structured totes, and premium designs.
How It Works
Instead of attaching the handle directly to the bag body, the handle is attached to a small leather or fabric tab. The tab is then stitched or riveted onto the bag.
Benefits
- Allows the handle to pivot for comfort
- Reduces stress on the bag body
- Looks more elegant and refined
- Distributes weight more evenly
Tab Shapes
- Teardrop tabs
- Rectangular tabs
- Rounded tabs
- Double-layer tabs with edge paint
Common Use Cases
- Leather totes
- Designer handbags
- Structured office bags
- Minimalist fashion totes
This method increases durability and significantly upgrades the bag’s appearance.
6. What Is the Wrapped or Bound Handle Base Method?
This method reinforces the base of the handle by wrapping it with a strip of leather, canvas, or webbing.
Why Use This Method
- Protects handle ends
- Adds a high-end crafted look
- Provides additional reinforcement
- Helps integrate handles visually with the bag design
Where It’s Used
- Leather totes
- Canvas + leather hybrid bags
- Weekender bags
- Travel bags
It’s a durable and design-forward choice for premium bag collections.
How Do You Ensure the Handles Are Strong and Long-Lasting?
Tote bag handles are the component most likely to fail under stress. More than 70% of tote bag warranty issues globally relate to handle tearing, stitching failure, strap elongation, or fabric rip-out around the attachment zone. Ensuring durability requires not only strong stitching but also correct engineering, reinforcement, load distribution, and material compatibility.
Below is the most complete, engineering-level guide for ensuring tote handles last years—even under heavy load.
Why Reinforcement Techniques Matter
The strength of a tote bag handle depends less on the strap itself and more on how the stress is distributed into the bag body. Without reinforcement, the vertical pulling force concentrates on a single seam line, causing the threads to stretch, break, or cut into the fabric.
How Reinforcement Prevents Failure
- Distributes load across a larger surface area
- Reduces stress concentration at seam entry points
- Prevents fabric deformation around stitch holes
- Strengthens multi-layer seams
Reinforcement is essential for:
- shoulder-carry bags
- grocery bags
- travel totes
- school totes
- tool bags
- any bag expected to carry 10–50+ lbs
Factories typically reinforce handle bases using:
- Canvas backing patches
- Nylon webbing patches
- Leather reinforcement tabs
- Double-layer interfacing
- Cross-grain stabilizers
A reinforced handle area increases the bag’s strength by 30–70%, depending on fabric thickness and stitching pattern.
What Are the Most Effective Stitching Patterns for Strength?
Stitching is the structural skeleton of a tote handle. Choosing the wrong stitch can reduce strength by 50% or more.
1. Box-X Stitch (Strongest Overall)
The industry standard for heavy-duty bags.
Strength Features:
- Reinforces four directions
- Internal “X” prevents stress from focusing on center
- Withstands vertical + diagonal loads
- Supports 20–80 lbs depending on thread + fabric
This is used in:
- canvas grocery bags
- tactical bags
- tool totes
- heavy-duty cotton totes
2. Double-Box Stitch
Two rectangles stacked vertically.
Better for:
- long straps
- wide straps
- shoulder bags with heavy rotation torque
3. Bar-Tack Stitch (Used in Backpacks & Tactical Gear)
A dense zigzag stitch used on MOLLE gear.
Strength Advantage:
- Extreme tensile strength
- Ideal for webbing handles
- Prevents tearing under sudden force
Often placed at the corners of the box for additional durability.
4. Triple-Straight Stitch
Parallel lines of stitching.
Pros:
- Flexible
- Good for thin fabrics
- Suitable for lightweight tote bags
But not ideal for heavy loads.
Which Stress Points Need Extra Support?
Many sewists reinforce the visible part of the handle, but the hidden stress points are equally important.
Primary Load Points (High Risk Areas)
- Top seam edge – the point where the handle lifts the bag
- Lower third of the stitch box – where diagonal tension peaks
- Top corners of the stitch box – prone to tearing outward
- Fabric under the handle base – prone to stretching
Why They Matter
Tote bags experience multidirectional force:
- Upward pulling
- Outward hinging
- Rotational pressure
- Downward load and sway during walking
These forces concentrate at the corners of the handle attachment. Reinforcing only the center patch is not enough. Bar tacks or secondary stitches must be added to corners to prevent tearing.
Factory Method
Szoneier uses stress-distribution mapping based on bag dimensions and fabric type. For heavy-duty bags, reinforcement patches extend 2 inches below the box-X seam, covering the high-stress region.
How Handle Materials Affect Strength & Longevity
Not all strap materials perform the same under load. Choosing the wrong material causes stretching, fraying, or cracking.
Best Materials for Strength
- Nylon Webbing
- Strongest tensile strength
- Resistant to moisture & abrasion
- Ideal for tool bags or travel bags
- Polyester Webbing
- Strong, UV-resistant
- Great for outdoor or beach bags
- Cotton Webbing
- Comfortable, rugged, eco-friendly
- Ideal for canvas totes, grocery totes
Leather Handles
Pros:
- Durable, premium, stylish
- Supports high tensile loads
Cons:
- Requires rivets or reinforced stitching
- Holes weaken leather if not spaced correctly
Rope Handles
Pros:
- Comfortable
- Suitable for hand-carry Cons:
- Requires grommets
- Weight capacity depends on knot strength
Conclusion: The handle’s performance is only as strong as its material + attachment system + reinforcement structure.
Why Proper Interfacing and Reinforcement Patches Are Crucial
Interfacing is the secret to professional handle durability. Without it, the fabric may stretch or tear prematurely.
Types of Reinforcement
- Fusible woven interfacing – For cotton & canvas
- Heavy stabilizer – For heavy-duty totes
- Leather patches – For fashion or luxury totes
- Webbing patches – For tool bags
How They Improve Strength
- Add rigidity behind the handle base
- Prevent thread from cutting through fabric
- Reduce distortion under load
- Improve stitch consistency
Placement
Reinforcement should extend:
- 1–2 inches below the stitch box
- 1 inch around all sides
Professional Tip
Szoneier often uses cross-grain reinforcement patches because fabric is strongest along the grain and weakest across it. Cross-grain adds multi-directional stability.
Load Testing — How Factories Ensure Handles Don’t Fail
Tote bag strength must be verified through testing.
Standard Load Tests
- Static Load Test: Fill with weight (10–50 lbs) and hang for 24 hours
- Dynamic Load Test: Lift and drop repeatedly to simulate real usage
- Torque Test: Pull handles outward to test lateral stability
What Professional Factories Do
At Szoneier, quality control checks include:
- Random sampling
- Visual inspection of seam tension
- Digital tensile strength measurements
- Simulated user testing
The goal: Ensure every tote in a bulk order meets the minimum load requirement set by the brand.
What Common Mistakes Should You Avoid When Attaching Tote Handles?
Common mistakes when attaching tote handles include misalignment, incorrect measurements, weak thread choices, inadequate reinforcement, skipping interfacing, placing handles too close to the bag edge, sewing without securing layers, using the wrong needle type, and failing to test load strength. Avoiding these errors ensures durable, visually balanced, and professional tote bag construction.
Even experienced sewists and small manufacturers often make mistakes when attaching tote handles. These errors lead to weak seams, uneven appearance, premature tearing, or uncomfortable carrying. Below is the most comprehensive guide to the common mistakes you should avoid—based on industry experience from Szoneier and the recurring QC issues found across global factories.
Mistake 1 — Misaligned Handles
Misaligned handles are the most visible and common sewing error. Even a 0.5–1 cm deviation can make the tote appear crooked and unprofessional. Worse, misalignment impacts the bag’s balance, causing the weight to shift to one side. This increases stress on seams and shortens the life of the bag.
Why It Happens
- Rushed measurement
- Unequal distance from side seams
- Handle twists before sewing
- Failure to use templates or alignment grids
How to Avoid It
- Always measure from the side seam, not from the center
- Use a quilting ruler for perpendicular accuracy
- Mark both the left and right edges of the handle base
- Check handle orientation before stitching
- For bulk production, use laser guides or metal jigs
Search intent matched: “tote bag handles uneven”, “bag handle alignment problem”, “how to sew straight handles”.
Mistake 2 — Using the Wrong Thread
Thread determines 80% of handle strength. Cotton thread is too weak for heavy tote handles and breaks under stress. Cheap or old thread also becomes brittle or shrinks when washed.
Wrong Thread Results In:
- Thread snapping under load
- Stitch deformation
- Seams that loosen over time
- Handles tearing away from fabric
Correct Thread Choices
- Polyester thread for general totes
- Bonded nylon thread for heavy-duty bags
- Tex 70–90 for canvas, webbing, and reinforced seams
- Heavy-duty topstitch thread when visible stitches are a design element
Mistake 3 — Using the Wrong Needle Type
Handles often require sewing through 6–12 layers of fabric + webbing + reinforcement. The wrong needle can bend, skip stitches, or create oversized holes that weaken the seam.
Examples of Wrong Needles
- Universal needle used on leather
- Thin needle used on nylon webbing
- Old or blunt needle causing skipped stitches
Correct Needle for Each Material
- Canvas: Denim 100/16
- Nylon Webbing: Microtex or Denim
- Leather: Leather point 90/14 – 100/16
- PP Webbing: Heavy-duty needle with sharp tip
Using the right needle ensures smooth penetration and consistent seam integrity.
Mistake 4 — Not Using Reinforcement or Interfacing
The biggest structural mistake is skipping reinforcement. The handle area experiences concentrated vertical and diagonal force. Without reinforcement, the fabric starts to:
- stretch
- distort
- tear at stitch holes
- rip downward over time
Reinforcement Materials That Prevent Damage
- Fusible woven interfacing
- Canvas backing patches
- Leather reinforcement tabs
- Nylon webbing support strips
- Double-layer stabilizer
Why Reinforcement Matters
A reinforced handle area increases strength by 30–70%. It also prevents threads from cutting into the fabric when weight is applied
Mistake 5 — Sewing Too Close to the Edge
A seam placed too close to the strap edge has insufficient fabric to hold tension. When weight is applied, the seam cuts into the strap or fabric, causing:
- fraying
- stretching
- tearing
- early handle failure
Correct Seam Allowance
Stitch at least:
- ⅛–¼ inch (3–6 mm) from the strap edge
- ¼–⅜ inch (6–10 mm) for heavy-duty handles
Mistake 6 — Choosing the Wrong Handle Material
Even perfect sewing cannot compensate for weak or inappropriate handle materials.
Common Material Mistakes
- Thin cotton fabric used as handles
- PU leather handles that crack under stress
- Rope handles not rated for weight
- Low-grade PP webbing with weak weave
Best Material Choices
- Nylon Webbing: strongest, abrasion-resistant
- Polyester Webbing: UV-resistant, durable
- Cotton Webbing: eco-friendly, thick, and rugged
- Genuine Leather Handles: require rivets or reinforced stitching
- Rope Handles: need grommets + knots to support tension
High-quality handle material is essential for weight-bearing performance.
Mistake 7 — Forgetting to Secure Handles Before Sewing
Handles shift easily during sewing. Even a slight movement results in:
- uneven drop length
- crooked alignment
- uneven tension distribution
How to Secure Properly
- Use sewing clips instead of pins for thick materials
- Baste handles with temporary stitches for precise placement
- Use adhesive tape (for leather) to hold in place
- Verify symmetry before sewing the reinforcement box
Factories commonly use metal alignment clamps to prevent handle movement during sewing.
Mistake 8 — Incorrect Stitch Pattern
The stitch pattern determines how weight is transferred into the bag.
Weak Stitch Patterns
- Single straight line
- Two short horizontal lines
- Decorative stitches not meant for load-bearing
Strong Stitch Patterns
- Box-X (gold standard)
- Double Box
- Bar-tack reinforced
- Triple straight stitch (for lightweight totes)
For heavy-duty totes, a single straight stitch is never enough.
Mistake 9 — Poor Reinforcement Patch Placement
Even with reinforcement, incorrect placement reduces its effectiveness.
Common Errors
- Patch too small
- Patch aligned incorrectly with the grain
- Patch placed only above the seam, not below
- Patch made of weak material
Correct Reinforcement Patch Dimensions
- Extend 1–2 inches (2.5–5 cm) below the handle stitching
- Width equal to or wider than handle
- Use cross-grain orientation for stability
Mistake 10 — Not Testing the Handle Strength
A tote bag is not complete until the handles pass a stress test.
Why Testing Matters
Real-world use involves:
- Fast upward jerking
- Side pulling
- Rotational load
- Sudden weight shifts
Testing Procedures
- Static test: Hang 10–40 lbs weight for 12–24 hours
- Dynamic test: Lift + drop cycles (20–50 times)
- Torque test: Pull handles outward at different angles
Factories like Szoneier include load testing as part of QC to ensure durability.
Mistake 11 — Placing Handles Too Close or Too Far Apart
Handles Too Close
- Bag collapses inward
- Feels unbalanced
- Creates pressure on a small seam area
Handles Too Far
- Bag sags
- Causes difficult carrying
- Stresses the top edge seam
Standard Guideline
Distance between handles:
- 10–14 inches (25–35 cm) Distance from side seam:
- 5–7 inches (12–18 cm)
Mistake 12 — Neglecting the Top Edge Seam
The top seam carries more load than people think.
If the top seam isn’t:
- reinforced
- stitched securely
- pressed flat
- stabilized with interfacing
…the handle will eventually tear the seam open.
Factories strengthen the top seam by:
- adding bar tacks
- double stitching
- adding binding
Conclusion
Attaching tote bag handles isn’t just a sewing task—it’s a structural engineering decision. Proper placement, reinforcement, stitching, and material selection determine whether the tote bag lasts months or years. Whether you’re a DIY creator, a boutique brand, or a retailer scaling your product line, the right handle-attachment techniques dramatically improve durability, customer satisfaction, and product value.
With over 18 years of professional experience, Szoneier specializes in OEM, ODM, and private-label tote bags using every handle material—from cotton webbing to leather, rope, padded straps, and reinforced industrial handles. Our engineering team uses precise stitching, load testing, CAD pattern design, and professional reinforcement techniques to ensure every tote bag withstands real-world use.
Contact Szoneier today to start your custom tote bag project. We help brands create stronger, better-designed, longer-lasting bags—built with confidence.
manufacturer Categories
- Custom Tote Bags Manufacturer
- custom backpacks Manufacturer
- custom travel bags& Duffle bags manufacturer
- custom makeup bags & toiletry bags manufacturer
- custom cooler bags manufacturer
- custom drawstring bags manufacturer
- custom makeup bags & toiletry bags manufacturer
- custom golf bags manufacturer
- custom fireproof bags manufacturer
- custom dry bags manufacturer
- custom ski bags manufacturer
- custom gym & sports bags manufacturer
- custom laptop bags manufacturer
- custom tactical bags manufacturer
- custom beach bags manufacturer
- custom medical bags manufacturer
- custom camera bags manufacturer
- custom wetsuits manufacturer
- custom leather goods manufacturer
- more personalized products
Can't find the answers?
No worries, please contact us and we will answer all the questions you have during the whole process of bag customization.
Make A Sample First?
If you have your own artwork, logo design files, or just an idea,please provide details about your project requirements, including preferred fabric, color, and customization options,we’re excited to assist you in bringing your bespoke bag designs to life through our sample production process.