 Skip to content
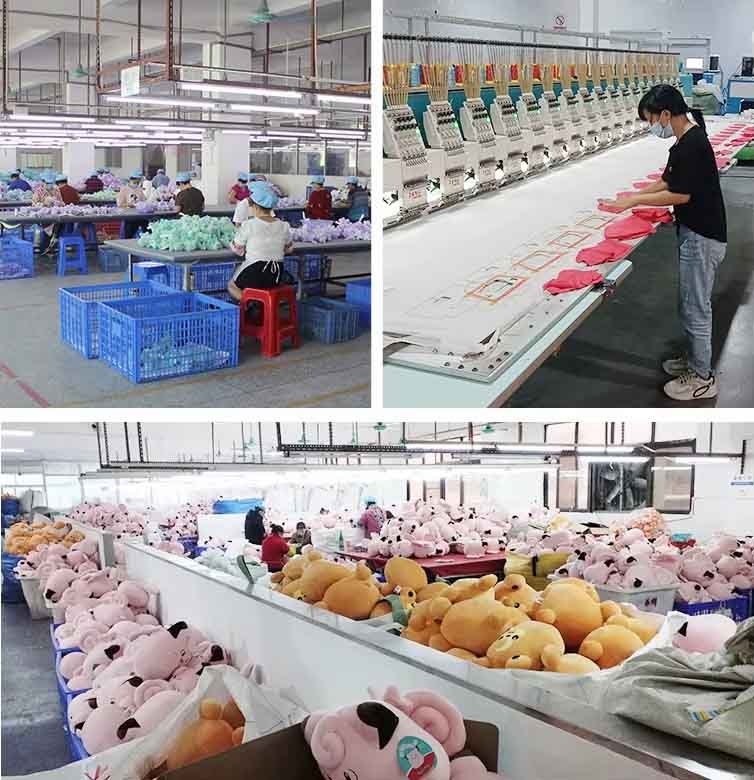
Plush toys are more than simple gifts. They’re childhood companions, emotional keepsakes, and for many brands, a growing business category worth billions annually. Whether you’re crafting a one-of-a-kind plushie for your child or prototyping a new product line for your brand, the process blends creativity, craftsmanship, and safety compliance.
So, how exactly do you make your own plush toy that is safe, adorable, and durable enough for hugs and washes?
To make your own plush toy, you need to select the right materials, design a proper pattern, cut and sew pieces accurately, assemble and stuff with high-quality filling, and finish with secure details like eyes and noses. Safety compliance (CPSIA, EN71) is essential if selling or gifting to children. For bulk production or professional quality, partnering with OEM/ODM factories like Szoneier ensures faster sampling, certified materials, and scalable manufacturing for global markets.
What materials and tools do you need?
For a safe, durable plush toy you’ll want soft pile fabrics (minky, fleece, velboa), compliant stuffing (poly fiberfill or recycled fiber), strong polyester thread, ball-point needles, safety eyes or embroidery, and basic gear such as fabric shears, rotary cutter, marking tools, pins or clips, a domestic sewing machine, turning tools, and a steam iron with pressing cloth.
1) Fabrics: pile, weight, stretch, and compliance
How to choose: Match fabric hand-feel to the user (baby vs collectible), select an appropriate pile length, and check stretch so your pattern pieces don’t deform. Prioritize certified fabrics for children’s products.
Common plush fabrics
| Fabric | Typical gsm | Pile / Surface | Stretch | Pros | Watch-outs | Best for |
|---|---|---|---|---|---|---|
| Minky (poly) | 250–380 | Short–medium pile, very soft | 2-way or 4-way | Ultra soft, vibrant color, easy care | Can creep/stretch while sewing; press on low heat | Baby animals, huggables |
| Velboa (poly) | 200–300 | Short pile, smooth | Minimal | Crisp shapes, good detail | Less cuddly than minky | Character shapes, mascots |
| Anti-pill fleece (poly) | 230–300 | Brushed knit | 2-way | Forgiving, beginner-friendly | Can pill over time | Everyday plush, budget lines |
| Cotton woven | 120–180 | Flat | None | Breathable, easy to cut | Less plush, frays | Clothing, patchwork details |
| Sherpa / faux fur | 300–500+ | Long pile | 2-way | Cozy loft, texture | Tricky cutting; sheds | Winter animals, accents |
| Organic cotton knit | 180–240 | Soft knit | 2-way | Eco story, gentle on skin | Cost, recovery | Infant ranges, ESG lines |
Certification & safety checklist
- Prefer OEKO-TEX® Standard 100 or equivalent for direct-to-skin parts.
- Lightfastness and colorfastness to washing matter for pale or high-contrast colorways.
- Avoid glitter shedding, flock that rubs off, or coatings not certified for children.
Tips
- Pre-wash cottons and cotton-blends to control shrink. Do not pre-wash faux fur; instead, steam to relax.
- Align nap in one direction across all outer pieces to keep color looking uniform. Mark nap arrows on your pattern.
2) Stuffing, weights, and internal structure
Filling options
| Fill | Feel | Care | Pros | Considerations | Typical use rate* |
|---|---|---|---|---|---|
| Polyester fiberfill (siliconized, hollow-conjugate) | Springy, lightweight | Machine-washable | Inexpensive, consistent | Non-bio based | 80–120 g for a 25 cm plush |
| Recycled rPET fiberfill | Slightly firmer | Machine-washable | ESG-friendly | Higher cost than virgin | 85–130 g |
| Cotton carded | Soft, natural | Gentle wash | Natural story | Can clump; dries slowly | 90–140 g |
| Wool roving | Dense, formable | Hand-wash | Holds shape well | Moth risk; cost | 100–150 g |
| Memory-foam crumbs | Squishy | Spot clean | Premium squish | Not ideal for frequent washing | 100–160 g |
| PP/PE pellets (weighted) | Adds heft | Hand-wash | Sensory weight, stability | Double inner pouch to prevent leaks; age-grade 3+ | 50–150 g as accent |
- Guidance for a typical medium 25 cm plush with average volume.
Safety & construction
- For any loose particulate (pellets), sew a sealed inner muslin pouch and place that inside the plush before final stuffing.
- Keep weighted components away from seams and ensure seam allowances are generous (8–10 mm) in weight-bearing zones.
- For under-3s, avoid pellets and stick to fiberfill; embroider all features.
Internal stabilizers (optional)
- Fusible tricot knit interfacing for thin knit fabrics to prevent stretch at seams.
- Needle-punched batting to smooth lumps under short-pile fabrics.
- No wire for toys intended for under-3s. If armatures are desired for collectibles, fully encapsulate ends and clearly age-grade 14+.
3) Threads, needles, and stitch settings
Thread
- 100% polyester, core-spun or filament poly is the standard for strength and abrasion resistance.
- Sizes: Tex 18–27 for domestic machines on plush; Tex 30–40 for load points or top-stitch accents.
- Color: match the base pile color, not the highlight tips.
Needles
- Ballpoint/jersey for knits (minky, fleece) to avoid cutting fibers.
- Universal for wovens and velboa.
- Sizes: 75/11 for fine fabrics, 80/12–90/14 for thicker piles or when crossing seam intersections.
Baseline machine settings (start here, test on scraps)
- Stitch length: 2.2–2.6 mm for general seams; 1.8–2.0 mm on tight curves.
- Tension: neutral to slightly lower for knits; adjust until stitches look balanced without tunneling.
- Differential feed (serger): 1.3–1.5 to counter knit stretch on minky/fleece.
4) Cutting and marking tools
- Fabric shears (8–9 in.) for straight cuts; keep a plush-only pair to stay sharp.
- Rotary cutter (45 mm) and self-healing mat for precise curves and mirrored pieces.
- Snips for thread tails close to the seam.
- Clips rather than pins on thick pile to avoid distortion.
- Marking: tailor’s chalk, heat-erasable pens, or tailor’s tacks. Test removability; avoid permanent markers that can bleed.
Faux-fur specific
- Cut from the backing using a craft knife to avoid chopping pile, which causes shedding and visible seams.
5) Pattern drafting and measuring aids
- Pattern paper: kraft paper, Swedish tracing paper, or light card for re-use.
- Rulers: clear quilting ruler, French curve for smooth head and limb arcs.
- Compass/hip curve for round muzzles and belly panels.
- Weights to hold patterns on pile fabrics instead of pinning.
- Digital tools (optional): Inkscape or Illustrator for clean, scalable templates; export to PDF or DXF for factory use.
Checklist for a production-ready pattern
- Grainline and nap arrows on every piece.
- Seam allowances noted (e.g., 8 mm standard, 10 mm at joints).
- Notches aligned across mirrored pieces.
- Part names and piece counts (e.g., EAR x2 mirrored).
6) Assembly aids, turning and stuffing tools
- Loop turner for narrow tails or limbs.
- Hemostats or long tweezers to position small parts, pull seams.
- Stuffing sticks or a smooth chopstick to place fill without poking holes.
- Small funnel for pellets into inner pouches.
- Point turner (wood or bone) to gently shape corners without piercing.
7) Fasteners, faces, and trims
Eyes and noses
- Embroidery: safest for infants; use polyester embroidery thread and a stabilizer behind the face panel.
- Safety eyes/noses: use locking washers sized for fabric thickness; pull-test after installation. Age-grade 3+ only.
- Appliqué felt: satin-stitch edges thoroughly.
Closures and accessories
- Hook-and-loop for removable outfits; avoid buttons for under-3s.
- Plastic snaps (press-fit) with firm setting; test with repeated pulls.
- Elastic for gentle gathers; ends should be bar-tacked securely.
Adhesives (limited use)
- Water-based fabric glue only for non-child ranges or as a placement aid prior to stitching. Hot glue is not recommended for children’s plush seams.
8) Pressing and finishing tools
- Steam iron with pressing cloth to avoid crushing pile and melting synthetics.
- Tailor’s ham for curved seams on heads and muzzles.
- Seam roller to flatten allowances without heat in delicate areas.
- Lint brush and grooming comb to lift pile out of seams after sewing.
Pressing practice
- Use low heat on synthetics; test on scraps. Steam from the wrong side or through a thick pressing cloth to protect pile.
9) Machine options: domestic, serger, embroidery
- Domestic sewing machine with adjustable presser-foot pressure is sufficient for most plush projects.
- Walking foot helps feed thick or slippery pile evenly.
- Serger/overlocker to finish internal seams neatly and add durability in production runs.
- Embroidery machine for consistent facial features and logos; pair with tear-away or cut-away stabilizer and top-film on high pile to keep stitches from sinking.
10) Labels, care, and packaging supplies
- Fiber content & care labels: e.g., “Shell: 100% Polyester; Filling: 100% Polyester. Hand wash cold. Line dry.”
- Tracking labels for regulated markets (batch/lot, factory ID).
- Hangtags with brand, SKU, barcode.
- Packaging: recyclable paper bands or boxes; if polybags are used, include suffocation warnings and choose recycled content where possible.
11) Safety screening tools for prototypes
- Small-parts cylinder (choke tube) to check that anything detachable cannot pass fully through for under-3s.
- Pull/torque gauges (simple spring scale works for home checks) to yank eyes, noses, bows to a target force (e.g., 90 N) as a pre-test.
- Home wash test: launder in a pillowcase on gentle; inspect for seam strain, dye bleed, and clumping.
BOM example: 25 cm classic bear
| Component | Spec | Qty | Est. Use | Notes |
|---|---|---|---|---|
| Outer fabric | Minky, 300 gsm, OEKO-TEX | 0.35 m | — | Nap consistent; pre-steam |
| Contrast | Velboa, 250 gsm (inner ear, muzzle) | 0.10 m | — | Short pile for detail |
| Interfacing | Tricot fusible, light | 0.15 m | — | Face panel, button-nose area |
| Thread | Poly Tex 27, matching color | 1 spool | — | Extra for ladder stitch |
| Needle | Ballpoint 80/12 | 2 | — | Swap if snagging |
| Fiberfill | Siliconized poly | — | 110 g | Recycled option available |
| Safety eyes | 10 mm, locking washer | 2 | — | Age-grade 3+ only |
| Nose | Embroidered satin fill | — | — | Safer than hard nose |
| Labels | Care + brand + tracking | 1 set | — | Fold-in side seam |
| Packaging | Recycled kraft box | 1 | — | Printed logo optional |
How do you design and size the pattern?
Start with a front and side sketch, set cute proportions, then split the silhouette into logical panels. Add grainlines, nap arrows, notches, and seam allowances suited to each seam. Create darts or gussets for 3D form. Prototype, mark corrections, and grade the pattern with clear rules so every size keeps its shape, safety, and ease of assembly.
1) Begin with a design brief that keeps you on track
Before you put pencil to paper, answer five questions. Your pattern choices flow from them.
Who is the user and age grade
Infant lines require embroidered features and simple panels. Collector lines can accept complex seams and wired poses with an adult age mark.
What is the character mood and silhouette
A sitting bear asks for a belly gusset. A standing fox needs leg rotation and balance.
What fabrics and pile lengths will you use
High-pile minky hides seams but softens edges. Velboa shows crisp shapes and needs cleaner seam geometry.
What durability and wash expectations do you have
Nursery toys need seam reinforcement, wide turning vents, and easy-wash fabrics.
What is the target cost and volume
Two large panels plus a small head gusset cut faster than five tiny darts. Production cost is usually in sewing minutes rather than fabric meters for plush.
Capture the answers in a one-page brief. Keep it visible while drafting so you do not drift toward details that fight your goals.
2) Turn the idea into orthographic sketches
Draw the front, side, and top views at the same scale. Add a centerline on each view. This is where you establish the cuteness ratio.
- Head to body proportion for cute styles often falls between 1.2 and 1.8.
- Limb length tells the personality. Short limbs feel chubby and friendly, long limbs feel agile and playful.
- Decide the pose. Sitting toys need a flat base or a belly panel that creates a stable tripod with the two legs.
Mark likely seam paths on the sketches. Think of seams as contour lines that allow fabric to bend without wrinkles.
3) Break the silhouette into pattern blocks
Choose a seam map that matches fabric and desired look.
Minimal seams for cozy, infant-safe toys
Two body halves plus a belly or head gusset produce soft curves and low stitch count.
Panelled realism for character accuracy
A head with side panels, a top gusset, a separate muzzle, and under-ear wedges gives more control of shape and expression.
Color blocking
If the belly is a contrast color, partition the body where the color change naturally appears in the sketch. Add overlap for a tidy join rather than forcing the meet at a sharply curved seam.
Add labels to every piece now. Name, count, cut direction, and whether a piece is mirrored or cut on fold.
4) Place grainlines and nap arrows with care
Your pattern will only sew cleanly if the fabric behaves as expected.
- Grainline on knits runs parallel to the greatest stability direction. On minky and fleece, align the grainline vertically on body parts so gravity does not distort the torso.
- Nap arrows point in the direction you want the pile to flow. One direction across the entire toy keeps the color even under light.
- Limbs that need stretch for stuffing can be placed with the cross-grain around the limb. Limbs that must resist stretch can be aligned with the stable grain.
5) Add seam allowances that match the job
A single global allowance is easy, yet different seams perform different jobs.
| Area | Recommended allowance | Reason |
|---|---|---|
| General curved seams | 8 mm | Strong enough for play and washing |
| High-stress joints (neck, limb bases, tail root) | 10 mm | Extra width for a bar tack and better tear resistance |
| Tiny details (ear tips, small curves) | 6 mm | Easier to turn without bulk |
| Zipper or hidden vents | 12 mm | Room for clean closure and topstitching |
Clip or notch curves after sewing so they sit flat when turned. On inward curves cut little V nicks up to but not through the stitch line. On outward curves trim the seam allowance down to remove bulk.
6) Use darts, tucks, and gussets to turn flat fabric into volume
The choice between a dart, a wedge removal, or a gusset changes the look.
- Darts create gentle bulges on heads and bellies without adding pieces. Keep dart tips smooth and end them a few millimeters before the highest point of the curve.
- Tucks work like darts but fold outward. Good for stylized ridges such as dragon backs.
- Gussets are extra panels that add width where volume matters. Head gussets define crown height and muzzle stance, while belly gussets stabilize sitting poses.
A quick practical rule
Head gusset width at mid-length is often between one quarter and one third of head width at the same location. Start there, then refine in prototyping.
7) Draw notches, drill marks, and registration points
Registration is how future you and factory teams avoid mismatches.
- Single notches align general seams.
- Double notches signal the back side of a limb or head, so you never attach left to right by mistake.
- Drill marks show exact points for safety eye stems, nose embroidery centers, muzzle placement, and dart tips.
- Balance points on long seams divide the run into equal sections that must match as you sew. Walk the seams on paper to confirm lengths are equal.
8) Plan turning vents and closing strategy
A pattern is not complete until you decide where the toy turns right side out and where you will close the final opening.
- Hide the turning vent on the back body seam or a belly seam where ladder stitching can be invisible.
- Avoid vents on tight corners where stress is high.
- If you add pellets in a pouch for gentle weight, design a cavity that holds the pouch in place away from seam lines.
9) Prototype fast and redline the paper
Make a first sample in the intended fabric. Do not chase perfection on round one. You are learning.
- Trace your paper to fabric with nap arrows honored.
- Sew at the intended stitches per inch and seam allowances.
- Stuff lightly first to see the true seam map, then adjust the fullness.
- With a felt pen, draw directly on the prototype where you want more fullness or less. Photograph each view with notes.
Transfer the redlines back to paper. Change only one family of shapes at a time, for example enlarge the head gusset while leaving limbs alone. Control the experiment so you know what caused the improvement.
10) Grade the pattern into multiple sizes that still feel the same
Grading a plush pattern is more than scaling. You must preserve the character’s face and balance.
Set grade rules before you scale
| Dimension | Mini to Small | Small to Medium | Medium to Large |
|---|---|---|---|
| Overall height | ×1.25 | ×1.25 | ×1.25 |
| Head width | ×1.28 | ×1.25 | ×1.22 |
| Limb length | ×1.20 | ×1.22 | ×1.25 |
| Limb thickness | ×1.22 | ×1.22 | ×1.22 |
| Eye diameter | +1–2 mm per size | +2–3 mm | +3–4 mm |
Why the differences
Faces read cuter when features grow slightly faster than the body. Limbs look correct when thickness increases with length so they do not appear spindly on large sizes.
Keep allowances constant
Do not scale seam allowances. Keep the 8 mm and 10 mm values regardless of toy size so sewability and strength remain predictable.
Scale safety hardware carefully
Eye stems and washers must suit fabric thickness. Larger toys often need larger washers for pull strength rather than only bigger eye domes.
11) Estimate stuffing and balance while you grade
Two fast ways to predict stuffing needs
Ellipsoid approximation
If the torso is close to an oval, estimate volume with
Volume ≈ 4 ÷ 3 × π × a × b × c
where a, b, c are half-lengths of height, width, depth in centimeters. Fiberfill typically weighs between 0.7 and 1.0 grams per cubic centimeter when packed firmly for toys. Multiply the volume by your chosen packing density.
Water displacement
Seal a first sample in a plastic bag, submerge in a container, and measure displaced water. Convert milliliters to cubic centimeters one to one. Note the fill grams that felt correct, then compute grams per cubic centimeter for this style. Use that ratio to predict for larger sizes.
12) Design facial features so they land exactly where you want
Faces drive purchase decisions. A beautiful body with the eyes two millimeters off still looks wrong.
- Put the face on a dedicated face panel or an area of the head with an interfacing layer to resist stretching during embroidery or appliqué.
- Save the eye and nose drill marks as a separate PDF layer. When you scale, print this layer at the same time as the main pattern so locations remain exact.
- For infant toys use embroidery. For older children, safety eyes must pass a pull test. Your drill hole diameter should match the eye stem to avoid fabric tearing, and the washer must lock past the barbs cleanly.
13) Choose the right level of panel complexity
Fewer pieces sew faster. More pieces shape better. The correct answer is the one that meets your brand and budget.
Two halves plus a gusset
Fastest to sew, softest look, ideal for nursery ranges.
Three to five head pieces
Gives control over crown height, cheek volume, and muzzle projection.
Many small panels
Allows realism and sharp contours for collector lines. Demands consistent seam allowances and expert operators.
Prototype both a simple and an advanced seam map early. Compare sewing minutes, expression control, and reject risk from mismatched curves. Pick deliberately rather than by habit.
14) Digital workflow for precision and factory readiness
Scan your paper prototype or redraw directly in vector. Use layers.
Suggested layer stack
- Cut line
- Seam line
- Notches and drill marks
- Grainline and nap arrow
- Labels and piece counts
- Size grade outlines
- Face placement template
Export cut lines as DXF for automated cutting if the factory uses a cutter. Export print-at-home tiled PDFs at 100 percent scale for retail craft patterns or for your own studio.
15) Paper drafting still wins for feel and speed
Not every designer loves a screen. Paper lets you sense curves with your hand.
- Use a French curve and a long flexible ruler to keep arcs smooth.
- Walk seams by standing pieces on edge and tracing along the mating edge to confirm lengths match through curves. Add or remove length where bounce-back tells you a mismatch exists.
- Trace fresh copies after every round of redlines so erasure marks do not hide notch accuracy.
16) Plan cutting layout for fabric yield
Marker making is how you save money at volume.
| Fabric width | Piece nesting tips |
|---|---|
| 150 cm knits | Alternate mirror images nose to tail so nap arrows align. Pair small parts such as ears in gaps between bigger panels. |
| 112 cm cottons | Rotate only if grain and print allow. Keep stripes or checks aligned where pieces meet. |
| Long pile faux fur | Leave air around pieces so you can cut the backing without chopping the pile. Plan for higher waste but lower finishing time. |
Do a quick yield test. Cut a mini marker for one size and count pieces per meter. Even a five percent improvement in yield impacts the final cost in production.
17) Write construction steps while you pattern
The person sewing deserves a map. Your own future self deserves one too.
- Embroider face on stabilized face panel
- Sew ear panels right sides together and turn
- Join head side panels to face, insert top gusset from notch to notch
- Close head back seam, leaving neck open
- Assemble body side seams, insert belly gusset
- Attach limbs to body with double stitch at notches, bar tack across the stress line
- Join head to body with a slow curve, clip allowances
- Insert inner pellet pouch if used, then stuff with fiberfill in layers
- Ladder stitch the turning vent closed
- Groom pile out of seams with a blunt needle
As you prototype, time each step. This informs cost and helps you set a realistic retail price.
18) Build a tech pack that removes ambiguity
A pattern becomes a product when information travels with it.
Essential tech pack pages
- Cover with style code, revision, size range, page list
- Bill of materials with supplier codes and color references
- Pattern list with piece names and counts
- Stitch and seam chart with thread type, needle size, and target SPI
- Embroidery or face artwork with placement from centerlines and drill marks
- Construction order with photos from the prototype
- QC points with tolerances for height, width, limb symmetry, and seam strength
- Packaging diagram, label placements, and care statements
Szoneier can build this from your sketches or refine what you have into factory language that operators and QC teams can follow without guesswork.
19) Safety by design rather than by correction
If the toy is safe on the page, it will be safe at the machine.
- Avoid seam junctions that create tiny holes at three-way intersections on short pile. Use small seam allowances there and reinforce with a second pass.
- Do not create finger traps. Any gap formed by accessories or costume pieces must be either closed or large enough not to trap a child’s finger.
- Place all knots and thread tails inside the body, not under an ear that can be chewed.
- If the toy is for under three years, remove all small parts and keep appliqués fully stitched on every edge.
20) Common pattern mistakes and how to prevent them
A short prevention list saves days of rework.
Side head seam longer than the face seam
Walk them. Match notches at the muzzle and cheek first, then the crown.
Ears stand at odd angles
Mark ear pitch on the head with drill marks and a dashed placement line.
Belly panel too flat
Add height at the center of the belly gusset. Even five millimeters can change sitting stability.
Limb twist after stuffing
Check that limb notches and body notches mirror exactly. Add a second locating notch near the limb tip.
Turning vent too small
Size the opening to accept a closed fist for medium plush. A bigger vent closes better with an invisible ladder stitch than a tiny slit that frays.
How do you cut, sew, and assemble cleanly?
Clean plush toy assembly depends on precision cutting, correct seam allowances, stable sewing techniques, and stepwise assembly order. Use sharp tools, control fabric nap and stretch, reinforce stress points, and maintain consistent stitch settings. Professional assembly includes QC checks after each stage — cutting, sewing, stuffing, finishing — to guarantee durability, safety, and a polished appearance.
Cutting: Accuracy Starts Before the First Stitch
Precise cutting controls seam matching, shape accuracy, and sewing speed.
| Cutting Step | DIY / Studio Method | OEM / Factory Method |
|---|---|---|
| Pattern Layout | On-grain, nap arrows aligned | Marker planning for yield, nap, grain |
| Cutting Tools | Fabric shears, rotary cutter, craft knife | CNC blade cutting, laser or die-cutting |
| Marking Points | Chalk, heat-erase pens, tailor’s tacks | Automated notching, drill hole placement |
| Nap Management | Cut backing only on faux fur (avoid pile cut) | Pre-sheared nap edges on long-pile fabrics |
Best Practices for Cutting
- Align nap direction consistently so fabric shading matches across panels.
- Mark notches and drill points for limb placement, darts, and safety eyes directly on the backing.
- Cut mirrored pairs accurately to prevent twisted limbs or ears later.
- For fabrics with stretch (minky, fleece), do not overhandle pieces; stretching edges changes seam fit.
QC Checkpoint: Cutting Stage
- Verify piece counts match tech pack.
- Confirm notch positions and drill marks visible after cutting.
- Randomly measure width/height vs. pattern tolerances (±3–5 mm typical).
Sewing: Settings, Seams, and Stress Management
Clean sewing ensures seams withstand stuffing, washing, and play.
Recommended Stitch Types for Plush Toys
| Stitch Type | Strength | Visibility | Application Area |
|---|---|---|---|
| Backstitch (hand) | High | Invisible inside | DIY joints, small runs |
| Ladder Stitch (hand) | Medium | Invisible finish | Closing turning vents after stuffing |
| Straight Stitch (machine) | High | Visible only inside | All primary seams |
| Zigzag / Stretch Stitch | Medium | Somewhat visible | Seams needing extra elasticity |
| Overlock / Serger | High | Clean edge | Mass production seam finishing |
Machine Settings (Starting Points)
- Stitch length: 2.2–2.6 mm for general seams; 1.8–2.0 mm on curves.
- Needle: Ballpoint 80/12 for knits (minky, fleece); Universal 80/12–90/14 for woven fabrics.
- Thread: Polyester core-spun Tex 27–30 for strength and abrasion resistance.
- Tension: Balanced for even stitches; slightly looser on thick pile fabrics.
Curve and Corner Management
- Tight curves → shorter stitch length + pivot every few stitches with the needle down.
- Outward curves → trim seam allowances to 3–4 mm before turning.
- Inward curves → notch triangles so the seam spreads when turned right-side out.
Tools for Precision:
- Walking foot for minky/fleece to prevent layer creeping.
- Stiletto or awl for guiding fabric under the presser foot at corners.
Reinforcing Stress Points
- Bar tack (dense zigzag) limb roots, tail bases, and ear tips.
- Double-stitch seams on neck joins and pellet pouches.
- Lockstitch seam ends to prevent unraveling after turning.
Common Sewing Errors & Fixes
| Problem | Cause | Fix |
|---|---|---|
| Wavy seams on minky | Too much presser foot pressure | Reduce pressure, use walking foot |
| Popped seams after stuffing | Short seam allowance, loose stitch | Widen seam allowance, tighten stitch |
| Fabric slipping | No notch alignment, wrong feed | Add notches, adjust differential feed |
| Twisted limbs after assembly | Incorrect grainline on cut pieces | Verify grain direction before sewing |
Assembly Order: Structured for Efficiency and Accuracy
A clear assembly sequence minimizes rework and maximizes durability.
Standard Plush Toy Assembly Workflow
- Face preparation
- Embroider eyes, nose, mouth on flat panels before 3D sewing.
- Apply fusible interfacing behind face areas to prevent stretching.
- Small Part Pre-assembly
- Sew ears, tails, horns right sides together, turn right side out.
- Topstitch edges if design calls for firmness.
- Head & Body Assembly
- Join head panels with gusset; stuff lightly to test symmetry before final closing.
- Sew body side seams, insert belly gusset if design requires sitting balance.
- Limb Attachment
- Attach limbs to body panels before side seams close (for inside seam joins).
- Reinforce attachment points with double stitching/bar tacks.
- Head-to-Body Join
- Match notches, sew slowly around the neck seam to avoid puckers.
- Turning & Stuffing Access
- Leave a strategically placed turning vent on the back or side seam.
- Stuffing & Weighting
- Layer stuffing to avoid lumps; position any pellet pouches low in torso/hips.
- Final Closure
- Close turning vent with ladder stitch or invisible machine stitch.
- Seam Grooming & Shaping
- Use a blunt needle or seam rake to pull pile out of seam lines.
Stuffing Techniques for Professional Finish
Stuffing affects shape, huggability, and durability.
| Stuffing Method | Outcome | Notes |
|---|---|---|
| Layered Packing | Smooth, consistent density | Start at extremities, fill core last |
| Pellet + Fiberfill Combo | Weighted base, soft upper body | Use sealed inner pouches for pellets |
| Foam Scrap Blends | Squishy, memory-foam effect | Best for pillows, not infant toys |
| Mixed Density Filling | Firm limbs, soft torso feel | Plan zones in pattern for firmness |
Tip:
Massage seams outward as you fill to keep curves natural and prevent overstuffing bulges.
Quality Control at Each Stage
Professional plush manufacturing adds QC gates between cutting, sewing, and stuffing.
| QC Stage | Inspection Focus | Tolerance / Target |
|---|---|---|
| Cutting | Piece count, grainline, notch accuracy | ±3–5 mm size tolerance |
| Sewing | Seam strength, stitch density, seam symmetry | 6–8 SPI (stitches per inch) |
| Assembly Order | Correct limb/head alignment, notch matching | ±3 mm alignment tolerance |
| Stuffing | Even density, pellet pouch sealing | No lumps, secure pouches |
| Final Closure | Ladder stitch tightness, seam grooming | No visible gaps or frayed edges |
Finishing Touches After Assembly
- Grooming Seams: Use a blunt needle to tease fur pile out of seam lines.
- Steam Shaping: Light steam through a pressing cloth smooths wrinkles.
- Topstitching (Optional): Adds decorative lines, strengthens openings (e.g., clothing seams on plush dolls).
Which safety and compliance rules apply?
Plush toys must meet global safety regulations like CPSIA (US), ASTM F963, EN71 (EU), and ISO 8124 (Australia/Asia). Testing covers small parts, seam strength, flammability, chemical safety, and labeling. Compliance requires third-party lab testing, tracking labels, and documented quality control systems to ensure toys are safe for children and meet regional import requirements.
Why Compliance Matters in Plush Toy Manufacturing
Plush toys fall under strict children’s product regulations because:
- Children may chew, pull, or sleep with toys → risks include choking, suffocation, toxicity, and flammability.
- Regulations protect brands from legal liability, recalls, and import rejections.
- Certifications increase retail acceptance and consumer trust.
For brands selling internationally, different regions require different standards, labeling, and documentation — failing even one can stop shipments at customs.
Global Safety Standards for Plush Toys
| Region | Standard / Regulation | Scope and Key Requirements |
|---|---|---|
| USA | CPSIA (Consumer Product Safety Improvement Act) | Lead & phthalates limits, tracking labels, age grading |
| ASTM F963 | Mechanical hazards, flammability, labeling | |
| European Union | EN71-1,2,3 | Mechanical/physical, flammability, chemical safety |
| UK | UKCA Marking (Post-Brexit) | Same as EN71 but requires UK-specific documentation |
| Canada | CCPSA & Toys Regulations | Toxicological, mechanical, flammability tests |
| Australia/NZ | AS/NZS ISO 8124 | Based on ISO & EN71 standards |
| Japan | ST 2016 | Chemical, mechanical safety, labeling |
| China | GB 6675 | Mechanical, flammability, migration of elements |
| Gulf States | GCC Standardization Org (GSO) | Mechanical, labeling, chemical migration |
Key Import Fact:
- US needs CPC Certificate + ASTM F963 + CPSIA tracking label.
- EU needs CE Mark + EN71-1,2,3 test reports + Technical File.
- UK needs UKCA mark (similar to CE but separate post-Brexit).
Testing Categories for Plush Toys
A. Mechanical and Physical Tests (EN71-1 / ASTM F963)
Ensures toys can’t break into small choking hazards or injure children.
| Test Type | Method | Requirement |
|---|---|---|
| Small Parts Test | Choke Tube: Parts must not fit in test cylinder | For under 3 yrs toys, no loose parts |
| Tension / Torque | Pull eyes/noses with 90N force, twist 4.5Nm | Parts must not detach |
| Seam Strength | 70N pull test on seams | Seams must not open |
| Sharp Edges/Points | After abuse tests, no sharp edges allowed | Visual & tactile check |
| Drop Test | 4x from 93 cm height | No dangerous breakage |
B. Flammability Tests (EN71-2 / ASTM F963)
Ensures fabric does not ignite too quickly.
- Plush fabric pile must have flame spread rate < 30 mm/s.
- Fabrics like minky, fleece, cotton typically pass if untreated.
- Avoid highly flammable finishes (e.g., decorative sprays).
C. Chemical and Heavy Metals Tests (EN71-3 / CPSIA)
| Substance | Limit (mg/kg) | Regions Enforcing |
|---|---|---|
| Lead | < 90 ppm | CPSIA (US), EN71-3 (EU) |
| Cadmium | < 75 ppm | EU REACH |
| Phthalates (DEHP, DBP) | < 0.1% | CPSIA, EU REACH |
| Azo Dyes | Banned | EU Textiles Regulation |
| Formaldehyde | < 20–75 ppm | Japan, EU |
Age Grading and Labeling Rules
Age Grading Categories (ASTM F963 / EN71 Guidance)
Under 3 years:
- No small parts, removable eyes, or long cords (>30 cm).
- Embroidered or printed faces recommended.
3+ years:
- Safety eyes allowed with locking washers & pull tests.
- Accessories must pass tension & torque tests.
Labeling Requirements by Market
| Market | Required Labels |
|---|---|
| USA | Tracking label: manufacturer, date, batch |
| EU/UK | CE or UKCA Mark + importer info |
| Australia | Age grade, care instructions |
| Canada | Bilingual labels (English/French) |
| Japan | ST Mark + importer contact |
Documentation and Certificates Required
| Document | Purpose | Region |
|---|---|---|
| CPC Certificate | US import compliance under CPSIA | USA |
| Declaration of Conformity | CE marking for EU toys | EU |
| Technical File | Retains test reports, labeling info | EU / UK |
| Test Reports | From accredited labs (SGS, Intertek) | All regions |
| Material Safety Data Sheets | Fabric/ink/paint compliance | EU, USA |
How do you add features and finish professionally?
Professional plush toy finishing involves secure facial detailing, premium trims, durable embroidery, safe accessory attachment, labeling, packaging, and quality control. Techniques like machine embroidery, heat-transfer prints, airbrushing, and woven labels enhance branding and appearance, while CPSIA/EN71 compliance ensures safety. Each step balances aesthetics, durability, and production efficiency for retail-ready results.
Facial Features: Expression, Safety, and Accuracy
Facial features drive emotional appeal — but safety standards drive design decisions.
| Method | Pros | Cons / Limits | Recommended Age |
|---|---|---|---|
| Embroidery | Soft, baby-safe, machine reproducible | Higher stitch count for clarity | All ages (esp. <3 yrs) |
| Heat Transfer Print | Vibrant colors, gradients | May fade after 50+ washes | 3+ yrs, decorative use |
| Appliqué Fabric | Textured, layered effect | Edges must be fully stitched | 3+ yrs |
| Plastic Safety Eyes | Shiny, 3D realistic look | Must pass pull/torque tests | 3+ yrs only |
Best Practices for Faces:
- Reinforce back panel with fusible interfacing before embroidery or eye insertion.
- Position features using drill marks from the pattern layer for symmetry.
- Apply torque (4.5 Nm) and tension (90 N) pull tests on safety eyes/noses to comply with ASTM F963/EN71-1.
QC Checkpoints – Facial Features:
- Check stitch density (min 0.3 mm between satin stitches).
- Inspect for fraying edges on appliqué pieces.
- Confirm safety eye washers lock beyond stem barbs.
Decorative Stitching and Branding Elements
Embroidery Details
- Logos, names, or decorative motifs can be digitized for consistency.
- Use polyester embroidery thread for colorfastness and tensile strength.
- Place under water-soluble topping film on high-pile fabrics to prevent stitches sinking.
Appliqué Layers
- Contrast fabrics for ears, bellies, or clothing panels.
- Secure with tight zigzag satin stitches along all edges to prevent peeling.
Topstitching for Definition
- Adds strength and aesthetic lines on ears, paws, or costume edges.
- Recommended stitch length: 3.0–3.5 mm for visible decorative seams.
Clothing, Accessories, and Costumes
Accessories increase perceived value but must meet age grading rules.
| Accessory Type | Finishing Method | Safety Consideration |
|---|---|---|
| Removable Clothing | Sewn Velcro, elastic waist | No small buttons for under-3s |
| Scarves, Hats | Bar-tacked or stitched ends | Cord length < 30 cm for under-3s |
| Backpacks / Props | Sewn-on or lock-stitched | Must pass torque/pull tests |
| Shoes / Paws Detailing | Embroidery or fabric layers | Avoid glued-on small pieces |
Tip: For retail sets, keep accessories machine-washable and attached for infant toys to avoid detachable choking hazards.
Surface Decoration: Printing and Airbrushing
Modern plush toys often feature graphics, gradients, or shading for realism or style.
| Method | Pros | Cons / Precautions | Typical Use Cases |
|---|---|---|---|
| Heat Transfer Printing | Vibrant, precise, fast | Limited stretch fabrics only | Logos, character clothing |
| Sublimation Printing | Permanent, no hand feel | Polyester-only fabrics | All-over patterns |
| Airbrushing / Painting | Soft gradients, highlights | Sealants needed, age-grade 3+ | Collector plush, costumes |
Safety Tips:
- Use water-based, EN71-3 compliant inks for all prints.
- Airbrushed areas must pass rub tests after drying (≥ 40 cycles with wet/dry cloth).
Labels, Hangtags, and Packaging
Labels are both legal requirements and brand touchpoints.
Label Types
- Woven Brand Labels: Sew into side seam or back.
- Tracking Labels (CPSIA): Include batch, date, factory ID.
- Care Labels: Washing instructions, fiber content.
Hangtags:
- Print UPC barcodes, age grading, CE/UKCA marks, and brand story.
- Use FSC-certified cardstock for eco-friendly packaging.
Packaging Options:
| Type | Use Case | Eco Option Available |
|---|---|---|
| Polybags | Standard retail, export shipping | Recycled LDPE, warning label |
| Kraft Boxes | Gift sets, premium toys | FSC-certified, soy inks |
| Paper Bands / Sleeves | Minimalist eco branding | Recyclable paperboard |
Final Assembly and Grooming
Once features and accessories are added:
- Seam Grooming: Use a blunt needle or grooming brush to pull fur pile out of seams.
- Steam Blocking: Shape plush toys using low-heat steam through a pressing cloth to smooth wrinkles.
- Lint Removal: Adhesive rollers remove loose threads or fur.
QC Checkpoints – Final Stage:
- No exposed seam allowances inside-out.
- Even stuffing density across limbs and torso.
- Symmetrical facial features ±2 mm tolerance.
- Correct label placement per tech pack.
Quality Control & Compliance Testing for Finished Plush
| Test Type | Method / Standard | Requirement / Limit |
|---|---|---|
| Torque & Pull Test | EN71-1 / ASTM F963 | Eyes/noses withstand 90 N pull |
| Seam Strength Test | EN71-1 / ISO 8124 | 70 N minimum, no seam opening |
| Small Parts Cylinder Test | ASTM F963 / EN71-1 | No detachable parts for <3 yrs toys |
| Wash Durability | ISO 6330 (5 cycles) | No fraying, colorfastness maintained |
| Chemical Safety | EN71-3 / CPSIA / REACH | Lead <90 ppm, phthalates <0.1% |
Conclusion: Partner with Szoneier for Custom Plush Toys
Bringing a plush toy idea to life — from initial sketches to a safe, market-ready product — requires far more than just fabric and stuffing. It takes precise design work, high-quality materials, rigorous safety compliance, and expert finishing techniques to meet today’s global standards and consumer expectations. For individual makers, this process can be complex and time-consuming. For brands aiming to launch or expand plush toy lines, the challenges multiply: meeting CPSIA, EN71, and ISO standards, ensuring consistent quality at scale, and integrating eco-friendly options that modern consumers demand.
Contact Szoneier today to turn your sketches into safe, huggable, and market-ready plush toys for any audience.
manufacturer Categories
- Custom Tote Bags Manufacturer
- custom backpacks Manufacturer
- custom travel bags& Duffle bags manufacturer
- custom makeup bags & toiletry bags manufacturer
- custom cooler bags manufacturer
- custom drawstring bags manufacturer
- custom makeup bags & toiletry bags manufacturer
- custom golf bags manufacturer
- custom fireproof bags manufacturer
- custom dry bags manufacturer
- custom ski bags manufacturer
- custom gym & sports bags manufacturer
- custom laptop bags manufacturer
- custom tactical bags manufacturer
- custom beach bags manufacturer
- custom medical bags manufacturer
- custom camera bags manufacturer
- custom wetsuits manufacturer
- custom leather goods manufacturer
- more personalized products
Can't find the answers?
No worries, please contact us and we will answer all the questions you have during the whole process of bag customization.
Make A Sample First?
If you have your own artwork, logo design files, or just an idea,please provide details about your project requirements, including preferred fabric, color, and customization options,we’re excited to assist you in bringing your bespoke bag designs to life through our sample production process.