 Skip to content
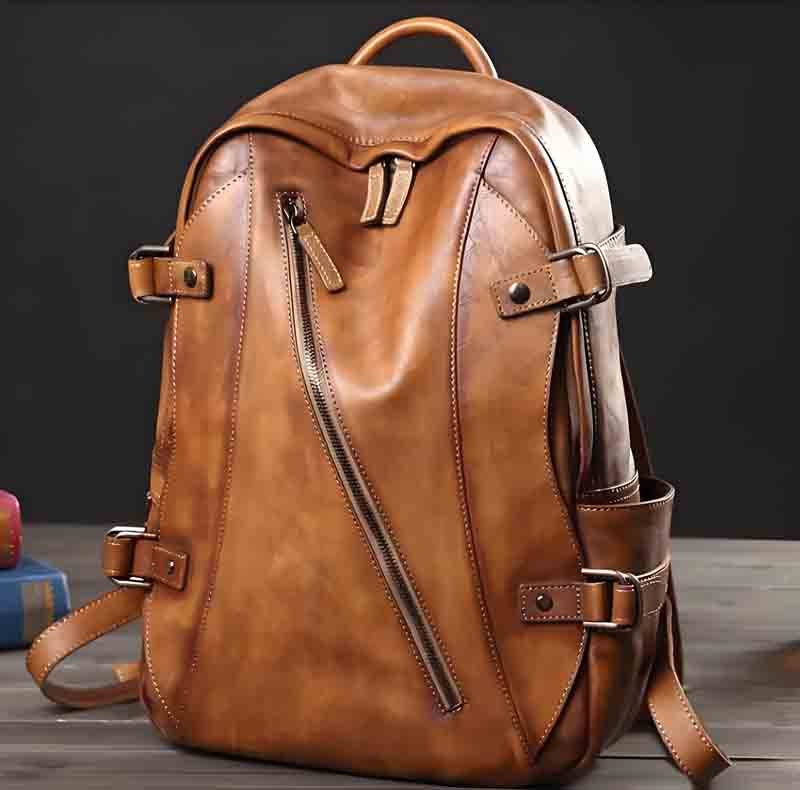
Few accessories capture both style and substance like a leather backpack. It’s not just a fashion statement; it’s a functional piece of craftsmanship combining structure, material science, and design intelligence. Whether it’s a sleek urban commuter bag or a vintage travel backpack, creating one involves a precise series of steps that merge artistry and engineering.
At its core, making a leather backpack involves selecting premium leather, cutting panels from accurate patterns, assembling with precision stitching, and applying protective finishes that enhance durability and aesthetics. Each step requires skill and patience—one wrong measurement or weak seam can compromise the entire product.
A leather backpack is made through a step-by-step process that includes selecting suitable leather, cutting it into precise panels, stitching and assembling with durable threads and hardware, lining the interior, and finishing with protective coatings. This craftsmanship ensures the backpack is strong, stylish, and long-lasting.
The art of bag making has evolved—modern workshops blend traditional hand tools with industrial precision. To understand how a fine leather backpack comes to life, we’ll break down the entire process from raw material to final polish.
What Materials and Tools Are Needed for a Leather Backpack?
To make a leather backpack, you need durable full-grain or top-grain leather, strong nylon or polyester thread, high-quality zippers and buckles, and lining materials like cotton or microfiber. Essential tools include cutting knives, stitching machines, rivet setters, and edge finishers. Choosing the right combination of materials and tools ensures your backpack achieves long-lasting strength, structure, and aesthetic appeal, whether it’s handcrafted or factory-produced.
The Foundation: Choosing the Right Leather
Leather selection determines texture, weight, cost, and durability—the backbone of backpack performance. Different leathers behave differently when cut, folded, or stitched, so choosing the right type depends on design purpose and target market.
Common Types of Leather for Backpacks
| Leather Type | Grain & Finish | Thickness (mm) | Main Advantages | Best Use Cases |
|---|---|---|---|---|
| Full-Grain Leather | Natural grain, uncorrected | 1.6–2.2 | Most durable, ages with patina | Luxury, heritage backpacks |
| Top-Grain Leather | Lightly sanded, coated | 1.2–1.8 | Smooth, uniform, stain-resistant | Fashion & travel backpacks |
| Crazy Horse / Waxed Leather | Oiled surface, vintage look | 1.6–2.0 | Water-resistant, rugged charm | Outdoor or retro designs |
| Split Leather | Inner hide layers | 1.0–1.4 | Soft, economical | Lightweight, casual styles |
| Nubuck or Suede | Sanded surface, velvety | 1.0–1.3 | Elegant feel, soft touch | Boutique or city backpacks |
- Full-grain is best for strength and longevity. It retains natural fibers that resist tearing and stretching.
- Top-grain offers visual uniformity for brand-oriented products.
- Crazy Horse leather, treated with waxes, develops a desirable rugged patina for lifestyle and travel bags.
Grain Direction and Cutting Efficiency
Professional bag makers always pay attention to grain direction when cutting patterns. The fibers near the backbone are denser, ideal for high-stress parts like straps or base panels, while belly sections are used for decorative or flexible zones. Optimizing grain direction ensures balanced tensile strength and reduces deformation under load.
Supporting Materials Beyond the Leather
A quality backpack requires multiple complementary materials to maintain structure, comfort, and durability.
a) Lining Fabrics
The lining protects the leather interior and adds aesthetic and functional value.
| Material | Features | Applications |
|---|---|---|
| Cotton Canvas (8–10 oz) | Breathable, natural, durable | Vintage or eco-friendly designs |
| Polyester Twill | Lightweight, wrinkle-resistant | Mass-market and urban backpacks |
| Microfiber Suede | Soft, luxurious texture | Premium interiors or laptop sleeves |
| Nylon Oxford (210D–420D) | Strong and moisture-resistant | Travel or sport backpacks |
Lining weight and thickness are matched to the outer leather’s stiffness: softer leathers need firmer linings to prevent collapse.
b) Reinforcement Materials
To maintain shape, specific panels (bottom, back, straps) require reinforcements such as:
- EVA foam (2–4 mm) for padding shoulder straps or back panels.
- Non-woven stiffeners like Texon or Salpa for structure.
- Cardboard or fiberboard sheets in bottom panels for load-bearing.
High-end factories also use thermoform reinforcements that mold precisely to curved back shapes — balancing comfort and structure.
c) Adhesives and Bonding Agents
Adhesives help join layers before stitching.
- Water-based PU glue is eco-friendlier, odorless, and flexible.
- Solvent-based adhesive (neoprene type) provides strong bonding for thicker hides. Used sparingly, these adhesives prevent shifting during sewing and create neat edge folds.
Hardware and Fittings — Function Meets Design
Leather backpacks rely heavily on hardware integrity for both function and aesthetics. Poor-quality metal parts can fail long before the leather does, so sourcing matters greatly.
Essential Hardware Components
| Component | Material Options | Recommended Standard | Function |
|---|---|---|---|
| Zippers | YKK, Riri, SBS (metal or nylon coil) | Size #5–#8 | Main closure or pockets |
| Buckle & Rings | Brass, zinc alloy, stainless steel | Nickel- or matte-coated | Strap adjustment |
| Rivets / Eyelets | Brass or steel plated | Anti-corrosion finish | Reinforce joints |
| D-rings & Dog hooks | Zinc die-cast | Polished finish | Attach straps and accessories |
| Magnetic snaps | Steel or brass core | Hidden type for aesthetics | Quick flap closures |
- YKK Excella zippers are widely used in premium brands for smooth pull and long life (tested for over 10,000 cycles).
- Solid brass hardware ages gracefully and matches the premium aesthetic of natural leather.
- For outdoor backpacks, coated or anodized finishes prevent rust and tarnishing.
Thread Selection
Threads may seem minor, but they play a critical structural role.
- Bonded nylon or polyester thread (Tex 70–135) is preferred for high strength and elasticity.
- Waxed polyester thread for hand-stitching provides water resistance and grip.
- Stitch length: 3–3.5 mm for heavy seams, 4 mm for decorative topstitching.
Matching thread color to leather tone creates a professional finish, while contrasting threads highlight craftsmanship in artisan lines.
The Complete Toolkit for Leather Backpack Production
Leatherwork combines manual skill and precision machinery. Whether you’re a small atelier or a large factory, tools define the outcome’s accuracy, speed, and quality.
a) Pattern and Cutting Tools
- Steel rule and compass — for accurate layout and symmetry.
- Cutting knives and rotary cutters — sharp blades ensure clean edges without fraying.
- Clicking press (die cutting) — industrial machines for cutting multiple layers at once.
- Skiving machine — thins leather edges for folds and seams.
- Punch tools — round, oval, or slot punches for rivets, handle holes, and straps.
A precise cut determines how neatly panels align later; even a 1 mm deviation can ruin fit at assembly.
b) Stitching and Assembly Tools
| Tool / Machine | Function |
|---|---|
| Flatbed sewing machine (heavy-duty) | Stitching main panels and flat sections |
| Post-bed sewing machine | 3D contour sewing around edges and straps |
| Cylinder-bed sewing machine | Small-area stitching and tubular sections |
| Saddle-stitching awl set | Hand-sewing precision for luxury goods |
| Edge guide and binder attachment | Keeps stitch lines straight |
Industrial workshops often use JUKI, Adler, or Pfaff heavy-duty machines capable of sewing leather up to 5–6 mm thick.
Artisans may opt for hand saddle stitching, using two needles simultaneously for superior durability — though production speed is lower.
c) Edge and Finishing Tools
A leather backpack’s refinement is visible at its edges. Tools for professional finishing include:
- Edge beveler: rounds off sharp edges.
- Burnishing stick or wheel: polishes edges using friction and wax.
- Creasing iron: creates heat lines near edges for a luxury finish.
- Edge-paint roller or pen: applies pigment evenly.
- Buffing cloth or brush: adds final shine.
Factories integrate automatic edge painters and hot edge-coating systems, which ensure consistent results across hundreds of units.
d) Measurement and Quality Control Tools
Precision is essential during pattern cutting and final inspection:
- Digital calipers for measuring leather thickness (±0.05 mm tolerance).
- Weighing scale for material yield calculation.
- Tension gauge for thread and stitch tests.
- Color light box for comparing dye batches under standard light conditions (D65, TL84).
These ensure batch consistency—a key factor in maintaining professional-grade production standards.
Optional Add-Ons: Design, Branding, and Technology
Many leather backpack brands differentiate themselves through small details that add value and identity.
Branding Materials
- Metal or embossed logos (zinc alloy, stainless steel, or debossed leather tags).
- Woven or printed fabric labels for lining.
- Embossing stamps with brass molds or laser engraving for heat-pressed logos.
Modern Additions
- RFID-blocking fabric integrated into lining for anti-theft protection.
- Laptop sleeves with padded foam inserts (EVA or neoprene).
- Smart tracking chip pockets for connected travel gear.
Even these optional materials require precision—each new element affects stitching order and overall structure.
The Material-Tool Relationship: Why Compatibility Matters
Every material and tool interacts physically. High-quality leather needs compatible adhesives, threads, and machine settings to prevent cracking or misalignment. For example:
- Thick full-grain leather requires heavier thread tension and larger needles (size 22–24).
- Softer top-grain leather benefits from double-feed sewing to avoid stretching.
- Fine edge finishing relies on low-speed burnishing to prevent scorching.
Professional manufacturers carefully match material softness, stitch density, and reinforcement thickness, optimizing for comfort, aesthetics, and durability.
Environmental and Quality Considerations
Modern leather manufacturing is becoming increasingly eco-conscious. Sourcing materials responsibly ensures both compliance and market appeal.
- Choose LWG (Leather Working Group)–certified leathers for traceable, low-impact tanning.
- Use water-based adhesives and coatings to reduce VOC emissions.
- Opt for nickel-free hardware for skin-friendly and RoHS-compliant results.
For global brands, adhering to REACH and CPSIA standards is mandatory to meet European and North American import regulations.
How Is the Leather Cut and Prepared?
Leather cutting and preparation involve creating accurate patterns, tracing them on the hide while respecting grain direction, and cutting panels using hand tools or CNC systems. Edges are skived to reduce thickness at folds, holes are punched for stitching and hardware, and markings guide assembly. This stage ensures each backpack component fits perfectly, maintains structural balance, and minimizes waste — laying the foundation for both visual precision and long-term durability.
Pattern Development: Translating Design into Templates
Before any cutting begins, the designer or technician creates patterns that represent every part of the backpack in true scale. These are essentially the blueprints of the product.
Pattern Creation Process
- Concept sketch → translated into technical drawings (front, side, and cross-sections).
- Material analysis → thickness and flexibility determine seam allowances and curves.
- 2D pattern generation → done manually on card stock or kraft paper, or digitally in CAD systems like Gemini CAD, Optitex, or AutoNest.
- Mockup creation using PU, paper, or canvas to test assembly and proportion.
Each part — from front panels and pockets to flaps, straps, handles, zippers, and base — has its own individual template. For industrial runs, these patterns are digitized to guide CNC cutting machines.
Pattern Considerations
- Seam allowance: 3–5 mm for stitching zones.
- Turn allowance: 8–10 mm for folded edges.
- Hardware placement markers: to align buckles, rivets, or D-rings.
Professional pattern makers also label grain direction arrows on every piece to maintain fiber alignment and reduce stretching during use.
Leather Inspection and Marking Before Cutting
No two hides are identical. Even full-grain leather varies across the surface — the backbone area is dense and strong, while belly regions are looser and stretch more easily.
Before cutting, every hide undergoes visual and tactile inspection under uniform lighting.
Defect Identification
- Natural marks: scars, wrinkles, insect bites.
- Processing flaws: uneven dye, branding, loose grain.
- Thickness variations: caused by inconsistent shaving.
Marking Steps
- Grade the hide (A–C) based on defect level.
- Outline large panels on denser zones (backbone to shoulder).
- Smaller parts (pockets, straps, loops) are arranged on belly or flank sections.
Factories often use UV-ink marking pens that disappear during finishing, ensuring no permanent marks. This inspection stage maximizes leather yield — top factories achieve 85–90% hide utilization, whereas manual cutting typically yields 70–75%.
Manual vs Machine Cutting Techniques
Cutting methods vary depending on production scale and precision requirements.
a) Manual Cutting (Artisan or Small-Batch Production)
- Tools used: head knives, rotary cutters, utility blades, and clicking hammers.
- Each pattern is placed over the leather and traced individually.
- Artisans follow grain direction manually for strength consistency.
- Ideal for custom or prototype work where hand control ensures adaptability.
Advantages:
- High flexibility for design adjustments.
- Preserves traditional craftsmanship appeal.
Limitations:
- Time-intensive (1–3 hours per bag).
- Human error may reduce precision on complex shapes.
b) Die Cutting (Industrial Mass Production)
- Uses metal dies (clicking dies) shaped according to each pattern.
- Operated with hydraulic or pneumatic presses, cutting multiple layers at once.
- Produces extremely uniform pieces across thousands of units.
Advantages:
- High repeatability and productivity.
- Lower labor dependency.
Limitations:
- Costly die setup (best for bulk orders).
- Less flexible for custom modifications.
c) CNC or Laser Cutting (Modern Automated Systems)
- Patterns are imported from CAD files into CNC plotters or laser cutting machines.
- A digital camera scans the hide to detect defects and automatically optimizes the nesting layout.
- Cuts within ±0.2 mm accuracy, preserving grain alignment.
Advantages:
- 15–20% higher leather yield than manual cutting.
- Traceability: every piece can be logged digitally.
- Consistency across different batches or suppliers.
Limitations:
- Requires high capital investment.
- Not ideal for extremely thick or oily leathers (laser scorching risk).
Skiving: Adjusting Leather Thickness
Once panels are cut, skiving (thinning) prepares edges for folding, stitching, and bonding. Without it, seams can become bulky and uneven.
Skiving Techniques
- Manual skiving knife: used by artisans for precision on corners or curves.
- Band skiving machine: thins large edges uniformly for industrial production.
Target Thickness:
- Body seams: 1.0–1.2 mm.
- Folding edges: 0.6–0.8 mm.
- Zipper flaps or handles: 0.8–1.0 mm.
Skiving ensures smooth seams and prevents cracking where the leather bends frequently (like strap bases or zipper folds).
Tip: vegetable-tanned leathers require slower skiving speeds due to their firmer fiber density compared to chrome-tanned hides.
Beveling and Edge Preparation
After skiving, edges are beveled to round off sharp corners. This improves grip during stitching and enhances aesthetics.
- Beveling tools remove 0.5–1.0 mm from edge corners.
- Creasing irons imprint a fine decorative line ~2 mm from the edge, common in luxury backpacks.
- Some factories use heated edge smoothers that also prepare the surface for painting or burnishing.
Punching and Perforation for Stitching and Hardware
Before assembly, the cut panels are prepared for stitching holes, rivets, and hardware placement.
Common Punching Operations
| Type of Punch | Purpose | Tool Used |
|---|---|---|
| Round hole | For rivets, D-rings, buckles | Rotary or press punch |
| Slot hole | For strap threading | Oval punch die |
| Stitching hole | For hand sewing | Pricking iron or chisel |
| Perforation | Decorative pattern or breathability | Perforation roller |
Industrial setups use automatic punching machines linked to CNC data, ensuring every hole aligns perfectly with stitching paths.
Hole Spacing Standards
- Stitch holes: 3.0–3.5 mm apart.
- Rivet holes: diameter 2.5–3.0 mm for #8 rivets.
- Strap slots: 10–15 mm wide, depending on strap thickness.
Inaccurate punching can cause uneven seams, misaligned buckles, or premature tearing — hence, technicians double-check hole placement with templates or laser guides.
Marking and Labeling for Assembly
Every piece must be clearly identified before stitching begins. Marking ensures proper orientation and sequence during assembly, especially when dozens of parts are involved.
Common Marking Methods
- Embossed codes: pressed lightly using metal dies.
- UV or chalk pens: temporary and removable.
- Barcode or QR labels: used in smart manufacturing for digital tracking.
Information Typically Marked
- Part ID (e.g., “front pocket inner,” “strap upper”).
- Stitch direction arrows.
- Grain direction.
- Quantity count and operator initials.
Some advanced plants integrate AI vision systems to verify pattern orientation before sending pieces to the sewing line — eliminating mix-ups between left/right or inner/outer panels.
Hide Nesting and Waste Management
Leather is costly — every inch matters. Efficient nesting (arranging patterns to minimize waste) is crucial for profitability and sustainability.
| Method | System Used | Efficiency |
|---|---|---|
| Manual Nesting | Done visually by skilled cutter | 70–75% yield |
| CAD Auto Nesting | Gemini, Lectra, or Optitex software | 85–90% yield |
| AI Vision Nesting | Automated cameras and algorithms | Up to 92% yield |
Offcuts are not wasted — they’re often repurposed for:
- Small accessories (keychains, name tags).
- Reinforcement patches or lining parts.
- Recycled leather composites for eco-lines.
By optimizing leather yield, manufacturers reduce not only material costs but also environmental footprint.
Pre-Assembly Quality Check
Before sewing begins, each cut panel is reviewed against a pattern checklist. Inspection criteria include:
- Accurate dimensioning and shape tolerance.
- Clean cut edges with no nicks.
- Correct skiving and bevel depth.
- Proper marking visibility and orientation.
For high-end or export orders, quality teams record batch data, ensuring traceability for each cut piece — part of ISO9001 and LWG Gold compliance.
How Is the Backpack Assembled and Stitched?
Leather backpack assembly involves sequentially attaching panels, pockets, and zippers, sewing them with heavy-duty machines, reinforcing load points, and adding linings and straps. Stitching must follow specific patterns—such as lockstitch or saddle stitch—to ensure strength, symmetry, and durability. Each seam is reinforced, edges are bound or folded, and hardware is installed before final inspection.
The Importance of Structured Assembly
Assembly is where engineering precision meets craftsmanship. Even perfectly cut panels must be aligned, shaped, and stitched in a defined sequence to create the backpack’s structural form. An average leather backpack contains 25–40 sewn components and up to 10 different seam types.
This stage defines:
- Dimensional accuracy (how well panels fit together)
- Structural integrity (how weight is distributed)
- Visual aesthetics (clean stitch lines, edge alignment)
Any error during assembly—like uneven tension or misaligned panels—can result in distorted shapes or weak stress points, which no finishing can later correct.
Assembly Sequence Guide
Every manufacturer develops its own standard operation procedure (SOP) based on design type, but a professional assembly flow typically follows this order:
| Stage | Operation | Purpose |
|---|---|---|
| 1 | Attach front and side pockets | Prepare visible compartments |
| 2 | Stitch zipper panels | Create main access structure |
| 3 | Assemble front, sides & bottom | Form main body shell |
| 4 | Insert lining and foam | Reinforce structure and comfort |
| 5 | Join back panel with straps | Add ergonomics and load support |
| 6 | Attach flap, handle & closures | Final shape and usability |
| 7 | Edge finishing & binding | Seal and polish seams |
Each step requires precise alignment and seam consistency, often guided by jigs, guides, and templates in factory settings.
Preparing for Stitching
Before any thread touches leather, temporary assembly is performed using adhesives, clips, or double-sided tape. This ensures that seams remain stable during machine stitching, especially on curves and multi-layer folds.
a) Edge Preparation
- Apply PU-based glue or water-based adhesive along seam allowances (5–10 mm).
- Let it tack dry for 30–60 seconds.
- Align panels and fix them using binder clips or masking tape—never pins, as they leave holes.
b) Marking Stitch Lines
- Stitch lines are pre-marked using creasing wheels or laser guides.
- Common seam allowance: 3–4 mm for visible seams, 5–6 mm for structural seams. Accurate marking ensures that all seams align perfectly during multi-panel assembly.
Stitching Methods and Machine Types
Leather is thick, dense, and non-stretchable, requiring specialized sewing machines capable of high torque and precise feed control.
a) Common Stitching Machines Used
| Machine Type | Use Case | Key Features |
|---|---|---|
| Flat-bed Heavy-Duty Machine | Flat panels & linings | Strong feed dogs; handles 2–4 mm leather |
| Cylinder-bed Machine | Tubular sections, sides | Ideal for small radii seams |
| Post-bed Machine | Corners, 3D shapes | Free-arm maneuverability |
| Walking-foot Machine | Uneven leather stacks | Dual feed prevents slippage |
| Twin-needle Machine | Parallel decorative seams | Consistent spacing and symmetry |
Manufacturers often use JUKI, Durkopp Adler, or Pfaff industrial machines, customized with leather needles (size #20–24) and bonded nylon thread (Tex 90–135).
b) Stitching Techniques
| Stitch Type | Description | Durability | Application |
|---|---|---|---|
| Lockstitch | Two threads interlock between layers | ★★★★☆ | Most seams, zippers |
| Saddle Stitch | Hand-stitched using two needles | ★★★★★ | High-end handmade bags |
| Edge Stitch | Decorative or reinforcing seam near edge | ★★★☆☆ | Aesthetic detailing |
| Topstitch | Visible seam for reinforcement | ★★★★☆ | Straps, pockets |
| Bartack Stitch | Dense zigzag for stress zones | ★★★★★ | Strap ends, handle bases |
Luxury brands still favor saddle stitching for aesthetic value and longevity—it doesn’t unravel if one thread breaks. Mass-production relies on lockstitch and bartack for efficiency and strength.
Reinforcement for Durability
Backpacks carry substantial weight; reinforcement determines whether they last 1 year or 10 years.
a) Stress Point Reinforcement
Critical areas—such as strap junctions, handle bases, and bottom corners—receive:
- Double-stitching or box-and-cross patterns (4 cm × 4 cm typical).
- Bartack reinforcement (dense 3–4 mm wide stitch blocks).
- Extra leather patches or rivets inside to spread tension.
b) Structural Inserts
Inside the base, fiberboard, Texon, or HDPE sheets are sewn or glued between leather and lining to prevent sagging. Straps often include nylon webbing cores to avoid stretching under weight.
c) Lining Attachment
Lining panels are sewn separately, then attached with edge binding or stitched into seam allowances. This keeps interior surfaces neat and prevents friction damage over time.
Stitch Tension, Speed, and Thread Control
Precise machine settings are essential to maintain balanced seams and prevent puckering or skipped stitches.
| Parameter | Typical Range / Setting | Purpose |
|---|---|---|
| Stitch Length | 3.0–3.5 mm | Balanced strength & aesthetics |
| Tension | 180–220 g | Prevent thread snapping |
| Sewing Speed | 1,200–1,800 spm (lockstitch) | Controlled feeding |
| Needle Type | LR-point (leather-cutting) | Creates slanted, decorative stitch look |
In luxury production, artisans manually adjust stitch length by leather thickness — shorter (2.5 mm) for edges, longer (3.5–4 mm) for visible topstitching. Thread color is also chosen to match brand identity — neutral brown for classic looks, contrast white or gold for sporty styles.
Attaching Zippers, Pockets, and Flaps
a) Zipper Installation
- Zippers are sewn to side panels or top flaps before body assembly.
- Backpacks typically use #8–#10 YKK Excella metal zippers for main compartments.
- Hidden zippers are installed between folded leather layers for a sleek profile.
Double stitching along the zipper tape prevents detachment even under repeated stress (tested for >10,000 open-close cycles).
b) Pocket Integration
Front and side pockets are constructed as sub-assemblies:
- Stitch zipper or flap onto pocket panel.
- Attach pocket panel to main body with 3–4 mm seam allowance.
- Reinforce corners using bartack or rivet.
c) Top Flap or Lid
For flap-style backpacks, magnets, buckles, or straps are pre-installed, then topstitched to the main body. Top flaps often include foam padding (2 mm EVA) to maintain contour and reduce wrinkling.
Strap and Handle Construction
Backpack straps endure the most strain. Professional assembly ensures both comfort and durability.
a) Layering
Each strap comprises:
- Outer leather layer (1.2–1.6 mm thick).
- Inner reinforcement (nylon webbing) for tensile strength.
- Foam padding (EVA 4–6 mm) for comfort.
- Lining (microfiber or mesh) to prevent slipping.
All layers are laminated with adhesive and stitched using box-X reinforcement at both ends. Testing: strap joints must withstand >40 kg tensile load without tearing.
b) Handle Attachment
Handles use folded leather tubes stitched around a rope or foam core. Reinforced via hidden rivets inside the fold for seamless appearance. In luxury production, handles are attached using saddle stitching for both strength and aesthetic refinement.
Assembling the Main Body
Once all panels, pockets, and straps are ready, the main body assembly begins.
Step-by-Step Process
- Join front, sides, and bottom panels using a cylinder-bed or post-bed machine.
- Press seams open using a rubber hammer or roller to flatten bulk.
- Add lining and reinforce the interior with structural layers.
- Insert back panel, ensuring strap attachment alignment.
- Close top seam or zipper line to form a complete body shell.
Each seam is inspected for stitch uniformity, alignment, and tension before moving to finishing.
Edge Binding, Piping, and Seam Finishing
Professional seam finishing distinguishes factory-grade quality from artisan craftsmanship.
a) Edge Binding
- Edges are wrapped with thin PU or leather tape and stitched.
- Prevents fraying and adds visual refinement.
- Common in lined bags and structured backpacks.
b) Piping (Corded Edges)
- Decorative piping is inserted between panels for visual definition and added rigidity.
- Made from 0.5–1.0 mm cord wrapped in matching leather or synthetic tape.
c) Edge Folding
- For unlined designs, edges are thinned and folded inward 5–7 mm, glued, and stitched.
- Creates a smooth, premium appearance — typical in minimalist or luxury backpacks.
Industrial Quality Control During Stitching
Quality assurance at this stage ensures all production meets both mechanical and visual standards.
a) In-Process Inspection
- Random samples checked every 10–15 units for stitch length, symmetry, and seam alignment.
- Inspectors verify thread tension consistency using digital tension meters.
- Defects such as skipped stitches, back-tacking errors, or uneven topstitching are corrected immediately.
b) Mechanical Testing (Sample Units)
| Test Type | Purpose | Typical Result Standard |
|---|---|---|
| Seam Slippage Test | Measures seam strength | >100 N before tear |
| Tensile Test (Strap Joint) | Measures load endurance | >40 kg load |
| Abrasion Test (Martindale) | Tests lining wear | ≥10,000 cycles |
| Cycle Fatigue Test | Strap movement durability | ≥5,000 flex cycles |
Consistent records from these tests demonstrate compliance with ISO 9001, REACH, and CPSIA standards for export-grade products.
Handmade vs Industrial Stitching — A Balanced Perspective
| Aspect | Handmade (Artisan) | Industrial (Factory) |
|---|---|---|
| Stitch Type | Saddle stitch | Lockstitch |
| Precision | Human-controlled | Mechanized precision |
| Speed | Slow (3–4 hrs/bag) | Fast (30–45 min/bag) |
| Cost | Higher | Scalable |
| Aesthetic Value | Unique, authentic | Consistent, repeatable |
| Durability | Very high | High (depends on reinforcement) |
Modern factories like Szoneier often combine both: automated lockstitch for structure and hand saddle stitch on visible edges, creating balance between efficiency and artisanal beauty.
Post-Stitching Steps: Cleaning and Inspection
Once stitching is complete, the backpack undergoes several final treatments before finishing:
- Thread trimming: Loose threads cut manually.
- Edge polishing: Removes burrs from seam areas.
- Visual inspection: Confirms stitch consistency and alignment.
- Pressing and forming: Bags are steamed or heat-pressed to restore final shape.
Bags failing seam alignment or stitch density checks are reworked immediately—professional manufacturers target a defect rate below 1.5% per batch.
Sustainability and Efficiency in Assembly
Modern production emphasizes both craftsmanship and environmental efficiency:
- Water-based adhesives replace solvent glues to reduce VOC emissions.
- Energy-efficient sewing machines (servo-motor types) lower electricity use by 20–30%.
- Digital SOP displays guide operators step-by-step, minimizing errors and training time.
How Is the Leather Finished and Protected?
Leather finishing and protection involve polishing, dye correction, edge sealing, and applying water- or oil-based coatings that improve durability and aesthetics. Finishing techniques such as burnishing, edge painting, waxing, and conditioning create a smooth surface, resist moisture, and prevent cracking. Factories often combine manual craftsmanship with machine processes—ensuring consistent color, feel, and protection that allow leather backpacks to maintain their structure and appearance for years.
Surface Finishing: Bringing Leather to Life
Once stitching and assembly are complete, the leather surface is prepared for final enhancement. This stage refines the bag’s overall appearance, corrects imperfections, and seals the surface for protection.
a) Surface Cleaning
- Compressed air removes dust and stitching residue.
- A soft cotton or microfiber cloth gently wipes away glue marks or excess wax.
- Any oil stains are lifted using ethanol-based leather cleaner or specialized degreasers.
Clean leather ensures finishing agents bond evenly and prevents uneven gloss or dull patches later.
b) Surface Polishing (Mechanical or Manual)
There are two main methods:
| Method | Process | Result |
|---|---|---|
| Manual polishing | Using soft cloths and neutral cream | Deep, natural sheen |
| Mechanical buffing | Rotary buffing with felt or wool wheels | Mirror-smooth finish |
Polishing enhances the depth of color and the natural grain pattern, especially in full-grain leather. Some luxury factories still use beeswax-based polish, applied by hand in circular motions for a traditional lustrous finish.
c) Color Correction and Finishing Coats
After assembly, the leather’s tone can vary slightly due to different hide lots or edge exposure. To unify the appearance:
- Aniline or semi-aniline dyes are applied as mist sprays.
- Pigment coatings correct inconsistencies in chrome-tanned leathers.
- Top coats (matte, satin, or gloss) seal the surface with a protective layer.
A typical factory applies 2–3 finishing layers, drying each with infrared or convection dryers for stability.
Edge Finishing: The Signature of Craftsmanship
Edges are one of the most visible and vulnerable parts of a leather backpack. Proper finishing here enhances both durability and luxury perception.
a) Edge Painting
The most common industrial technique for modern leather goods.
Process:
- Edge sanding — smooth uneven cuts using 400–800 grit sandpaper.
- Apply base coat (water-based polyurethane paint).
- Dry under heat lamp (60–80°C) for 5–10 min.
- Sand again, reapply color coat, and polish.
- Optional topcoat for gloss or matte finish.
High-end brands apply 3–5 layers for perfectly rounded, sealed edges. Factories use automatic edge-painting machines for uniform thickness (0.2–0.3 mm).
| Paint Type | Finish | Key Advantage |
|---|---|---|
| Water-based | Matte or semi-gloss | Eco-friendly, flexible |
| PU-based | Glossy | Strong abrasion resistance |
| Rubberized | Soft-touch | Shock absorption and modern feel |
b) Edge Burnishing (Traditional Method)
Used primarily for vegetable-tanned or vintage-style leathers.
Process:
- Rub edges with gum tragacanth or beeswax.
- Use a burnishing stick (wood or bone) at high friction to seal pores.
- Buff with canvas cloth for shine.
Burnishing compresses fibers, making edges smoother and darker — perfect for heritage or rustic designs. Unlike painting, burnished edges reveal the leather’s natural cross-section, preserving authenticity.
c) Edge Folding
Luxury leather backpacks often feature folded edges, where leather is thinned (skived) and wrapped inward. This eliminates exposed cross-sections entirely, giving a clean and elegant appearance — common in Hermès-style construction.
Advantages:
- Highest aesthetic refinement.
- Prevents edge cracking or peeling over time.
- Requires precise hand-skiving and adhesive application.
Folded edges are labor-intensive but ideal for premium collections.
Surface Protection Treatments
Once the backpack’s surface and edges are polished, protective coatings are applied to resist environmental damage such as moisture, sunlight, and abrasion.
a) Water and Stain Resistance
Leather is naturally porous, so it needs extra barriers for protection.
- Fluoropolymer coatings (C6-based) create invisible hydrophobic layers.
- Water-based nano coatings repel liquid without blocking breathability.
- Wax emulsions fill pores for a semi-matte, slightly darker finish.
Water repellency tests: After 24-hour exposure, properly finished leather should absorb less than 10% water by weight (ISO 5403 standard).
b) UV and Color Protection
UV rays can fade leather colors over time, especially lighter tones.
- UV-absorbing topcoats with benzotriazole compounds prevent discoloration.
- Pigmented finishes scatter light, reducing degradation.
- Semi-aniline leathers already have built-in protection due to light pigment layers.
In high-end production, tanners perform Xenon-arc light tests to simulate 100+ hours of sun exposure and confirm stability.
c) Oil and Abrasion Resistance
Frequent handling can transfer body oils, which darken unprotected leather over time.
- Silicone-based protectants add slickness and reduce fingerprints.
- Resin finishes improve abrasion resistance (tested via Martindale > 10,000 cycles).
- Wax topcoats combine natural luster with soft-touch protection.
Backpacks made for travel or outdoor use often feature hybrid coatings combining wax, PU, and water repellents.
Conditioning and Softening
To ensure long-term flexibility, finished backpacks are conditioned with oils or creams that restore natural moisture lost during processing.
Common Conditioning Agents
| Type | Composition | Effect on Leather |
|---|---|---|
| Lanolin oil | Animal-derived | Deep hydration, soft feel |
| Neatsfoot oil | Natural fat oil | Flexibility, darkens tone slightly |
| Beeswax cream | Natural wax + oil mix | Protective and shiny finish |
| Synthetic emollients | Silicone-based | Smooth, lightweight feel |
These agents are applied via soft cloth or spray and left to absorb for several hours. Factory conditioning lines use tumbling drums to distribute oils evenly across finished goods — improving softness without altering structure.
Pressing and Shaping
Once protective finishes are applied, backpacks undergo pressing or heat-setting to stabilize their shape.
- Hydraulic heat presses (60–70°C) flatten seams and enhance adhesion between layers.
- Air-shaping machines help form 3D body contours and remove wrinkles.
- Manual molding around wooden forms ensures each backpack maintains its silhouette during drying.
This step ensures that each product emerges with consistent shape retention and crisp construction lines — essential for retail presentation.
Hardware and Trim Finishing
Hardware must also receive finishing attention to ensure both aesthetics and corrosion resistance.
- Metal polishers remove fingerprints or micro-scratches from buckles and zippers.
- Protective anti-oxidation spray (clear acrylic) seals brass or zinc alloy hardware.
- Rivet and snap inspections ensure smooth function and alignment.
In luxury-grade production, hardware is often brushed or plated twice to ensure color uniformity (e.g., matte gold, gunmetal, antique brass).
Quality Control and Testing After Finishing
Before packaging, the finished leather backpacks undergo multiple checks to validate their surface consistency, protection quality, and visual perfection.
a) Visual Inspection
- Surface checked under D65 daylight lamps for uniform gloss and color.
- Inspectors verify no paint drips, bubbles, or discoloration.
- Edges are checked under magnifying lamps to confirm even coating.
b) Physical Performance Tests
| Test | Purpose | Standard |
|---|---|---|
| Rub Fastness | Resistance to color transfer | ISO 11640 (>300 cycles) |
| Abrasion Resistance | Surface wear durability | Martindale > 10,000 cycles |
| Adhesion of Finish | Bond strength of coatings | ISO 11644 (>3 N/cm) |
| Water Repellency | Moisture absorption rate | ISO 5403 (<10%) |
c) Flex Testing
Finished backpacks undergo bending tests (20,000–30,000 flex cycles) to ensure coatings remain crack-free and edges don’t peel under repeated motion.
Eco-Friendly Finishing Practices
Sustainability is now a cornerstone of professional finishing. Factories increasingly replace solvent-heavy products with water-based and low-VOC alternatives.
Common Green Innovations
- Waterborne PU paints instead of solvent versions.
- Plant-based wax and oil conditioners (carnauba, jojoba, coconut).
- Closed-loop filtration systems for spray booths and tumblers.
- Low-energy IR drying to reduce electricity use by 25–30%.
Certifications like Leather Working Group (LWG) Gold and ZDHC compliance now define responsible finishing — essential for brand clients targeting EU and US markets.
Final Presentation and Packing Preparation
After finishing and inspection, backpacks move to the presentation phase:
- Dust removal and final polish using clean microfiber.
- Shape insertion (air-filled bags or paper molds).
- Protective wrapping of handles, straps, and hardware.
- Silica gel packs inserted to control humidity during shipping.
A well-finished leather backpack should:
- Exhibit uniform color and grain.
- Have sealed, smooth edges.
- Retain a clean, supple handfeel.
- Pass durability tests without cracking or fading.
What Are the Common Design Variations and Styles?
Leather backpacks come in various styles, from classic flap-top and roll-top designs to modern zip-front or convertible hybrids. Each style differs in structure, function, and target audience. Classic designs emphasize craftsmanship and heritage, while modern ones integrate minimalist lines, tech compartments, and lighter materials. Understanding design variations helps manufacturers and buyers balance durability, weight, and aesthetics to meet brand identity and market expectations.
1. How Leather Backpack Design Has Evolved
Leather backpacks have transitioned from utility gear to lifestyle icons over the past century.
- Early designs (1900s–1950s): Rugged, military-inspired packs made from thick vegetable-tanned hides, built purely for function.
- Mid-century (1960s–1990s): Emergence of urban leather satchels and school bags, combining durability with style.
- Modern era (2000s–today): A fusion of fashion, technology, and ergonomics — slimmer silhouettes, laptop protection, and travel-friendly features.
Contemporary brands now classify leather backpacks not merely by shape but by usage context — work, travel, leisure, or digital lifestyle.
2. Structural Variations by Opening Mechanism
How a backpack opens defines both its appearance and functionality.
| Style | Closure Type | Key Features | Best For |
|---|---|---|---|
| Flap-Top Backpack | Flap with buckle, magnetic snap, or drawstring | Heritage look, secure, rain-resistant | Classic or vintage collections |
| Roll-Top Backpack | Roll closure with buckle or clip | Adjustable capacity, minimalist aesthetic | Travel, urban commuters |
| Zipper-Front Backpack | Full-zip main compartment | Quick access, modern silhouette | Office, daily use |
| Fold-Over Backpack | Folded upper flap, usually magnetic | Compact design, casual vibe | Fashion & lifestyle lines |
| Drawstring Backpack | Cord cinch at top | Lightweight, simple | Gym, daypacks |
| Clamshell Backpack | 180° zip opening | Easy packing, structured | Tech or travel models |
Design Considerations
- Flap-tops require thicker leather and internal reinforcement to maintain flap shape.
- Zipper-fronts often use thinner top-grain leather and nylon lining for flexibility.
- Roll-tops integrate water-resistant linings and high-density hardware to handle repeated rolling.
Each opening mechanism impacts both manufacturing complexity and user perception — flap-tops evoke craftsmanship; roll-tops express functionality.
3. Shape-Based Classifications
Backpacks vary in body shape, influencing both cutting patterns and comfort.
| Shape | Description | Manufacturing Note |
|---|---|---|
| Boxy / Rectangular | Structured, angular sides | Requires rigid inserts and precise cutting |
| Round / Dome-Top | Soft curvature at top | Easier to stitch, higher visual volume |
| Slimline / Flat-Profile | Minimal bulk, closer to body | Ideal for commuters, lighter leather |
| Bucket Shape | Open cylindrical design | Uses drawstring or flap; fewer panels |
| Hybrid / Modular | Combination of structured base + soft upper | Complex assembly, modern look |
Luxury brands often combine structured bases with soft tops to balance form and flexibility — a hallmark of “engineered design” in leather goods.
4. Functional Design Families
Modern leather backpacks are often categorized by intended purpose, which dictates interior construction and material pairing.
a) Everyday or Commuter Backpacks
- Compact (18–22 L) with slim profile.
- One main compartment, small front pocket, laptop sleeve.
- Typically use top-grain leather + cotton or polyester lining.
- Ideal for daily office or school use.
Examples: minimalist zipper-front backpacks from Bellroy or Samsonite Leather.
b) Travel and Weekender Backpacks
- Larger (25–35 L), expandable compartments.
- Multi-pocket organization, padded straps, back ventilation mesh.
- Reinforced base (fiberboard + foam).
- Often include luggage strap sleeves for trolley attachment.
Material Insight: combination of full-grain leather panels with nylon side gussets to balance weight and capacity.
c) Fashion & Lifestyle Backpacks
- Aesthetic-driven: clean silhouettes, unique hardware, bold textures.
- Leathers: Nubuck, embossed, patent, or metallic finishes.
- Decorative stitching and custom metal logos are key differentiators.
- May sacrifice minor storage space for a refined look.
Common among boutique fashion labels and designer collaborations.
d) Tech & Laptop Backpacks
- Internal padding for devices (13–17″).
- RFID pockets, cable ports, and water-resistant zippers.
- Often hybridized with synthetic linings or EVA padding.
- Weight kept below 1.5 kg despite full leather exterior.
These models are highly popular for executive or business travel, where functionality meets luxury.
e) Outdoor & Adventure Leather Packs
- Thicker waxed or pull-up leather with rugged brass hardware.
- Reinforced base, multiple utility straps, and drawstring top.
- Uses cotton canvas or waterproof nylon for inner compartments.
- Heavier (~2–3 kg) but extremely durable.
Targeted toward premium heritage or outdoor fashion markets — reminiscent of vintage explorer packs.
5. Style Variations by Aesthetic Direction
While function defines purpose, style defines emotion — the visual language that connects the product to a specific market segment.
a) Classic Heritage
- Full-grain or vegetable-tanned leather.
- Brass hardware, contrast stitching, flap-top or buckle closure.
- Minimal lining; natural patina develops over time.
- Associated with durability, tradition, and craftsmanship.
- Brands: Filson, Saddleback, Szoneier’s custom heritage lines.
b) Minimalist Modern
- Clean panels, hidden seams, matte finish.
- Monochrome tones (black, tan, dark brown, olive).
- Lightweight linings and low-profile straps.
- Appeals to urban professionals and designers.
Production Detail: requires precise cutting and edge painting — every imperfection is visible.
c) Vintage / Retro Revival
- Waxed or distressed leather; hand-stitched details.
- Antique brass or bronze hardware.
- Inspired by 1950s travel or military gear.
- Popular in lifestyle and collector markets.
d) Luxury Contemporary
- Polished finish, slim silhouette, refined metal trim.
- Often features hand-painted edges, custom hardware, and logo embossing.
- Manufactured with tolerance under ±0.5 mm seam variance.
- High-end brands emphasize symmetry and minimal visible stitching.
e) Hybrid Urban Utility
- Combines leather with nylon, neoprene, or canvas for lighter weight.
- Magnetic fasteners, modular pockets, and padded tech sleeves.
- Reflects a “performance fashion” identity — style + function.
- Ideal for OEM/ODM manufacturers serving startup lifestyle brands.
6. Surface Finishes and Texture Styles
Beyond structure, leather texture and finish strongly influence how a backpack looks and feels.
| Finish / Texture | Description | Visual Effect | Typical Market |
|---|---|---|---|
| Smooth Aniline | Transparent dye, visible grain | Natural elegance | Luxury |
| Pebbled / Milled Grain | Textured surface | Scratch-resistant | Casual & everyday |
| Saffiano | Cross-hatched embossed | High stiffness, uniform | Business |
| Nubuck / Suede | Sanded surface | Soft touch, matte | Fashion |
| Patent / Glossy | Shiny coated surface | Reflective luxury | Designer & women’s |
| Pull-Up / Oiled | Waxy surface that changes with bending | Vintage patina | Heritage & travel |
Selecting texture affects both production technique (edge painting, lining adhesion) and brand storytelling — smooth leather exudes sophistication; pebbled conveys practicality.
7. Structural Features That Define Quality
Regardless of style, professional design focuses on reinforcing comfort, usability, and longevity.
a) Ergonomics
- Contoured back panels with EVA foam or mesh for airflow.
- Adjustable padded straps with metal D-rings for load control.
- Balanced weight distribution reduces stress on seams and shoulders.
b) Storage & Interior Design
- Laptop compartment: lined with microfiber and foam (5–8 mm).
- Accessory pockets: for chargers, keys, pens.
- Zippered inner pocket: security compartment for valuables.
- Key leash / RFID sleeve: modern add-ons for convenience.
c) Reinforcements
- Double stitching at stress points.
- Base insert (HDPE or Texon) for structure retention.
- Handle anchor plates between leather and lining for durability.
d) Hardware Detailing
- Branded YKK Excella zippers.
- Zinc alloy or stainless buckles with anti-oxidation finish.
- Matching metal logo plaques for cohesive design.
8. Style vs Manufacturing Complexity
Each design variation also dictates manufacturing challenges, directly influencing cost and lead time.
| Design Type | Panel Count | Sewing Difficulty | Relative Production Time |
|---|---|---|---|
| Zipper Front (Modern) | 20–25 | Medium | 5–6 hours/unit |
| Flap Top (Classic) | 25–30 | High (multi-layer folds) | 6–7 hours/unit |
| Roll Top (Minimalist) | 18–22 | Medium | 5 hours/unit |
| Luxury Folded Edge | 30–35 | Very high (manual folding) | 8–10 hours/unit |
| Hybrid / Mixed Material | 22–28 | Medium-high | 6–7 hours/unit |
Manufacturers like Szoneier often use modular production lines, assigning specialists to different sections — pockets, zippers, straps — to handle high-variation projects efficiently while preserving craftsmanship accuracy.
9. Market Positioning and Buyer Perception
Design variations correspond directly to target buyer segments and price positioning:
| Category | Target Audience | Retail Price Range (USD) | Material Tier |
|---|---|---|---|
| Classic Heritage | Artisans, collectors | 250–600 | Full-grain veg-tan |
| Minimalist Urban | Professionals, designers | 180–400 | Top-grain / milled |
| Luxury Fashion | High-end retail | 600–1500+ | Premium aniline |
| Travel Utility | Frequent travelers | 200–450 | Full-grain + canvas |
| Hybrid Tech | Urban youth | 150–350 | Leather + nylon mix |
10. Emerging Design Trends (2025 and Beyond)
Current trends indicate a blending of heritage craftsmanship and smart functionality:
- Modular pockets: detachable or magnetic systems for versatility.
- Lightweight construction: thinner leather layers (1.0–1.2 mm) paired with reinforced linings.
- Sustainable sourcing: vegetable-tanned and chrome-free leathers gaining popularity.
- Color evolution: earthy neutrals (tan, olive, taupe) paired with minimalist forms.
- Smart integration: hidden power banks, Bluetooth tracking, or RFID blocking built discreetly into design.
These reflect a global shift toward purpose-driven design — balancing tradition, technology, and eco-consciousness.
Conclusion: Crafting Premium Leather Backpacks
A well-made leather backpack is a testament to human skill — a fusion of precision cutting, balanced structure, and timeless design. Every stitch reinforces durability, every polished edge represents care, and every surface finish preserves beauty against time.
Bring Your Leather Vision to Life
Whether you are a designer, retailer, or private-label brand, transforming your idea into a tangible product starts with a capable manufacturing partner. Szoneier’s 18+ years of experience in leather R&D, prototyping, and production enable you to create customized designs — from luxury business backpacks to functional travel and lifestyle bags.
manufacturer Categories
- Custom Tote Bags Manufacturer
- custom backpacks Manufacturer
- custom travel bags& Duffle bags manufacturer
- custom makeup bags & toiletry bags manufacturer
- custom cooler bags manufacturer
- custom drawstring bags manufacturer
- custom makeup bags & toiletry bags manufacturer
- custom golf bags manufacturer
- custom fireproof bags manufacturer
- custom dry bags manufacturer
- custom ski bags manufacturer
- custom gym & sports bags manufacturer
- custom laptop bags manufacturer
- custom tactical bags manufacturer
- custom beach bags manufacturer
- custom medical bags manufacturer
- custom camera bags manufacturer
- custom wetsuits manufacturer
- custom leather goods manufacturer
- more personalized products
Can't find the answers?
No worries, please contact us and we will answer all the questions you have during the whole process of bag customization.
Make A Sample First?
If you have your own artwork, logo design files, or just an idea,please provide details about your project requirements, including preferred fabric, color, and customization options,we’re excited to assist you in bringing your bespoke bag designs to life through our sample production process.