
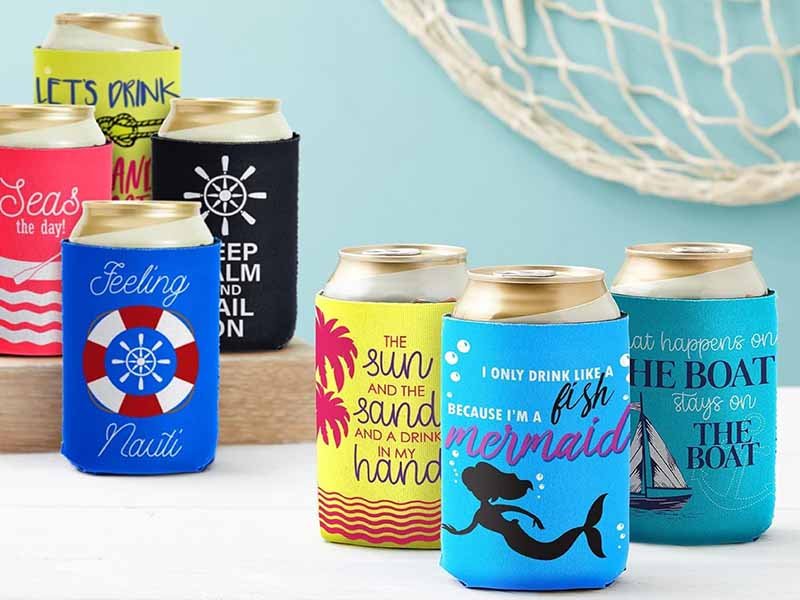
From summer barbecues to branded giveaways, a good koozie is more than just insulation—it’s a statement. Imagine sending your client a chilled can wrapped snugly in a custom-branded koozie that keeps their drink cold and keeps your logo in their hand. But how do you actually make one—from choosing materials to customizing printing—and how do your DIY efforts compare with factory production?
A koozie is a soft insulated sleeve typically made of foam or neoprene, designed to keep drinks cold and hands dry. You can make one by cutting the material, sewing or gluing seams, and applying your logo via printing or heat transfer.
In this guide, we walk you through what a koozie is (and how it differs from a “cozy”), which materials work best, the full step-by-step process, logo customization techniques, comparisons of DIY vs factory-made, and care tips for reuse. Along the way, we draw on 18+ years of expertise in bag and accessory manufacturing to give you pro-level insight. Stick with me: by the end, you’ll know when to DIY and when to work with a factory like Szoneier to design custom, high-quality koozies for your brand.
What Is a Koozie?
A koozie is a soft, insulated sleeve designed to fit around beverage containers such as cans, bottles, or cups. It reduces heat transfer, keeps drinks cold longer, prevents condensation from wetting hands, and provides a customizable surface for branding. Originally popular at outdoor events, koozies now come in various materials, shapes, and designs, making them both practical and promotional accessories for businesses, events, and individual users.
What’s the Difference Between a Cozy and a Koozie?
The terms “cozy” and “koozie” are often confused, but there are subtle differences.
- Cozy: A generic term for any fabric or sleeve designed to keep containers warm or insulated—like a teapot cozy or mug wrap.
- Koozie: A trademarked term in the U.S. referring specifically to insulated sleeves for beverages. Over time, “koozie” became the common name for can or bottle coolers, especially those made from foam or neoprene.
For businesses, using “koozie” in product descriptions aligns with customer search habits, boosting visibility for promotional or custom drink sleeves.
How Do Koozies Keep Drinks Cold?
Koozies work by slowing heat transfer through:
- Conduction: They limit direct heat flow from warm air or hands to the cold beverage.
- Convection: The insulating layer reduces air circulation on the container’s surface, maintaining a cooler microclimate.
- Condensation prevention: By keeping surfaces dry, koozies prevent the heat-exchange effect caused by water droplets on cans or bottles.
In fact, a study by Physics of Fluids found that condensation accelerates warming more than air temperature alone—meaning the koozie’s role in stopping moisture is as important as its insulation.
What Types of Koozies Are Most Popular Today?
Modern koozies go beyond the classic foam can holder. Some trending formats include:
- Straight-can sleeves (typical cylindrical shape)
- Collapsible or folding koozies (neoprene that folds flat)
- Bottle sleeves (for longneck bottles)
- Travel koozies (with zippers or handles)
- Custom-shaped sleeves for special cans or cups
| Type | Description | Best Use Case |
|---|---|---|
| Standard Can Koozies | Cylindrical, fixed shape | Everyday drinks, giveaways |
| Collapsible Koozies | Fold-flat neoprene or foam | Portability, event marketing |
| Bottle Koozies | Tapered for longneck bottles | Bars, branded promos |
| Zippered Koozies | Full-length with zippers, often neoprene | Beer bottles, premium branding |
| Travel Koozies | With handles or straps, sometimes waterproof | Outdoor activities, boating |
| Specialty Koozies | Smell-proof, fireproof, or eco-friendly designs | Niche markets, sustainability focus |
Businesses often customize these with logos, slogans, or QR codes, turning them into functional marketing tools that last months or even years.
What Material Is a Koozie Made Of?
Koozies are commonly made from foam or neoprene, but newer eco-friendly options such as recycled neoprene, cork-lined fabric, and biodegradable foams are becoming popular. Each material offers different benefits in terms of cost, insulation, print quality, and durability. Foam suits budget-friendly giveaways, while neoprene is preferred for premium, reusable, and full-color printed koozies. Sustainable materials appeal to brands with environmental goals or niche audiences.
1. Foam Koozies
Foam koozies are the traditional, low-cost option widely used for large promotional events, corporate giveaways, and single-day festivals. Made from polyurethane (PU) or polyethylene (PE) foam, they offer basic insulation and a low barrier to entry for bulk production.
Key Features:
- Cost: Lowest among all materials; ideal for campaigns with tight budgets.
- Insulation: Moderate; keeps drinks cold for short durations (~15–20 mins).
- Printing: Supports screen printing and basic heat transfer; limited for full-color graphics.
- Durability: Short-term use; foam may compress, tear, or degrade under frequent washing or outdoor exposure.
- Best Use: Political rallies, one-day events, inexpensive promotions.
2. Neoprene Koozies
Neoprene, a synthetic rubber used in wetsuits, dominates the premium koozie segment. It is flexible, durable, and provides up to 40% better insulation compared to standard foam.
Key Features:
- Cost: Higher than foam; economical in ≥ 300–500 unit runs.
- Insulation: Excellent; maintains cold temperatures for 30+ minutes.
- Printing: Compatible with sublimation, full-color heat transfers, screen printing, and embroidery.
- Durability: Reusable for years; washable, tear-resistant, outdoor-ready.
- Best Use: Premium branding, retail merchandise, weddings, corporate gifts, outdoor or marine environments.
3. Fabric-Covered Foam Koozies
These koozies combine a foam inner layer for insulation with an outer fabric shell (polyester or cotton) for better aesthetics and full-color sublimation printing.
Key Features:
- Cost: Moderate; fabric layer increases production complexity slightly.
- Insulation: Similar to foam alone but with better sweat absorption due to fabric.
- Printing: Excellent for full-color or photographic graphics via sublimation.
- Durability: Outer fabric layer adds wear resistance vs. bare foam.
- Best Use: Promotional events needing vibrant branding but moderate cost control.
4. Cork-Lined Neoprene Koozies
A sustainable hybrid combining natural cork on the outside with neoprene inside. Cork gives a premium, eco-friendly appearance while neoprene ensures insulation performance.
Key Features:
- Cost: Higher due to specialty material sourcing.
- Insulation: Excellent; cork adds minimal insulation but elevates aesthetics.
- Printing: Laser engraving or single-color printing recommended on cork surfaces.
- Durability: Long-lasting, water-resistant, unique tactile feel.
- Best Use: Craft breweries, eco-focused brands, upscale promotional gifts.
5. Recycled Neoprene Koozies
Made from post-consumer wetsuits or scrap neoprene, this option reduces landfill waste and supports environmental responsibility without sacrificing performance.
Key Features:
- Cost: Slightly higher due to recycling processes.
- Insulation: Same as virgin neoprene—excellent thermal retention.
- Printing: Compatible with water-based inks for eco-branding campaigns.
- Durability: Same lifespan as standard neoprene; often >3 years with regular use.
- Best Use: Outdoor brands, sustainable campaigns, eco-conscious retailers.
6. Biodegradable Foam Koozies
Emerging materials like starch-based biodegradable foams mimic traditional foam but break down faster after disposal, reducing environmental impact.
Key Features:
- Cost: Higher than PU/PE foam due to limited availability.
- Insulation: Similar to conventional foam; suitable for single-event use.
- Printing: Works with screen printing; heat methods depend on material stability.
- Durability: Short lifespan; not designed for long-term reuse.
- Best Use: Festivals, outdoor events with “green” branding goals.
7. Specialty Materials
- Leather-Wrapped Koozies: High-end, luxury items for corporate gifts; often feature removable liners.
- Metal Insulated Sleeves: Stainless steel or aluminum; not foldable, but offer multi-hour insulation.
- Soft Fabric Sleeves (e.g., fleece): Used for novelty designs, minimal insulation, purely decorative.
These are niche materials for unique branding concepts or luxury markets rather than mainstream campaigns.
Material Comparison Table
| Material Type | Cost Level | Insulation Quality | Printing Options | Durability | Eco-Friendly Options | Typical Use Cases |
|---|---|---|---|---|---|---|
| Foam | Low | Moderate | Screen, basic heat transfers | Short-term use | Limited | Bulk giveaways, rallies, one-day events |
| Neoprene | Medium-High | Excellent | Screen, heat transfer, sublimation | Long-term use | Recycled neoprene available | Premium promos, retail, corporate gifts |
| Fabric-Covered Foam | Medium | Moderate | Sublimation, full-color prints | Moderate | Depends on fabric choice | Branding-heavy campaigns, weddings |
| Cork-Lined Neoprene | High | Excellent | Laser engraving, simple prints | Long-term use | Natural cork option | Eco-luxury gifts, craft beverage branding |
| Recycled Neoprene | High | Excellent | Water-based inks, sublimation | Long-term use | Yes (recycled materials) | Eco-conscious brands, outdoor campaigns |
| Biodegradable Foam | Medium-High | Moderate | Screen printing only | Short-term use | Fully biodegradable | Green festivals, sustainable events |
| Specialty Materials | Varies | Varies | Limited (leather, metal, fleece) | Depends on type | Possible in select materials | Luxury gifts, novelty products |
Is Foam or Neoprene Better for Koozies?
Foam and neoprene dominate the koozie market because of their balance between insulation performance, customization potential, and cost-effectiveness.
Foam pros and cons:
- Pros: Low cost, lightweight, easy to cut and glue, good for simple promotional giveaways.
- Cons: Thinner, less durable, may compress over time, can lose insulation performance.
Neoprene pros and cons:
- Pros: Excellent thermal insulation, flexibility, long durability, good for repeated use, tear-resistant.
- Cons: Higher cost, more challenging to process (needs more precise cutting/sewing), slightly heavier.
| Feature | Foam Koozies | Neoprene Koozies |
|---|---|---|
| Cost | Low (ideal for bulk giveaways) | Medium to High (premium branding) |
| Insulation | Moderate (shorter cold retention) | Excellent (up to 40% better cooling) |
| Durability | Lower (can compress or tear over time) | High (tear-resistant, washable) |
| Flexibility | Rigid shape | Flexible, fits snugly on containers |
| Print Compatibility | Screen printing, basic heat transfers | Screen, heat transfer, sublimation |
| Aesthetic Quality | Simple, functional | Premium look and feel |
| Storage | Bulkier, not foldable | Collapsible, easy to pack and ship |
- For high-volume, budget-focused marketing events, foam offers unbeatable price advantages.
- For premium branding, retail sales, or reusable products, neoprene is the clear winner in durability, insulation, and aesthetics.
How to Make a Koozie Step by Step Guide
To make a koozie, you need a pattern, the insulating material, cutting tools, and adhesive or sewing equipment. After cutting the pieces, align and glue/sew edges, finish seams, then apply logo or design.
Quick-glance bill of materials & tools
- Materials: 3 mm neoprene (premium) or 2–3 mm foam (budget), optional polyester outer for sublimation, binding tape (18–22 mm), optional zipper (bottle sleeve), bottom disk (same material)
- Tools: Cutting mat, rotary cutter (45–60 mm) or laser/die cutter, steel ruler, fabric clips, seam roller, heat press (for transfers), screen setup (optional), domestic zigzag machine or overlock/serger, polyester thread, ballpoint/stretch needles 80/12–90/14, PPE for adhesives
- Adhesives (if used): Flexible contact cement rated for neoprene/foam (solvent- or water-borne)
1. Define the container & target fit
Goal: Lock the geometry so the koozie hugs the can/bottle without wrinkles.
Measure the actual vessel (don’t rely on charts):
- Use a flexible tape to get circumference (C) at the label area; measure height (H) from base to desired cover line (usually 100–105 mm for 12-oz cans to leave the lip exposed).
Typical reference values (informational, always verify):
- 12-oz standard can: Ø ≈ 66 mm → C ≈ 207 mm, H ≈ 122 mm (koozie height 100–105 mm)
- 12-oz slim can: Ø ≈ 57–58 mm → C ≈ 179–182 mm, H ≈ 155–170 mm (koozie height 115–125 mm)
- 16-oz tallboy: Ø ≈ 68–70 mm → C ≈ 213–220 mm, H ≈ 165–170 mm (koozie height 110–120 mm)
Choose “negative ease” so the sleeve grips the container:
- Neoprene (3 mm): target inner circumference T = C × (0.94–0.97) (−3% to −6%)
- Foam (2–3 mm): target T = C × (0.97–0.99) (−1% to −3%)
- More negative ease = tighter fit; start modest, tighten after a paper test.
Go/No-go check: If your paper mockup wrinkles or won’t meet at the seam, adjust T by 2–3 mm increments.
2. Draft the template (repeatable math, clean geometry)
Goal: A flat pattern that yields your target inner circumference after seam/overlap.
Pick seam method (affects math):
- Glue-lap seam: edges overlap by L = 5–6 mm.
- Sewn butt/zigzag seam: edges abut; add S = 6–8 mm seam allowance (consumed by stitch “bite”).
Width formula (panel width W):
- Glue-lap: W = T + L (inner circumference equals panel width minus the lap)
- Sewn butt: W = T + S (allowance consumed by stitch bite and compression)
Height (panel Hₚ): desired cover height + 0–3 mm for trimming; add +4–6 mm if you plan a folded hem, or none if using raw laser edge.
Mark guides: seam line, registration notches at top/bottom, logo centerline opposite the seam.
Example (12-oz can, neoprene 3 mm, −4% ease, glue-lap 6 mm): C ≈ 207 mm → T = 207 × 0.96 ≈ 198.7 mm → W = 198.7 + 6 ≈ 204.7 mm → cut height Hₚ = 102–105 mm.
Tip: Save DXF/PDF with bleed boxes so printing stays aligned run-to-run.
3. Plan the artwork & choose the print process
Goal: Crisp branding placed exactly where you want it, with the right durability.
Print flat panels before assembly for perfect registration.
Method selection:
- Screen printing: durable, cost-effective for 1–3 spot colors.
- Heat transfer (vinyl/DTF): great for small runs and gradients; follow vendor temps/pressures.
- Sublimation: photo-quality on polyester-faced neoprene/fabric (typical 185–200 °C, 40–60 s; always follow ink/media spec).
Layout rules:
- Place main art opposite the seam, center vertically.
- Add 3–5 mm bleed for edge-to-edge.
- Keep text ≥ 2.5–3 mm stroke for screen, ≥ 6–8 pt for transfers to avoid fill-in.
Quality gate: Pull a strike-off (test print) and check color, registration, and handfeel before full run.
4.Cut the pieces (precision controls your finish)
Goal: Clean, repeatable edges and identical parts.
- Manual: Rotary cutter + steel ruler; one confident pass prevents frayed micro-tears.
- Die cut: Fast and consistent for volume; use nested dies for yield.
- Laser cut: Best edge quality on laminated neoprene; also seals synthetic faces and cuts curves perfectly.
- Mark/notch lightly so guides remain visible after printing.
- Batch control: Keep panels flat; avoid stretching neoprene while handling.
QC: Stack a random set of 10; widths should be within ±1–2 mm, edges square, not scalloped.
5. Assemble the side seam
Goal: A straight, strong seam that doesn’t pucker and sits behind the artwork.
Glue-lap method (foam or neoprene):
- Surface prep: Wipe edges; dust/oil reduce bond strength.
- Apply contact adhesive thinly to both edges; wait until tacky (per datasheet).
- Align from bottom notch up; close in small sections to avoid drift.
- Roll the seam firmly with a seam roller; wipe any squeeze-out.
- Cure undisturbed on a flat surface.
Sewn butt (neoprene premium look):
- Clip edges flush; don’t stretch the panel.
- Machine settings: zigzag width 3–5 mm, length 2.5–3.5 mm; polyester thread.
- Feed neutral: lower presser foot pressure to prevent tunneling.
- Top-stitch option: a second line 1–2 mm away improves strength and flatness.
Combo (glue + stitch): Light glue for positioning, then zigzag for durability.
Safety: Ventilate when using solvent cements; gloves/respirator as recommended.
6. Add the base disk (optional, for stand-up styles)
Goal: Stability on counters and a higher-end look.
Disk diameter (D): D ≈ inner diameter – 1–2 mm to ease in smoothly.
- Inner diameter ≈ T / π (use your target inner circumference).
Assembly:
- Glue first: tack the first quadrant, then ease around.
- Stitch after: slow, even feed; slightly stretch the body, not the disk, to avoid pleats.
Alternate: Skip the disk for collapsible “flat-fold” koozies (saves space in shipping).
QC: Koozie stands upright, no “smiles” or pleats at the base.
7. Finish the top edge
Goal: Protect edges and define the product’s look.
- Raw laser edge (neoprene): clean, modern, fastest.
- Folded hem: only for thin material (≤3 mm); even presser pressure to avoid waves.
- Binding tape (premium):
- Use 18–22 mm elastic/nylon binding.
- Stretch the binding slightly, not the body, while stitching.
- Maintain consistent bite (2–3 mm) for a straight, tailored line.
Tip: Match binding color to brand Pantone for a retail look.
8. Apply transfers/finishing
Goal: Durable, centered graphics with crisp edges.
- Heat transfers (vinyl/DTF): Press per supplier spec; avoid over-pressing that can “orange-peel” neoprene.
- Sublimation (if using poly face): Flat press with protective sheets; cool flat to prevent ghosting.
- Embroidery/patches: Add on flat panels before seam whenever possible; keep stitch density moderate on stretch substrates.
QC: Check adhesion with a light peel test at corners after cool-down.
9. Cure, condition & quality control
Goal: Lock in strength and verify consistency before packing.
Cure times:
- Contact adhesive: typically 12–24 h (follow datasheet).
- Transfers: cool to room temp before testing.
Fit test: Slides on with light resistance; no vertical wrinkling; grips at 360°.
Visual QC:
- Height ±2 mm; width ±2 mm
- Seam straight; no puckers; stitch length 3–4 mm, balanced tension
- Artwork centered ±2 mm, upright, no pinholes/banding
- Edge/binding smooth, no waves or nicks
Stress test: Flex seam 20–30×; no bond crack or stitch pop.
Documentation: Approve a first-article sample and lock machine/press settings for the batch.
10. Packaging & storage
Goal: Deliver flat, clean, color-true product.
- Flat-pack collapsible styles; logo facing outward.
- Spacer sheets between freshly printed items to avoid offset.
- Heat & compression: Avoid compressing glued seams during cure and during hot transit.
- Labeling: By size (slim/standard/tallboy) and colorway; add QR code for brand campaign if desired.
11. Troubleshooting cheat-sheet
- Too tight: Reduce negative ease (increase T by 2–3 mm); widen zigzag; lower binding tension.
- Too loose: Increase negative ease (reduce T by 2–3 mm); verify you used the correct overlap math.
- Wrinkled seam: Align from bottom notch; glue in small sections; consider a simple seam jig.
- Edge waves: Lower presser foot pressure; lengthen stitch slightly; don’t stretch body during binding.
- Glue peel: Longer open time; stronger rolling pressure; ensure clean, dust-free edges; consider different adhesive.
- Logo off-center: Re-align art to pattern’s seam/center guides; always print on flat panels.
12. Optional upgrades
- Bottle zipper (install on flat panel first)
- Pull tab/loop (easier on/off)
- Contrast or reflective piping
- Pocket for business card/QR code
- Eco options: recycled neoprene, cork exterior, water-based inks
How to Customize Koozies with Logos or Designs
To customize koozies, you first choose the right printing method—screen printing, heat transfer, sublimation, or embroidery—based on the material, artwork complexity, and quantity. Then prepare high-resolution vector artwork, align it with your koozie pattern, and print on flat panels before assembly for the best registration. Professional factories offer options like PMS color matching, edge-to-edge printing, and premium add-ons such as zippers or pockets for branding impact.
Decide the Printing Method Based on Project Needs
Key Factors: Material type, artwork complexity, color requirements, and budget.
Screen Printing:
- Best for 1–3 solid colors, crisp logos, and high durability.
- Ideal for foam or neoprene with minimal stretch.
- Cost-effective at ≥ 100 units.
Heat Transfer (Vinyl or Digital):
- Great for small runs or gradient designs.
- Requires precise temperature & pressure settings (usually 150–180°C).
- Works on both foam and neoprene but may peel with heavy flexing if not cured correctly.
Sublimation Printing:
- Full-color, photo-quality graphics on polyester-faced neoprene.
- Perfect for edge-to-edge designs.
- Needs white base layer for vivid color accuracy.
Embroidery or Rubber Patches:
- Premium look with tactile feel.
- Limited to larger logos; small text may distort.
- Often used on corporate or luxury koozies.
Prepare High-Quality Artwork & Templates
- Use Vector Formats (AI, EPS, SVG): For infinite scaling without pixelation.
- Resolution: Minimum 300 DPI for raster images.
- Color Profiles: Convert to CMYK for printing; specify Pantone (PMS) for precise brand colors.
- Logo Placement: Align with centerline opposite the seam; leave 3–5 mm bleed for edge-to-edge prints.
- Artwork Panels: Use factory-supplied dielines with cut lines, seam lines, and safe zones marked.
Tip: Always print on flat panels before assembly to avoid distortion near seams or curved surfaces.
Align Printing with Material Characteristics
| Material | Recommended Methods | Special Notes |
|---|---|---|
| Foam | Screen printing, heat transfer | Avoid heavy ink layers; foam compresses during use. |
| Neoprene | Screen, sublimation, transfers | Sublimation only on poly-faced neoprene for vibrant colors. |
| Fabric-Covered | Sublimation, transfers | Allows full-color, photo-quality prints; crisp edges possible. |
| Cork-Lined | Laser engraving, screen print | Eco-friendly branding; subtle monochrome looks work best. |
| Recycled Neoprene | Water-based inks, sublimation | Low-VOC inks align with sustainability goals. |
Printing Workflow for Best Results
- Pre-Treatment (if needed):
- Wipe panels clean; some materials need primer coatings for better ink adhesion.
- Print on Flat Panels:
- Guarantees logo alignment and reduces defects compared to printing after assembly.
- Curing or Heat Pressing:
- Follow vendor specs for time, temperature, and pressure to prevent cracking or color loss.
- QC During Printing:
- Check color density, registration accuracy, and edge sharpness every 50–100 units.
Add-On Branding Techniques
- Embossing or Debossing: For subtle, textured logos on thicker neoprene panels.
- Rubber Patches or Labels: Heat-sealed or stitched for premium appeal.
- Metal Tags or Rivets: For industrial or luxury branding concepts.
- QR Codes or NFC Tags: Turn koozies into interactive marketing tools for events or promotions.
Edge-to-Edge vs Centered Artwork
- Centered Artwork: Traditional look; logo sits on front panel opposite seam.
- Edge-to-Edge Printing: Requires sublimation or all-over heat transfer; popular for photo backgrounds or gradient designs.
- Split-Panel Graphics: Artwork wraps around sides with center focus on the front panel.
Quality Control & Testing
- Color Matching: Use Pantone swatches under daylight lamps to verify branding colors.
- Adhesion Testing: Bend and twist printed samples; no cracking or peeling allowed.
- Wash Testing: For reusable koozies, run at least 3 gentle wash/dry cycles to check ink durability.
- Fit & Logo Alignment: Print edges should not creep onto seams or fold areas.
Factory vs DIY Customization
| Aspect | DIY Setup | Factory Production |
|---|---|---|
| Printing Volume | 1–50 units | 100–50,000+ units |
| Methods | Heat transfer, small screen setups | Full-color sublimation, multi-color screen, UV |
| Cost/Unit | Higher for small runs | Economical at scale |
| Color Options | Limited gradients | Unlimited, photo-quality prints |
| QC Systems | Manual checking | ISO-based QC with AQL sampling |
| Lead Time | On-demand, hobby-scale | 10–20 days typical for mass production |
Eco-Friendly Branding Options
- Water-Based Inks: Lower VOC emissions; compliant with REACH/OEKO-TEX standards.
- Recycled Materials: PET fabrics, reclaimed neoprene, cork overlays.
- Low-Energy Curing: UV-LED inks reduce power consumption by up to 60% vs traditional ovens.
- Minimal Packaging: Ship flat in recycled cartons with single-color printing on outer boxes.
Post-Customization Finishing & Packaging
- Edge Finishing: Bind or fold edges for retail-ready appearance.
- Kitting: Pair koozies with branded cans or event giveaways.
- Retail Packaging: Hang tags, belly bands, or polybags with printed inserts.
- Bulk Shipments: Flat-packed with logo facing out for easy display setup.
How to Care for and Reuse Koozies
Most high-quality neoprene or foam koozies can be hand washed with mild detergent and air-dried. Avoid intense heat or wringing. Proper care helps maintain insulation and extends usable life by 1–3 years (or more with premium materials).
Understand Materials and Basic Cleaning Methods
Proper care starts with understanding your koozie’s material. Foam koozies are lightweight and inexpensive but absorb liquids easily, so they should be hand washed with mild soap and cold water after each use. Neoprene koozies—the same material used in wetsuits—are more durable, water-resistant, and can handle gentle machine washing if stitched correctly. Fabric-covered or cork-lined koozies require extra care to avoid damaging outer layers; spot cleaning with fabric-safe detergents or damp cloths works best. Regardless of type, always rinse promptly after use to prevent stains or odors, and avoid harsh chemicals, bleach, or boiling water, which can degrade adhesives, prints, or coatings.
Washing, Drying, and Odor Control
For routine cleaning, fill a basin with cool water and mild detergent, soak the koozies for 5–10 minutes, then gently scrub surfaces with a soft sponge. Neoprene koozies can go into a mesh laundry bag on a delicate cycle with low spin speed, but always air-dry afterward—never tumble dry, as heat can damage seams or cause delamination. To tackle odors, especially after contact with sugary drinks or beer, use a baking soda paste for foam koozies or a diluted vinegar rinse for neoprene, ensuring thorough rinsing to prevent lingering scents. Storing koozies only after they are completely dry avoids mold and mildew growth, keeping them fresh for repeated use.
Storage and Lifespan Extension
Store koozies flat and dry in a cool environment away from direct sunlight, which can fade prints and weaken adhesives over time. For event organizers, organizing by size, design, or campaign batch helps streamline future distribution. Rotate stock so older koozies are used first, preserving newer ones for premium branding opportunities. With proper cleaning and storage, foam koozies typically last 6–12 months, while neoprene models can remain functional for 2–3 years, even after frequent use. Inspect seams and logos monthly; minor seam separations can be repaired with flexible adhesives before they become full failures, extending product life significantly.
Reuse, Rebrand, and Eco-Friendly Practices
Businesses can extend koozie lifecycles through rebranding—adding new heat-transfer designs or screen-printed logos over existing stock for future campaigns. Older but functional koozies can be donated to schools, nonprofits, or community events rather than discarded. For creative upcycling, neoprene scraps can be turned into drink coasters, jar openers, or protective padding for packaging. Use biodegradable detergents when cleaning large batches to reduce environmental impact, and partner with manufacturers offering recycling programs for end-of-life materials. These practices not only cut waste but also reinforce a company’s sustainability commitments while maximizing ROI on promotional products.
Get Your Custom Koozie from Szoneier
You now have a comprehensive roadmap to how to make a koozie—from understanding the difference between cozy vs koozie, to choosing materials (foam or neoprene), to detailed DIY assembly steps, and customization via printing. You also saw how factory-made koozies differ and why many brands turn to professional manufacturers for bulk or premium orders.
If you’re planning a promotional campaign, branded giveaway, retail line, or corporate gift, Szoneier has the expertise and manufacturing infrastructure to take your koozie design from prototype to full-scale production. With over 18 years in bag and accessory development, we specialize in custom and private-label orders, offering free design services, low MOQ, fast sampling, and 100% quality assurance. Contact us now to get a quote, discuss materials and processes, or request samples tailored to your brand. Let us help you turn that idea into a high-impact, durable, and stunning custom koozie.
manufacturer Categories
- Custom Tote Bags Manufacturer
- custom backpacks Manufacturer
- custom travel bags& Duffle bags manufacturer
- custom makeup bags & toiletry bags manufacturer
- custom cooler bags manufacturer
- custom drawstring bags manufacturer
- custom makeup bags & toiletry bags manufacturer
- custom golf bags manufacturer
- custom fireproof bags manufacturer
- custom dry bags manufacturer
- custom ski bags manufacturer
- custom gym & sports bags manufacturer
- custom laptop bags manufacturer
- custom tactical bags manufacturer
- custom beach bags manufacturer
- custom medical bags manufacturer
- custom camera bags manufacturer
- custom wetsuits manufacturer
- custom leather goods manufacturer
- more personalized products
Can't find the answers?
No worries, please contact us and we will answer all the questions you have during the whole process of bag customization.
Make A Sample First?
If you have your own artwork, logo design files, or just an idea,please provide details about your project requirements, including preferred fabric, color, and customization options,we’re excited to assist you in bringing your bespoke bag designs to life through our sample production process.