 Skip to content
When you buy a new camera, protecting it becomes priority number one. That’s where a camera bag comes in—not just any bag, but one designed with padding, structure, and compartments that shield delicate gear from bumps, moisture, and scratches. For DIY enthusiasts or small brands, learning how to sew a camera bag is both a creative challenge and a chance to build something tailored to your exact needs.
To sew a camera bag, start with durable fabric like canvas or nylon, add foam padding for shock absorption, and design compartments to fit your camera and lenses. Use reinforced stitches and consider waterproof linings for extra protection. Roll-top or zipper closures secure gear, while adjustable straps add comfort. Planning dimensions and structure before sewing ensures your bag protects equipment effectively and looks professional.
Now imagine this: a traveler on a rainy street whose gear stays safe thanks to a self-made padded camera bag. Another hobbyist struggles with a generic backpack, lenses clanking inside. That contrast is why this guide will walk you through everything—materials, design, dimensions, stitches, and whether to DIY or partner with OEM manufacturers like Szoneier.
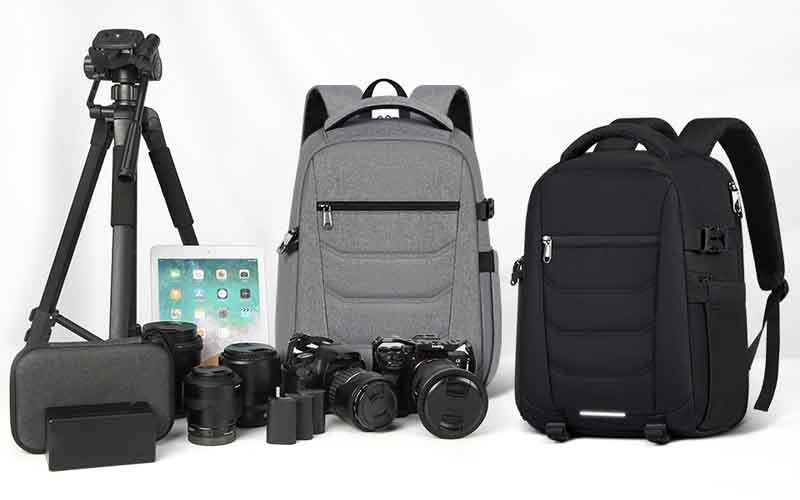
What Makes a Camera Bag Different from a Regular Bag?
A camera bag is different from a regular bag because it is purpose-built to protect fragile equipment. It includes thick foam padding, reinforced seams, and customizable compartments to keep cameras and lenses safe from shocks and scratches. Waterproof materials or linings add extra protection, while standard bags rarely offer these features. In short, a camera bag is engineered for safety, organization, and durability, whereas a regular bag focuses on carrying convenience or fashion.
Why is it called a camera bag?
The term “camera bag” originated because these bags are designed around the unique needs of photographers. Unlike a tote or backpack, which simply holds items, a camera bag’s very purpose is to transport sensitive optical and electronic gear safely. Over decades, the name became a category in itself—so much so that when photographers say “bag,” they often mean “camera bag.”
Protection First: Padding and Reinforced Construction
The biggest difference is protection. Camera bags include:
- Foam Padding: Layers of EVA or closed-cell foam line the sides, bottom, and dividers. This acts like a shock absorber.
- Reinforced Seams & Stitching: Stress points (like strap joints) use bar-tacks or double stitching to handle the weight of heavy lenses.
- Rigid Structure: Some camera bags use plastic sheets or aluminum frames inside the walls to keep shape and protect against crushing.
Regular bags lack these protective features, which means if you drop them, your laptop may dent—but your DSLR lens will shatter.
Specialized Compartments and Organization
Camera bags are designed around gear-specific organization:
- Dividers: Velcro or modular dividers let users reconfigure the interior to fit cameras, lenses, and drones.
- Accessory Pockets: Small, padded sleeves for SD cards, batteries, chargers.
- Quick Access Panels: Side or top zippers allow photographers to grab gear without fully opening the bag.
By contrast, a regular bag usually has 1–2 large compartments, designed for clothes or books, with little structure.
Weather and Environmental Protection
Camera gear is highly vulnerable to water, dust, and temperature extremes. That’s why many camera bags add:
- Waterproof Coatings: TPU- or PU-coated nylon and polyester keep rain out.
- Sealed Zippers: Aquaguard zippers or storm flaps reduce leakage.
- Rain Covers: Integrated pull-out covers for heavy rain.
A regular bag might resist light drizzle but isn’t built to handle unexpected weather in the field.
Dimensions and Weight Distribution
Camera bags are sized for equipment loadouts, not just random storage:
- A compact mirrorless camera kit fits in a 10–15L sling or backpack.
- A DSLR with multiple lenses may require 20–30L.
- Professional setups with drones or cinema cameras often need 40L+ roller cases.
Additionally, straps and back panels are padded for comfort because camera gear is heavier and more concentrated in weight than clothing or groceries. Regular bags may cause strain over time when used for heavy gear.
Style vs Functionality
- Camera Bags: Often understated, sometimes disguised as normal bags (anti-theft style), but always built with functionality first.
- Regular Bags: Prioritize fashion, variety, or minimal cost, often compromising on protective performance.
Which Materials and Tools Do You Need to Sew a Camera Bag?
To sew a camera bag, use strong outer fabrics like canvas, ballistic nylon, or leather; padding such as EVA foam for impact resistance; and soft linings like microfiber to protect lenses. Add waterproof coatings or TPU films for weather resistance. Tools include a heavy-duty sewing machine, bonded nylon thread, size 16–18 needles, rotary cutters, and Velcro for dividers. These materials and tools ensure durability, waterproofing, and professional-quality results.
Outer Fabrics: The First Layer of Defense
The outer fabric is what gives the camera bag its durability and weather resistance. Options include:
- Canvas: Traditional and rugged. Waxed canvas adds natural water resistance, making it popular for vintage-style camera satchels.
- Ballistic Nylon (1680D or higher): A gold standard for professional camera bags—tear-resistant, abrasion-proof, and inherently water-repellent.
- Cordura Nylon (500D–1000D): Lighter than ballistic but still very strong, with excellent balance of weight and toughness.
- Polyester with PU/TPU coating: Budget-friendly, available in multiple colors and patterns. Coated polyester can achieve waterproof ratings up to IPX5.
- Leather (Full Grain / PU): Luxurious and stylish, often used in premium brands. Real leather is durable but heavier; PU leather offers lighter weight and lower cost.
Tip: If the bag is intended for heavy outdoor use, opt for ballistic nylon + TPU coating. For lifestyle/fashion brands, waxed canvas or leather works better.
Padding and Protective Inserts
Cameras and lenses are fragile; padding is non-negotiable.
- Closed-Cell Foam (EVA, PE): Dense and stiff, ideal for walls and base panels. Provides structure and absorbs shocks.
- Open-Cell Foam: Softer, compressible, often used as secondary padding or internal lining to cradle lenses.
- Layered Padding: Many bags combine EVA side panels with softer foam lining for dual protection.
- PE Board or Plastic Sheets: Inserted between fabric and foam to prevent crushing from external pressure.
Rule of thumb: 10–15 mm EVA foam in walls, 3–5 mm softer foam inside dividers = reliable protection.
Inner Linings
The inner lining ensures the camera and lenses don’t scratch. Common choices:
- Microfiber: Soft and anti-scratch, ideal for lens and LCD screen protection.
- Polyester Taffeta: Lightweight, smooth, and available in bright colors (helps visibility inside the bag).
- Nylex (Velcro-compatible fabric): Used on dividers and interiors to allow flexible repositioning of padded walls with hook-and-loop strips.
Some high-end brands add antimicrobial finishes to prevent mold growth in humid climates—a growing trend for OEM/ODM buyers.
Waterproofing and Weatherproof Add-ons
Camera gear is often exposed to rain, snow, or humidity, so fabrics alone aren’t enough.
- PU/TPU Coating: Laminates that add waterproofing and durability.
- DWR (Durable Water Repellent): A surface treatment that causes water to bead and roll off.
- Sealed Zippers (YKK Aquaguard): Prevent leakage through openings.
- Rain Covers: Lightweight polyester covers stored in hidden pockets, pulled out during heavy storms.
Sewing Tools and Accessories
A professional camera bag requires specialized tools:
- Heavy-Duty Sewing Machine: Standard home machines often fail with multiple layers of canvas + foam. Industrial walking-foot machines are recommended.
- Needles: Size 16–18 for heavy fabrics; leather needles for real leather.
- Thread: Bonded nylon or polyester (Tex 70 or higher) for durability and UV resistance.
- Cutting Tools: Rotary cutters and hot knives (for nylon) to prevent fraying.
- Closures & Hardware: Zippers (waterproof recommended), buckles, D-rings, magnetic snaps.
- Velcro & Elastic Bands: For dividers, straps, and accessory organization.
For DIY projects, investing in edge binders and bar-tacking attachments will dramatically improve seam strength—matching factory finish.
Comparison Table – Recommended Materials
| Component | Best Options | Purpose |
|---|---|---|
| Outer Fabric | Ballistic Nylon, Cordura, Canvas | Durability, abrasion resistance, weatherproofing |
| Padding | EVA Foam, PE Foam, Layered Inserts | Shock absorption, structure |
| Inner Lining | Microfiber, Nylex, Polyester | Scratch resistance, divider compatibility |
| Waterproofing | TPU Coating, DWR, Rain Cover | Protects against rain, humidity |
| Hardware | YKK Zippers, Buckles, Velcro | Secure closures, adjustable compartments |
| Tools | Heavy-duty machine, Tex 70 thread | Ensures strength and professional finishing |
How to Design the Structure and Compartments of a Camera Bag?
To design a camera bag, start by measuring your camera body, lenses, and accessories. Plan compartments with adjustable Velcro dividers and ensure enough padding between each section. Standard camera bag dimensions range from 10–15 liters for compact kits to 20–30 liters for DSLR setups. The structure should balance protection with easy access, using side or top openings for efficiency.
The design stage determines whether a camera bag is practical. Without proper planning, even the best fabrics and sewing won’t deliver usability.
Measuring Dimensions:
A DSLR with two lenses might need a 25 × 15 × 30 cm interior. A mirrorless kit may fit into 20 × 12 × 25 cm.
Table Example:
Camera Type Suggested Dimensions (cm) Volume Compact/Mirrorless 20 × 12 × 25 10–15L DSLR + 2 lenses 25 × 15 × 30 20–25L Pro DSLR + 3–4 lenses 30 × 18 × 40 30–35L Compartments:
Use padded, removable dividers. Velcro-backed dividers allow reconfiguration.
Access Points:
- Top Load: Quick grab access.
- Side Load: Convenient while wearing.
- Full Front Opening: Best for organizing multiple lenses.
Additional Features:
- Tripod straps.
- Laptop sleeve.
- Side pockets for batteries or cards.
A well-designed camera bag balances security with speed—protecting gear while letting photographers capture shots without fumbling.
How to Sew a Camera Bag Step by Step?
Draft your bag around your gear, then cut outer fabric, foam, and lining to a precise plan. Build padded panels first, add pockets to the lining, assemble shell (front/back → sides → bottom), install the lid/zipper, and attach strap anchors with bar-tacks or box-X stitches. Finish with removable dividers, seam binding/sealant, and a final fit test. Use bonded nylon thread, size 16–18 needles, and welded/covered seams where possible for pro-grade durability.
Below is a production-style walkthrough you can follow at home—or hand to a sample room. It includes formulas, a cutting list, stitch specs, and QC checks so your bag protects real camera gear, not just looks the part.
1) Plan from the Gear Up (dimensions & clearances)
Measure your largest loadout standing upright:
- Camera body width (Wc), height (Hc), depth with lens (Dc)
- Longest lens length (Ll) and diameter (Dl)
- Accessories volume (batteries, charger, mic, etc.)
Add functional clearances:
- Wall padding (t): 10–15 mm EVA per side (≥10 mm for walls; ≥15 mm for base).
- Divider padding (td): 3–6 mm PE/EVA per divider.
- Ease (e): 8–12 mm per wall so dividers can flex and fabric doesn’t crush foam.
- Seam allowance (s): 10–15 mm (consistent across panels).
Interior target box
- Interior Width (Wi) = max(Wc, Dl) + 2×td + e
- Interior Depth (Di) = max(Dc, Ll diameter pocket depth if horizontal) + 2×td + e
- Interior Height (Hi) = Hc + room for top divider or lid pocket + e
Cut sizes (for each layer = outer/foam/lining)
- Front/Back panels: (Wi + 2t + 2e + 2s) × (Hi + t + e + 2s)
- Side/Gusset panels (x2): (Di + 2t + 2e + 2s) × (Hi + t + e + 2s)
- Bottom panel: (Wi + 2t + 2e + 2s) × (Di + 2t + 2e + 2s)
- Lid (top-load): add 10–15 mm overhang beyond Wi/Di for weather flap or zipper guard.
Tip: Sketch a scale layout and place rectangles for camera and lenses to confirm divider spacing before cutting.
2) Bill of Materials (BOM) & Cutting List
| Component | Recommended spec | Qty (typical 20–25 L) | Notes |
|---|---|---|---|
| Outer shell | 1000D Cordura or 1680D ballistic nylon (or waxed canvas/leather) | As per paneling | Abrasion + structure |
| Padding (walls) | EVA closed-cell foam 10–15 mm | As per panels | Shock + form |
| Padding (base) | EVA 15–20 mm + PE board insert | 1 | Drop protection |
| Lining | Nylex/loop fabric (Velcro-friendly) or microfiber | As per panels | Soft + divider-ready |
| Dividers | EVA 3–6 mm sandwiched with loop fabric | As needed | L-, T-, U-shapes |
| Zippers | #8–#10 coil; YKK Aquaguard for weather areas | 1–3 | Lid + pockets |
| Webbing | Nylon 38 mm shoulder, 25 mm trims | — | Anchors + lash |
| Hardware | D-rings, tri-glides, side-release buckles | — | Strap adjust/attach |
| Hook & loop | 25–50 mm | — | Dividers + lid tab |
| Thread | Bonded nylon Tex 70 (or poly Tex 60–80) | — | High tensile |
| Needles | Size 16–18 (110–120), leather needle for leather | — | Thick stacks |
| Binding | Nylon binding tape 20–25 mm | — | Cover raw seams |
| Waterproofing | TPU/PU coating or add rain cover | — | Weather security |
3) Machine Setup & Stitch Specs
- Primary seams: Lockstitch (3.0–3.5 mm length) for structural seams.
- Edge control / anti-fray: Zigzag (width 3–5 mm) or bind seams with nylon binding tape.
- Stress points (strap anchors, handle bases): Box-X (25–35 mm square) plus bar-tacks (18–22 stitches).
- Top-stitching (appearance + strength): Lockstitch 3.5–4.0 mm.
- Thread: Bonded nylon Tex 70 (UV-resistant) with matching bobbin; tighten top tension slightly for cleaner box-X.
4) Build Order
Step A — Laminate panels
- Spray-adhere EVA to outer shell panels.
- Quilt in wide grids (e.g., 50–70 mm) or perimeter stitch to prevent foam creep.
- Adhere/line the inside with loop fabric (Nylex) or microfiber; stitch at edges.
Step B — Add pockets to lining (before closing the box)
- Sew flat or bellows pockets for batteries/filters to the lining sides.
- Install laptop/tablet sleeve on the back lining panel (foam-backed).
- If using a front full-open design, sew the zipper placket to the front panel now.
Step C — Construct the shell: front/back → sides → bottom
- Join front panel to side gussets (right sides together). Seam allowance s = 10–12 mm.
- Repeat for back panel; then close the ring at the side seam.
- Insert the bottom panel: clip corners, sew one long edge at a time to control ease.
- Bind all internal raw seams with nylon binding tape; optional seam sealant for weatherization.
- Top-stitch along the panel joins from the outside where accessible for extra strength and a crisp edge.
Step D — Build & install the lid (choose one):
- Top-load lid with zipper: Create a framed opening on the top, install #8–#10 coil zipper, add a storm flap covering the zipper on the exterior.
- Front-open clamshell: Add a perimeter zipper to the front; hinge along one side; include zipper garages at ends to improve water resistance.
- Roll-top hybrid (outdoor style): Add a 100–120 mm extension above the top rim; line with EVA 3–4 mm; install side buckles for rolling closure.
Step E — Strap system & load paths
- Fabricate shoulder strap with 38 mm webbing + EVA padded sleeve.
- Sew box-X + bar-tacks into a reinforcement patch (extra outer fabric with EVA) before attaching to shell to diffuse load.
- Add sternum strap and removable waist strap for heavier kits.
- Install top grab handle (double-layer webbing + foam core) with mirrored reinforcements.
Step F — Dividers & interior architecture
- Cut divider blanks to internal spans: width = Wi, height = bag’s internal height minus lid clearance.
- Sandwich 3–6 mm EVA in loop fabric, stitch perimeter.
- Apply hook strips (softened corners) at ends for reconfiguration.
- Shape set: 1 long main divider (splits body/lens), 2–4 cross dividers (lenses), 1–2 short caps for stacking.
- Optional: add elastic loops to a divider face for pens, lens pens, or cables.
Step G — Weather features & finishing
- Apply DWR to canvas or add a stowable rain cover in a bottom pocket.
- Add drainage eyelet to an exterior pocket (not main cavity) in case of bottle leak.
- Install reflective piping or logo for urban safety.
- Flame-seal nylon webbing ends; bury and lock back-tacks; trim threads cleanly.
5) QC: fit, strength, and comfort checks
- Fit test: Place full kit, shake the bag—gear must not shift; dividers should hold angles.
- Drop test: 20 cm drop onto padded base (carpet) × 3; recheck stitching and base foam compression.
- Load test: Hang by shoulder strap at 1.5× expected load for 5 minutes; inspect box-X/bartacks.
- Ingress test: 5-minute shower test; interior should remain dry (minor mist around zipper is acceptable on non-Aquaguard designs).
- Comfort test: Wear for 15 minutes; confirm strap bite points and back panel ventilation.
6) Common pitfalls & how to avoid them
- Foam creep (padding walks inside): quilt or perimeter-stitch foam to shell before assembly.
- Wavy zippers: stabilize with fusible tape or stitch zipper to a zipper guard placket first.
- Weak strap anchors: always use reinforcement patches + box-X + bar-tacks.
- Tight interior (dividers don’t fit): include the padding and seam allowance in your math; leave 8–12 mm ease.
- Fraying edges: bind seams or hot-knife cut nylon; avoid raw edges in the main cavity.
7) Optional upgrades
- MOLLE/PALS webbing on sides for modular pouches.
- Hidden AirTag/Tile pocket for recovery.
- Top quick-draw door (secondary small lid) above the main zipper for instant camera access.
- Removable sling strap anchor points for dual-carry.
- Custom branding: woven label, silicone badge, heat-transfer, or leather patch; Pantone-matched webbing.
Stitch & Seam Reference
| Area | Stitch | Spec |
|---|---|---|
| Panel seams | Lockstitch | 3.0–3.5 mm length |
| Top-stitching | Lockstitch | 3.5–4.0 mm (appearance + strength) |
| Edge control | Zigzag or binding | 3–5 mm width (zigzag) / 20–25 mm binding tape |
| Strap anchors | Box-X + bar-tacks | 25–35 mm square + 18–22-stitch bartack |
| Foam quilting | Lockstitch (grid) | 50–70 mm spacing or perimeter stitch |
| Zipper install | Lockstitch | Stabilize tape; add storm flap/garage |
From DIY to OEM/ODM
If you love making one-offs, this process gets you to a robust, field-worthy bag. If you’re building for retail, hand these specs to a factory and request:
- Panel/weld diagrams, seam binding everywhere, Tex 70 bonded nylon thread, box-X templates, and a 5-stage QC (fit, load, drop, ingress, visual).
- Material callouts (e.g., 1680D ballistic nylon + 10 mm EVA walls + Aquaguard #8), divider set count, and branding locations.
Szoneier can convert this build into production with low MOQs, free design tweaks, fast sampling, and certified materials—so your first prototype already feels like a finished product.
What is the best stitch to sew a bag?
For strength, use lockstitch for straight seams and zigzag for edges. Reinforced bar tacks are essential at stress points like strap anchors.
How to Add Waterproofing and Extra Features?
Waterproofing a camera bag means using coated fabrics, sealed seams, and secure closures like roll-tops or waterproof zippers, plus extras such as rain covers. Adding reinforced bases, tripod straps, reflective details, and smart interior organization ensures both durability and usability. A layered approach—fabric, seam, closure, and accessories—provides the best real-world protection for cameras and lenses in unpredictable environments.
Waterproof Fabrics:
The first step in waterproofing a camera bag is fabric choice. Materials like TPU-laminated nylon, PU-coated polyester, or waxed canvas provide water resistance, while ballistic nylon offers excellent abrasion resistance. For lifestyle-focused bags, waxed canvas and leather blends add style, but for outdoor photography, TPU-laminated Cordura is the gold standard.
Seam Construction:
Even the strongest fabric leaks at seams if not treated properly. Camera bags should use welded or RF-fused seams for top-end waterproofing, or stitched seams with hot-air seam tape for a balance of cost and performance. For DIY, applying PU seam sealant on the inside of stitched panels works effectively.
Closures and Openings:
The closure system is critical to stopping water entry. Waterproof zippers like YKK Aquaguard, roll-top closures with side buckles, or storm flaps covering zippers are standard options. Roll-tops give the best protection during submersion, while zippers with garages are better for quick access.
Interior Protection:
Waterproofing isn’t just about the outside; the lining matters too. Microfiber or PU-laminated polyester helps resist moisture and is easy to wipe clean if condensation forms. Adding a silica gel pocket inside the bag keeps lenses dry in humid climates.
Rain Covers:
Many professional bags include a stowable rain cover for redundancy. These are made from lightweight PU-coated polyester with an elastic hem, stored in a hidden bottom or side pocket, and deployed instantly when heavy rain starts.
Reinforced Base:
Camera bags are often placed on wet ground, so reinforcing the base is essential. A multi-layer system with EVA foam, a PE board insert, and a TPU-coated outer panel prevents water seepage and resists wear. Adding rubber feet or Hypalon patches further extends durability.
Extra Features:
Beyond waterproofing, features enhance usability. Tripod straps, quick-access hatches, and laptop sleeves expand functionality. Lockable zippers, hidden tracker pockets, and slash-resistant straps improve security. Reflective piping or logos increase night visibility, while a light-colored interior lining improves visibility inside the bag.
Testing Waterproofing:
To verify waterproofing, bags can be tested with a 5-minute shower test or IPX rating protocols. IPX4 ensures splash resistance, IPX6 protects against heavy rain, and welded roll-top designs may reach IPX7 for brief submersion. A simple DIY test involves lining the bag with paper towels and exposing it to water spray to detect leaks.
OEM/ODM Customization:
For brands, waterproofing features can be tailored by factory partners. Szoneier offers customization with Pantone-matched coated fabrics, seam-sealed construction, branded rain covers, and custom reflective elements. This allows retailers to offer both urban waterproof models and outdoor expedition-grade bags, giving them flexibility across markets.
Is It Better to Sew a Camera Bag Yourself or Work with OEM/ODM Manufacturers?
Sewing a camera bag yourself is rewarding, flexible, and cost-efficient for one-offs, but limited in durability and scalability. OEM/ODM manufacturers, on the other hand, deliver professional-grade materials, certified quality, and branding options, making them ideal for brands and retailers. For hobbyists, DIY works; for small to medium businesses, OEM/ODM ensures consistency, lower risk, and market-ready products. The choice depends on whether you need a single bag or a scalable product line.
The Appeal of DIY Sewing
DIY sewing gives makers full creative control. You decide the size, compartments, fabrics, and color scheme to match your exact photography kit. For a hobbyist or sewing enthusiast, the reward is personal: you own a unique bag tailored to your gear, often at a lower material cost compared to buying a premium commercial brand.
DIY also provides flexibility in experimentation—want a waxed canvas exterior with a bright orange microfiber interior? You can test and iterate without waiting for factory samples. For students, hobbyists, or early-stage designers, DIY is a valuable learning process that builds technical understanding of what makes a camera bag strong, waterproof, and usable.
However, limitations arise quickly. Sewing through multiple layers of foam, nylon, and webbing requires an industrial machine; home sewing machines may jam or fail. DIY also struggles with durability—seam sealing, welded closures, and professional padding are difficult to replicate without factory equipment.
The Strength of OEM/ODM Manufacturers
OEM (Original Equipment Manufacturer) and ODM (Original Design Manufacturer) partners like Szoneier specialize in making camera bags at industrial quality. They use 1680D ballistic nylon, waterproof TPU laminates, EVA padding, RF welding, seam taping, and certified hardware—techniques beyond most DIY setups.
Factories also guarantee consistency. Every bag in a batch is identical in stitching, padding thickness, and load-bearing capacity. This is critical if you are selling to customers who expect reliability. OEM/ODM also allows custom branding: logos, Pantone-matched fabrics, reflective piping, and even anti-theft features can all be integrated at scale.
For brands, OEM/ODM means shorter time-to-market. Instead of spending weeks prototyping alone, you get a factory sample in 7–10 days and a production batch within weeks, backed by ISO, REACH, or OEKO-TEX certifications.
Cost, Time, and Quality
| Factor | DIY Sewing | OEM/ODM Manufacturing |
|---|---|---|
| Cost (per unit) | Low for single units (materials only) | Lower per unit at scale, higher upfront MOQ |
| Time | 10–30 hours for one bag | 7–10 days sample, 30 days production |
| Quality | Depends on skill, limited durability | Industrial durability, tested waterproofing |
| Customization | Unlimited, but time-intensive | Wide options: Pantone fabrics, hardware, branding |
| Scalability | Not scalable | Ideal for retail, e-commerce, wholesalers |
Who Should Choose DIY?
- Hobbyists who want one unique bag for personal use.
- Designers experimenting with new patterns or features before going to mass production.
- Students or small creators building a portfolio prototype.
Who Should Choose OEM/ODM?
- Startups launching a private-label camera bag line.
- Retailers needing consistent quality across hundreds of units.
- Professional photographers who need reliable performance gear with warranties.
- Brands that want custom logos, special fabrics, or eco-certified materials.
Case Example:
A small photography accessories brand orders 300 custom waterproof camera backpacks from Szoneier, complete with Velcro dividers, laptop sleeves, and reflective logos. The result: professional-grade products without the DIY limitations.
Conclusion: From DIY Sewing to Scalable Branding
Learning how to sew a camera bag gives you insight into what makes these bags unique—durable fabrics, padding, reinforced stitches, and thoughtful compartments. But whether you’re a hobbyist creating one bag for personal use or a brand planning to sell hundreds, the key lies in combining functionality with protection.
Ready to design your next camera bag collection?
manufacturer Categories
- Custom Tote Bags Manufacturer
- custom backpacks Manufacturer
- custom travel bags& Duffle bags manufacturer
- custom makeup bags & toiletry bags manufacturer
- custom cooler bags manufacturer
- custom drawstring bags manufacturer
- custom makeup bags & toiletry bags manufacturer
- custom golf bags manufacturer
- custom fireproof bags manufacturer
- custom dry bags manufacturer
- custom ski bags manufacturer
- custom gym & sports bags manufacturer
- custom laptop bags manufacturer
- custom tactical bags manufacturer
- custom beach bags manufacturer
- custom medical bags manufacturer
- custom camera bags manufacturer
- custom wetsuits manufacturer
- custom leather goods manufacturer
- more personalized products
Can't find the answers?
No worries, please contact us and we will answer all the questions you have during the whole process of bag customization.
Make A Sample First?
If you have your own artwork, logo design files, or just an idea,please provide details about your project requirements, including preferred fabric, color, and customization options,we’re excited to assist you in bringing your bespoke bag designs to life through our sample production process.