Skip to content

A successful bike bag collection is not built by changing the size of one pouch and giving each version a different name. Every mounting position on a bicycle creates its own demands for weight distribution, clearance, stability, accessibility, and weather protection. A frame bag carries weight close to the center of the bicycle. A handlebar bag places the load near the steering system. A seat pack hangs behind the rider and must control side-to-side movement. Even a small difference in strap position or bag depth can affect comfort after several hours on the road.
Cycling brands commonly use frame bags, top tube bags, handlebar bags, saddle bags, seat packs, panniers, rack bags, stem bags, and fork bags. Each design serves a different purpose. Compact bags carry tools, phones, and nutrition, while larger systems carry clothing, laptops, camping equipment, or multi-day supplies. The right choice depends on bicycle geometry, riding terrain, storage volume, load weight, mounting method, and frequency of access.
A good bag feels almost invisible while riding. It stays quiet, keeps its shape, avoids the rider’s knees and tires, and allows essential items to be reached without unpacking everything else. A poorly developed bag may look impressive in product photos yet rotate around the frame, rub through its fabric, trap water, or become unstable when fully loaded. The difference often appears only after the bicycle leaves smooth pavement.
What Are the Main Types of Bike Bags?
Bike bags are mainly classified by mounting position. Frame, top tube, handlebar, saddle, rack, pannier, stem, and fork bags each place cargo in a different area of the bicycle. Capacity commonly ranges from less than 0.5 liters for a small tool pouch to more than 25 liters for one touring pannier. Shape and attachment design are often more important than nominal volume.
The figures below are development reference ranges rather than fixed industry rules. Final capacity and safe load depend on the bag structure, bicycle frame, rack rating, strap strength, and intended riding conditions.
| Bike Bag Type | Common Capacity | Suggested Load Range | Main Position | Common Use |
|---|---|---|---|---|
| Top tube bag | 0.4–1.5 L | 0.2–1.0 kg | Top tube | Phone, snacks, power bank |
| Small saddle bag | 0.3–1.5 L | 0.2–1.0 kg | Under saddle | Tube, tools, inflator |
| Stem bag | 0.5–1.2 L | 0.3–1.0 kg | Beside stem | Bottle, food, camera |
| Frame bag | 1.5–8 L | 1–4 kg | Main frame triangle | Tools, food, batteries |
| Handlebar pouch | 2–6 L | 0.5–2.5 kg | Front handlebar | Camera, jacket, daily gear |
| Handlebar roll | 6–15 L | 1–5 kg | Front handlebar | Sleeping gear, clothing |
| Seat pack | 5–17 L | 1.5–5 kg | Saddle and seatpost | Clothing, sleeping equipment |
| Rack bag | 5–15 L | 2–8 kg | Top of rear rack | Commuting, short trips |
| Fork bag | 3–6 L each | 1–3 kg each | Bicycle fork | Light camping equipment |
| Pannier | 10–25 L each | 4–12 kg each | Side of front or rear rack | Touring, work, groceries |
Frame Bags
A frame bag fits inside the bicycle’s main triangle, placing cargo low and close to the center of the bike. Such positioning makes frame bags suitable for dense items such as repair tools, food, batteries, locks, water reservoirs, and cooking equipment. A full-frame model can provide around 4–8 liters, while half-frame and wedge designs often provide 1.5–4 liters.
Frame geometry creates the main development challenge. Two medium bicycles can have very different top tube angles, seat tube positions, shock layouts, and bottle-cage locations. One universal pattern rarely fits every bicycle well.
Important frame bag decisions include:
- Full-frame, half-frame, or wedge construction
- One main compartment or divided storage
- Left-side, right-side, or dual-side access
- Fixed straps, removable straps, or bolt-on mounting
- Hydration hose or charging cable opening
- Internal tool loops and mesh pockets
- Bottle clearance below the bag
- Protection against crank, knee, and frame contact
For a size-based collection, three to five frame sizes can cover a broader range of bicycles than one oversized design. Development should begin with frame-triangle measurements rather than bicycle labels such as small, medium, and large. Useful measurements include top edge length, down tube length, seat tube length, front triangle height, rear triangle height, and tube circumference at every strap point.
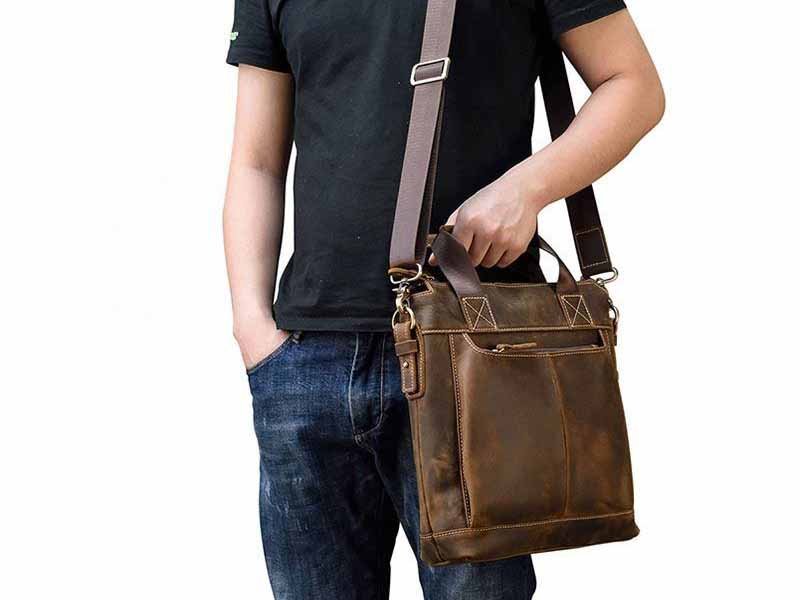
Handlebar Bags
Handlebar bags include compact cylindrical pouches, rectangular front bags, roll-top bags, quick-release baskets, and large bikepacking rolls. Smaller versions generally carry 2–6 liters. Large rolls may carry 8–15 liters of lightweight equipment such as a sleeping bag, insulated jacket, tent body, or spare clothing.
The front of the bicycle offers good visibility for logo placement and easy access for the rider. It also creates several fit restrictions. The bag must avoid brake cables, shift cables, lights, computers, hands, and the front tire. Drop handlebars require special attention because the usable width between the brake levers may be only 360–460 millimeters, depending on the bar and lever position.
Key development measurements include:
- Available width between controls
- Distance from handlebar to front tire
- Distance from handlebar to head tube
- Cable routing and hose movement
- Light and computer location
- Handlebar diameter
- Maximum packed diameter of the bag
A stable handlebar bag normally uses two main bar straps and one lower anti-sway strap. Spacer blocks can create 15–30 millimeters of cable clearance. A semi-rigid back panel helps the bag retain its form, while internal compression reduces cargo movement. For rough roads, attachment points should be reinforced across a wider fabric area rather than sewn only to one exterior panel.
Saddle Bags and Seat Packs
A small saddle bag is designed for repair equipment. Common contents include one inner tube, two tire levers, a compact multi-tool, a patch kit, and a CO₂ cartridge. Capacities generally range from 0.3 to 1.5 liters. Road cyclists often prefer a narrow profile that stays hidden behind the seatpost and does not touch the rider’s thighs.
A seat pack is a larger rackless bag attached to both the saddle rails and seatpost. Capacity commonly ranges from 5 to 17 liters. The longer body provides useful storage, but it also creates leverage behind the saddle. Weak compression, flexible base material, or loose rail straps can lead to visible side-to-side movement.
Seat pack stability depends on:
- Saddle-rail strap width and grip
- Seatpost strap position
- Base panel stiffness
- Side compression panels
- Load distribution inside the bag
- Packed bag length
- Distance between the bag and rear tire
Clearance should be tested with the bag fully loaded, not empty. Small frames, low saddle positions, large tires, and rear suspension can reduce available space. A safe development process includes static load testing, repeated strap tightening, riding vibration, simulated pothole impact, and tire-clearance checks under compression.
Dropper-post bicycles need a shorter and more carefully positioned bag. A large seat pack may block saddle movement or damage the post surface. For mountain-bike use, a compact tool roll or frame-mounted pouch is often more suitable.
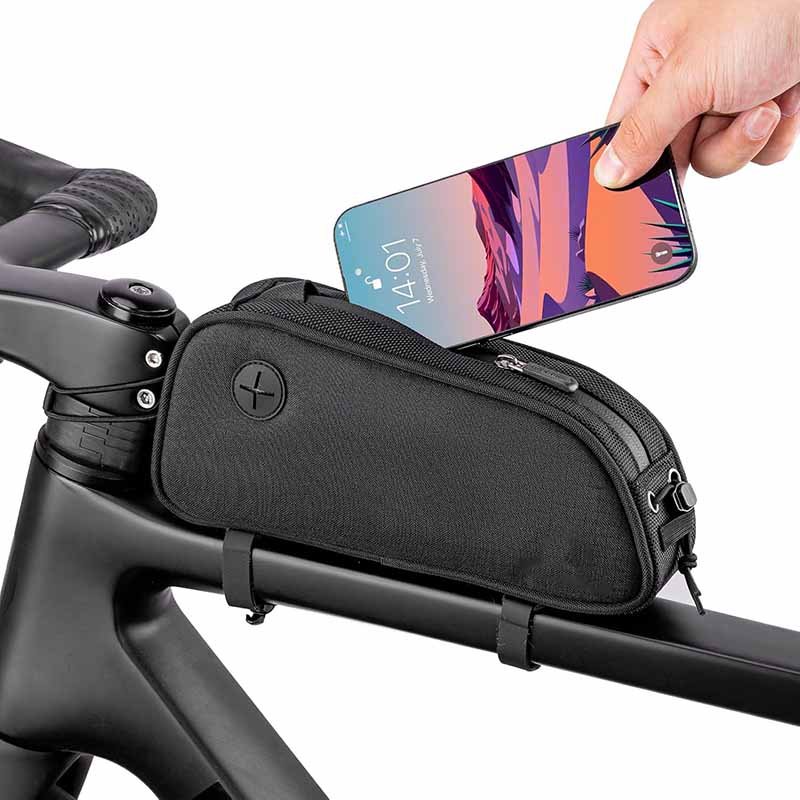
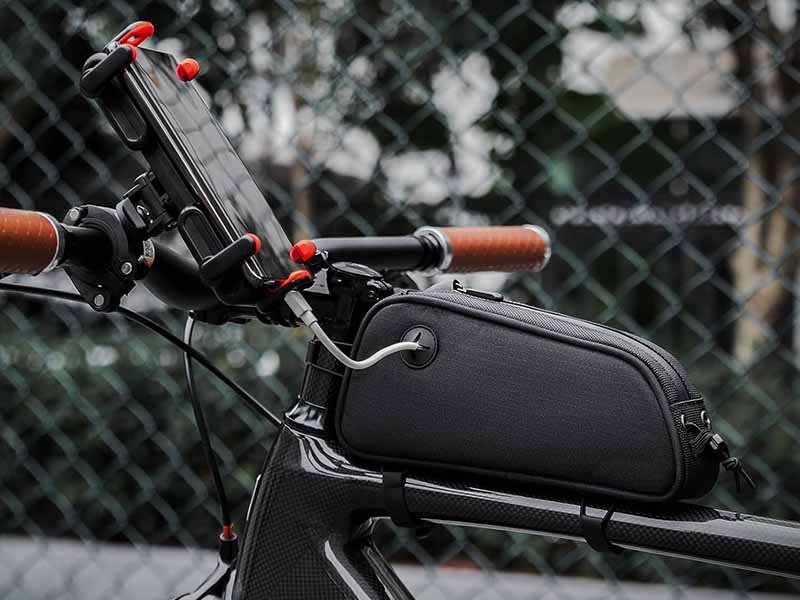
Top Tube and Stem Bags
Top tube bags sit above the bicycle frame and keep frequently used items close to the rider. Common capacities range from 0.4 to 1.5 liters. They are widely used for energy gels, keys, phones, compact cameras, power banks, and charging cables.
Two installation systems are common:
- Strap-mounted bags for broad bicycle compatibility
- Bolt-on bags for frames with top tube mounting bosses
A narrow body is essential. Many riders pedal with their knees close to the top tube, so a bag that expands beyond the frame width may cause repeated contact. A well-shaped top tube bag often uses side-wall reinforcement to prevent outward bulging when packed.
Stem bags, sometimes called feed bags, attach beside the stem and handlebar. They usually hold 0.5–1.2 liters and are designed for one-handed access. A rider may use one bag for a water bottle and a second for snacks, gloves, or a compact camera.
Useful stem bag details include:
- Drawcord opening that can be operated with one hand
- Drainage eyelet in the base
- Three-point attachment to reduce rotation
- Insulated or padded wall options
- Outer mesh pocket for wrappers
- Reinforced rim to keep the opening upright
The upper edge should remain clear of the rider’s hands and brake controls. A soft back panel can also reduce noise and surface wear where the bag touches the bicycle.
Panniers and Rack Bags
Panniers mount on the sides of a front or rear rack and offer some of the highest usable storage volumes. A single pannier commonly carries 10–25 liters. A matched rear pair can therefore provide 20–50 liters, enough for clothing, work equipment, groceries, or long-distance touring supplies.
Unlike strap-mounted bikepacking bags, panniers rely on rack hardware. The upper hooks carry most of the weight, while a lower hook or rail prevents the bag from swinging outward. Hardware spacing must match the rack, and hook dimensions should suit common rack-tube diameters.
Areas requiring close attention include:
- Upper hook opening
- Lower retention position
- Heel clearance
- Wheel-side abrasion panel
- Rack tube compatibility
- Carry handle balance
- Shoulder strap storage
- Quick-release security
- Rattle reduction
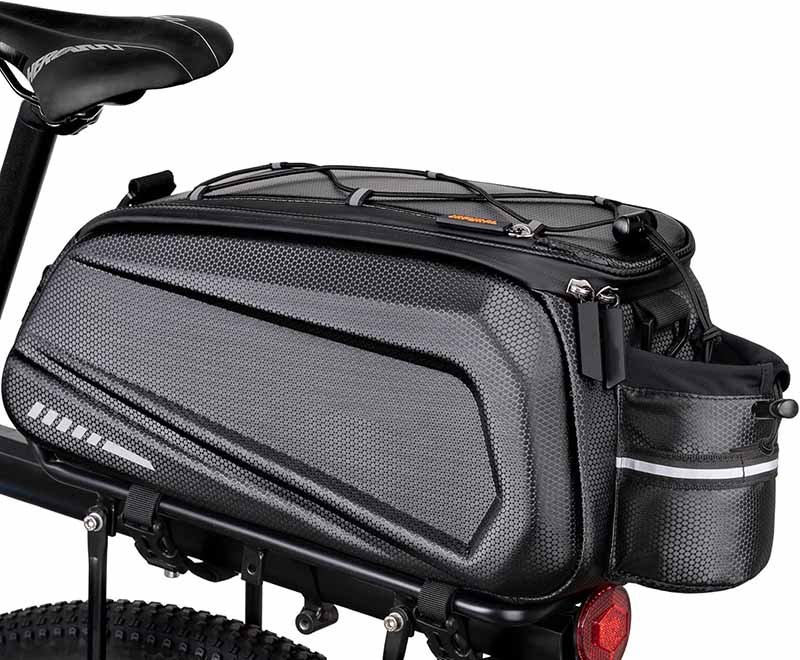
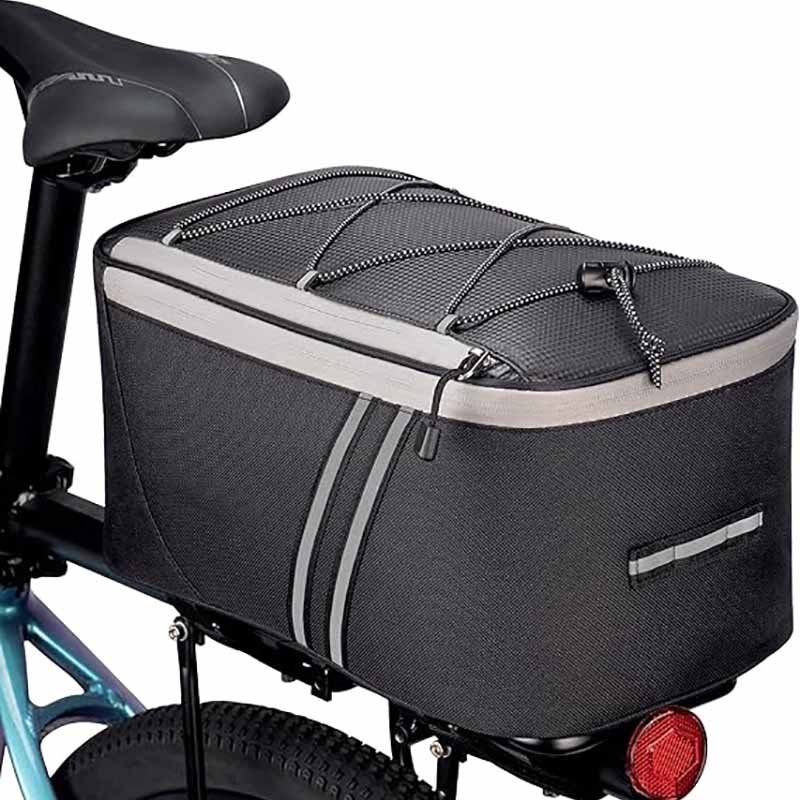
Rack bags sit on top of the rear rack. Capacity commonly ranges from 5 to 15 liters. Such bags are narrower than panniers and work well for lunch, clothing, cameras, tools, or batteries. Some models include fold-down side compartments, creating additional storage without requiring a full pannier system.
For commuting, removable shoulder straps and clean carry surfaces are valuable. The wheel-facing panel should resist mud and abrasion, while the office-facing side should remain presentable after daily use.
Fork Bags and Tool Rolls
Fork bags use cage mounts or threaded fork bosses to carry light cargo. Capacities usually range from 3 to 6 liters per side. They are often selected for sleeping mats, rainwear, cooking sets, or soft camping equipment.
Fork-mounted weight directly affects steering. Heavy tools, large water containers, or dense food loads can make the bicycle harder to control. Bag and cage limits should therefore be clearly defined during product development.
A fork bag needs:
- Strong vertical retention
- Side compression
- Abrasion-resistant base fabric
- Secure cage contact
- Wheel and brake clearance
- Water-resistant closure
- Reinforced strap channels
Tool rolls are smaller and can mount under the saddle, inside the frame, or on the handlebar. They organize tools in separate sleeves and roll into a compact package. A tool roll may carry less than one liter, yet its construction must handle sharp metal edges and concentrated weight.
Inner reinforcement, elastic loops, and shaped pockets prevent tools from striking one another. The outer strap should remain secure after repeated opening, especially when the roll is exposed to dust, rain, and vibration.
Which Bike Bags Fit Each Riding Style?
Road cycling calls for light and narrow bags. Gravel and mountain riding require stronger attachments and abrasion resistance. Commuters value fast removal and organized compartments. Bikepacking riders distribute cargo between the frame, handlebar, saddle, and fork, while touring riders often use racks and panniers for higher loads. Product selection should begin with riding conditions, not appearance alone.
| Riding Style | Recommended Bag Types | Common Total Capacity | Main Product Priorities |
|---|---|---|---|
| Road cycling | Saddle bag, top tube bag | 0.7–3 L | Low weight, narrow profile, low movement |
| Gravel riding | Frame bag, top tube bag, handlebar bag | 3–15 L | Stability, dust control, abrasion resistance |
| Mountain biking | Compact frame bag, tool roll, stem bag | 1–6 L | Body clearance, impact control, strong mounting |
| Daily commuting | Pannier, rack bag, handlebar bag | 8–40 L | Quick removal, organization, laptop protection |
| Bikepacking | Frame bag, seat pack, handlebar roll, fork bags | 20–50 L | Balanced load, compression, weather resistance |
| Touring | Pannier set, rack bag, handlebar bag | 35–80 L | High capacity, rack fit, repairable hardware |
| E-bike riding | Rack bag, pannier, frame pouch | 5–40 L | Battery clearance, cable access, load support |
| Triathlon | Aero top tube bag, rear hydration pouch | 0.5–2 L | One-hand access, low drag, secure mounting |
Road Cycling
Road cyclists usually carry a limited set of items: one or two inner tubes, tire levers, an inflator, a multi-tool, nutrition, keys, and a phone. A compact saddle bag combined with a slim top tube bag can provide enough storage without affecting the bicycle’s clean profile.
Weight and movement matter more than maximum volume. A soft 1.5-liter top tube bag may expand sideways when full, causing knee contact. A structured 0.8-liter model can perform better because the contents stay inside a controlled shape.
Road-focused development should consider:
- Bag width close to the top tube width
- Low-profile zipper pulls
- No loose strap ends
- Quiet hardware
- Minimal wind-facing surface
- Sweat and rain resistance
- Easy tool removal
- Compatibility with carbon frames
Reflective printing can be added without making the product look like workwear. Small reflective logos, piping, or rear-facing tabs improve visibility while maintaining a clean appearance.
For a compact road collection, three products can cover most daily needs: a 0.5–0.8-liter saddle pouch, a 0.6–1-liter top tube bag, and a 2–3-liter handlebar pouch.
Gravel Riding
Gravel bicycles are used on paved roads, loose stone, forest tracks, washboard surfaces, and long-distance routes. Bags face more vibration, dust, and frame contact than they do during smooth urban riding.
Frame bags are particularly useful because they keep weight centered. A half-frame bag with 2–4 liters of capacity leaves room for water bottles, while a full-frame version offers more space for long routes. Top tube bags provide quick food access, and compact handlebar bags carry an extra layer or camera.
Strap movement becomes a major wear point. Repeated vibration can cause webbing to rub against painted, aluminum, or carbon surfaces. Soft neoprene-backed straps can improve grip and reduce direct abrasion. Replaceable straps also allow worn parts to be changed without replacing the complete bag.
Gravel bag testing should include:
- Repeated vibration with a full load
- Dust exposure around zippers
- Strap slippage on smooth frame tubes
- Abrasion at contact points
- Water spray from the front wheel
- One-handed opening while wearing gloves
- Closure performance after contamination
A gravel collection often works best with coordinated 1-liter, 3-liter, 5-liter, and 10-liter storage options rather than many similar sizes.
Mountain Biking
Mountain-bike geometry leaves less open frame space. Rear shocks, wide down tubes, dropper posts, and large tires can reduce the mounting area available for bags. Rider movement is also more aggressive. During descents, the rider may move behind the saddle or lower the body close to the frame.
Low-profile storage is therefore important. Compact frame pouches, bolt-on top tube bags, stem bags, and tool rolls can carry essential equipment without blocking movement. Large seat packs are less suitable when a dropper post is used.
Metal tools should be held in place rather than allowed to move freely. Internal elastic loops, padded dividers, and closed-cell foam reduce noise and prevent the contents from damaging the bag.
Attachment systems should account for mud and water. Hook-and-loop material can lose grip when contaminated, while smooth webbing may slip on wet tubing. A three-point mounting layout usually performs better than two independent straps.
Trail testing should include jumps, braking forces, steep climbing, side impacts, and repeated saddle lowering. A bag that survives a static pull test may still rotate or sag during real riding.
Commuting and Daily Transport
Commuter bags often carry heavier and more valuable items than sport-focused bags. A daily load may include a laptop, charger, clothing, lunch box, water bottle, documents, and bicycle lock. Total weight can easily reach 5–10 kilograms.
Panniers and rack bags are well suited to such loads because the rack supports the weight. A padded backpack may be convenient off the bicycle, but carrying a heavy pack on the rider’s back can increase heat and shoulder pressure.
Laptop protection requires more than a foam sleeve. The compartment should:
- Sit above the base of the bag
- Remain separated from hard objects
- Include closed-cell padding
- Prevent side-to-side movement
- Stay away from the wheel-facing panel
- Fit the stated laptop dimensions
- Remain accessible without emptying the bag
Quick removal is equally important. A commuter should be able to detach the bag in a few seconds without handling muddy straps. Hidden shoulder straps, balanced carry handles, and clean back-panel covers improve off-bike use.
Common commuter capacities range from 12–20 liters for one-day use and 20–40 liters for larger loads or grocery trips.
Bikepacking and Touring
Bikepacking distributes storage across several areas of the bicycle. A common setup may include a 3–6-liter frame bag, an 8–15-liter handlebar roll, a 10–17-liter seat pack, and two 3–5-liter fork bags. Combined capacity often falls between 25 and 45 liters.
Touring setups usually rely on front or rear panniers. A four-pannier system may provide 50–80 liters, supporting longer trips, colder-weather clothing, cooking gear, and larger food supplies.
Weight placement should follow a simple principle:
- Dense items near the center of the frame
- Lightweight sleeping equipment at the handlebar
- Clothing in the seat pack
- Balanced loads across paired panniers
- Frequently used items near the top or front
- Fragile electronics inside padded compartments
Higher capacity does not always improve the ride. Large bags encourage overpacking, increase stopping distance, and place more stress on seams and hardware. Capacity labels should be supported by load guidance, packing examples, and clear mounting instructions.
Repairable hardware adds value during long trips. Replaceable buckles, removable straps, spare screws, and accessible attachment panels allow small failures to be corrected on the road.
E-Bike Riding
E-bikes often have wider frame tubes, integrated batteries, rear racks, display cables, and built-in lighting systems. Bag mounting must account for each component. A frame bag should not block battery removal or charging ports. A rack bag should not cover the rear light. Handlebar straps should remain clear of display wiring.
E-bike users may carry chargers, spare batteries, locks, helmets, and work equipment. Such loads make panniers and rack bags useful. Reinforced bases and stable rack hardware are more important than soft, lightweight construction alone.
Product development should check:
- Battery removal path
- Charging-port access
- Cable and display clearance
- Rack load rating
- Rear light visibility
- Heat-sensitive storage areas
- Bag removal while the bicycle is parked
- Security for expensive accessories
A coordinated e-bike range can include a compact charger pouch, rack-top bag, removable pannier, and handlebar organizer. Shared fabrics, reflective details, zipper pulls, and logo positions create a unified appearance across the collection without forcing every product to use the same structure.
How Do Bike Bag Types Compare?
Bike bag types differ in capacity, weight position, accessibility, bicycle compatibility, and mounting stability. Frame bags provide centered storage, top tube and stem bags allow fast access, seat packs offer rackless capacity, while panniers support heavier loads. The strongest collection combines several bag positions instead of forcing one product to serve every riding condition.
A comparison should begin with how the bag performs when fully loaded. Empty products can look stable in photographs, yet a filled bag changes shape, pulls on the straps, shifts the bicycle’s center of gravity, and places stress on seams and hardware. Capacity numbers are useful, but volume alone does not explain whether a bag will remain comfortable and controlled on the road.
| Bag Position | Access While Riding | Weight Stability | Load Capacity | Bicycle Fit Difficulty | Main Risk |
|---|---|---|---|---|---|
| Top tube | Very high | High at light loads | Low | Medium | Knee contact |
| Stem | Very high | Medium | Low | Low to medium | Handlebar interference |
| Frame | Medium | Very high | Medium | High | Poor geometry fit |
| Handlebar | High | Medium | Medium | Medium | Steering influence |
| Saddle pouch | Low | High | Low | Low | Strap movement |
| Seat pack | Low | Medium | Medium to high | High | Sway and tire contact |
| Rack bag | Medium | High | Medium | Medium | Rack movement |
| Pannier | Medium | High | High | Medium | Heel and rack interference |
| Fork bag | Low | Medium | Low to medium | High | Steering imbalance |
Capacity Planning
Stated capacity should match the usable interior, not only the outer dimensions. Foam panels, folded seams, liners, dividers, rounded corners, and zipper placement can reduce usable storage. A bag calculated at five liters from external measurements may offer considerably less practical space once the structure is completed.
Product planning should connect capacity with realistic contents:
- 0.3–0.8 liters: tire tube, levers, patch kit, keys
- 0.8–1.5 liters: phone, power bank, snacks, compact tool
- 2–4 liters: rain jacket, camera, gloves, food, small lock
- 4–8 liters: tools, cooking equipment, water bladder, clothing
- 8–15 liters: sleeping bag, jacket, daily commuting load
- 15–25 liters: laptop, groceries, touring clothes, larger equipment
- 25–50 liters per pair: extended touring or high-volume commuting
A cycling bag should also have a stated load recommendation. Volume and weight are not interchangeable. Ten liters of clothing may weigh less than two liters of metal tools. Dense cargo creates stronger pulling forces at attachment points and may distort the bag even when the interior is not full.
For small frame and top tube bags, a load range of 0.5–2 kilograms is often more realistic than a high marketing figure. Large seat packs generally perform better with lightweight equipment rather than tools or water. Panniers supported by suitable racks can carry heavier loads, but the safe limit must remain below the rack and hardware ratings.
Overfilled bags create several problems:
- Zippers become difficult to operate
- Side panels bulge toward the rider
- Seams remain under constant tension
- Hook-and-loop closures lose full contact
- Bag bases sag toward tires
- Rack hooks carry uneven pressure
- Waterproof liners may separate from outer shells
A useful development method is to prepare a standard packing list for each model. The bag can then be photographed, weighed, measured, and tested using the same contents during sampling and mass-production inspection.
Weight Distribution
Weight position changes steering, climbing, braking, and cornering. Cargo placed near the bicycle’s center generally has less influence on handling than cargo positioned high, far forward, or far behind the rider.
Frame bags are efficient for heavier items because the load remains inside the main triangle. Tools, food, batteries, and water can be stored lower in the bag, while lighter items remain near the top. Such placement reduces side movement and keeps the bicycle balanced during standing climbs.
Handlebar bags should carry lighter contents. A large load at the front makes steering slower and can pull the handlebar sideways at low speed. The effect becomes more noticeable on narrow trails, steep climbs, and loose surfaces. Sleeping equipment, jackets, and lightweight clothing are better choices than metal tools or dense water containers.
Seat packs also work best with light, compressible items. Heavy cargo positioned behind the saddle creates a pendulum effect. Each pedal stroke can cause the bag to move from side to side. Stiffer base panels, shorter packed length, and strong compression straps reduce the problem, but careful packing remains necessary.
Panniers should be balanced from left to right. A large difference in weight can cause the bicycle to lean when stopped and feel uneven during cornering. Front and rear distribution also matters. Too much rear weight may reduce front-wheel grip on climbs, while excessive front weight makes steering slower.
For multi-bag systems, a useful arrangement is:
- Dense tools and food in the frame bag
- Frequently used items in the top tube or stem bag
- Lightweight sleeping gear at the handlebar
- Clothing in the seat pack
- Balanced utility loads in panniers
- Light, bulky gear on fork cages
Product instructions should explain load position. Clear packing guidance reduces misuse and helps the rider experience the product as intended.
Fast Access
Fast access matters when the rider needs food, a phone, camera, map, gloves, or small tools without removing other equipment. Bag opening direction, zipper length, internal organization, and mounting position all influence access.
Top tube bags provide some of the fastest access. A long upper zipper can be opened with one hand, although the slider must remain stable over vibration. Dual zipper pulls provide opening flexibility, but loose metal pulls can create noise. Soft cord pulls are quieter and easier to operate while wearing gloves.
Stem bags also work well for food and bottles. A drawcord opening allows the rider to reach inside without stopping. The opening should remain upright instead of collapsing. A stiffened rim or thin foam layer helps the bag keep its shape.
Handlebar pouches are accessible when designed with a forward or top opening. Large roll-top handlebar bags are slower to open because compression straps and rolled closures must be released. A separate front pocket can solve the problem without weakening the main compartment.
Frame bags need carefully planned zipper locations. A zipper positioned too close to the crank side may be difficult to reach. Full-length openings provide better access but place more stress on the zipper when the bag is overfilled. Shorter openings retain structure but can make large items difficult to insert.
Internal organization should remain simple. Too many small pockets reduce usable space and increase sewing time. Useful features include:
- One padded phone sleeve
- One key clip
- Two elastic tool loops
- One flat mesh pocket
- One removable divider
- One cable port
Every pocket should have a clear purpose. Decorative organization can add cost without improving the riding experience.
Bicycle Compatibility
A universal label should be used carefully. Bicycles vary in frame size, tube shape, cable routing, rack geometry, saddle height, suspension, tire width, and accessory placement. A bag may fit many models, but rarely every model.
Frame bags require the most detailed fit work. Product teams should record:
- Top tube length
- Down tube length
- Seat tube length
- Triangle height at front and rear
- Tube circumference at each strap position
- Bottle-cage location
- Cable and hose routing
- Rear shock position
- Crank and knee clearance
Paper templates are useful before sample production. Riders can place the template inside the frame triangle and confirm clearances. Printable sizing sheets also reduce incorrect product selection during online sales.
Handlebar compatibility depends on width, control position, and cable space. Flat bars usually provide more room than drop bars. A large cylindrical bag may fit a mountain bike but block the hands or brake levers on a gravel bicycle.
Seat packs require enough exposed seatpost and tire clearance. A useful measurement set includes:
- Saddle rail to tire distance
- Exposed seatpost length
- Saddle setback
- Seatpost diameter
- Rear suspension movement
- Maximum bag height when loaded
Panniers depend on rack construction. Hook spacing, rail diameter, lower retention points, and heel clearance should be tested. The rider’s shoe must not strike the bag during each pedal rotation.
Compatibility charts should show dimensions rather than vague bicycle categories. Clear measurements give cycling brands fewer returns and make product selection easier for riders.
Rackless Bags and Panniers
Rackless systems use frame bags, handlebar rolls, seat packs, and fork bags. They keep the bicycle narrow and can be fitted to bikes without conventional racks. Such systems are popular for gravel routes, mountain trails, and lightweight bikepacking.
Panniers use a rack-supported structure and provide easier loading, higher capacity, and faster removal. They are well suited to commuting, groceries, delivery use, and traditional touring.
Rackless bag advantages include:
- No permanent rack required
- Narrow profile on trails
- Lower hardware weight
- Compatibility with many sport bicycles
- Flexible bag combinations
- Better movement through tight spaces
Rackless bag limitations include:
- More straps to install
- Slower bag removal
- Greater risk of frame rubbing
- More difficult packing
- Lower suitability for dense cargo
- Seat pack sway under poor compression
Pannier advantages include:
- High usable capacity
- Rectangular packing space
- Quick rack removal
- Strong support for heavier loads
- Easier organization
- Better suitability for laptops and groceries
Pannier limitations include:
- Rack required
- Increased bicycle width
- Possible hardware noise
- Heel-clearance restrictions
- Higher total system weight
- More wind exposure
Neither system is automatically better. A road-focused cycling label may gain more value from compact rackless products, while a commuter range may need panniers and rack bags as its core products. Some collections can include both systems under one visual design language.
Mounting Systems
Mounting hardware determines whether the bag remains stable after hundreds of kilometers. Fabric quality cannot compensate for a poorly positioned strap, weak buckle, or unsuitable rack hook.
Hook-and-loop straps are widely used for frame, top tube, saddle, and handlebar bags. They are adjustable, lightweight, and easy to replace. Strap width commonly ranges from 20 to 50 millimeters. Wider straps spread pressure across the tube but require more mounting space.
Neoprene-backed straps provide cushioning and grip. They can reduce paint wear and help stabilize the bag on smooth tubes. The neoprene layer should remain thin enough to wrap cleanly without creating a bulky fold.
Webbing straps with side-release or cam buckles support higher tension. They work well for handlebar rolls, seat packs, and compression systems. Cam buckles allow precise tightening but should be positioned away from painted frame surfaces.
Bolt-on mounting creates a clean appearance and strong stability on compatible bicycles. Reinforced holes or metal eyelets must match frame bosses accurately. The bag base around each mounting point should resist tearing and twisting.
Rack hooks may use glass-filled nylon, aluminum, steel, or composite structures. Product selection depends on target load, rack tube size, cost, and desired removal method. Adjustable hooks cover more racks, while fixed hooks provide a simpler appearance.
Magnetic closures can improve quick access, but they should not serve as the only load-bearing connection. Magnets are better used for flaps or accessory pockets than primary bicycle mounting.
During testing, mounting systems should be checked for:
- Strap slippage
- Buckle opening under vibration
- Stitching movement
- Tube-surface abrasion
- Hook deformation
- Fastener corrosion
- Noise on rough roads
- Ease of operation with gloves
- Performance after repeated removal
A bag should be tested with the maximum intended load and on the intended terrain. Static hanging tests alone do not reproduce the forces created by braking, cornering, vibration, and pothole impact.
What Materials and Features Matter?
Bike bag materials must control water, abrasion, tearing, shape, weight, cleaning, and repeated strap tension. Polyester and nylon are widely used for outer shells, while TPU, PVC, PU coatings, neoprene, foam, and rigid sheets provide structure and protection. Material selection should follow the riding environment, bag position, target weight, appearance, and planned construction method.
The outer fabric is only one part of the system. Thread, seam position, zipper tape, binding, webbing, backing foam, liner, and reinforcement panels must work together. A premium shell fabric can still fail when water enters through needle holes or when a strap anchor is sewn into an unsupported panel.
| Material | Common Weight Range | Main Strength | Main Limitation | Suitable Products |
|---|---|---|---|---|
| 300D polyester | 150–220 gsm | Light, cost controlled | Lower abrasion resistance | Small road bags |
| 600D polyester | 220–350 gsm | Durable and widely available | Heavier than fine nylon | Commuter and rack bags |
| 420D nylon | 180–260 gsm | Strong for its weight | Higher material cost | Gravel and bikepacking bags |
| 500D nylon | 230–320 gsm | High abrasion resistance | Heavier construction | Trail and touring bags |
| Ripstop nylon | 100–240 gsm | Tear control and low weight | May need reinforcement | Handlebar and seat bags |
| TPU-laminated fabric | 200–450 gsm | Weldable and waterproof | Higher process requirements | Dry bags and panniers |
| PVC-coated fabric | 300–700 gsm | Strong water barrier | Heavier and stiffer | Delivery and utility panniers |
| Neoprene | 1–5 mm thick | Cushioning, grip, flexibility | Not fully waterproof at seams | Straps, sleeves, protective panels |
Fabric Selection
Polyester offers stable color, wide availability, and controlled cost. A 300D polyester can suit small saddle and top tube bags where low weight matters. A 600D polyester provides more body and abrasion resistance for commuter panniers, rack bags, and daily utility products.
Nylon usually provides higher tear and abrasion performance for a given weight. A 420D or 500D nylon is well suited to gravel, trail, and bikepacking products. Ripstop structures help control the spread of small tears, although exposed high-contact areas may still require heavier reinforcement.
Fabric denier should not be treated as a complete quality measurement. Coating weight, yarn density, weave construction, backing adhesion, and finishing quality strongly affect performance. Two fabrics labeled 600D may behave very differently during abrasion and water testing.
Important material checks include:
- Fabric weight in grams per square meter
- Yarn construction and density
- Tensile strength
- Tear strength
- Abrasion cycles
- Coating adhesion
- Water resistance
- Colorfastness
- UV exposure performance
- Low-temperature flexibility
- Resistance to cleaning agents
Dark fabrics can become hot under sunlight, especially when carrying electronics or food. Light colors improve visibility but show dirt more easily. Printed patterns require attention to alignment, color consistency, and coating compatibility.
For products sold as a collection, the same shell fabric can be used across several models while structure is adjusted through foam, lining, and reinforcement. Such planning helps maintain color consistency and reduces material complexity.
Neoprene Applications
Neoprene is useful in bike bags where cushioning, flexibility, surface grip, and shape recovery are required. It is commonly used for frame protectors, bottle sleeves, phone pockets, tool wraps, soft dividers, shoulder pads, zipper garages, and strap backing.
Thickness selection affects feel and function:
- 1–1.5 mm: thin protective layer and strap backing
- 2 mm: phone sleeves, soft dividers, compact pouches
- 3 mm: bottle sleeves, tool wraps, padded panels
- 4–5 mm: stronger impact protection and structured cases
A laminated neoprene usually combines the foam layer with polyester or nylon fabric on one or both sides. The face fabric allows printing, color matching, sewing, and abrasion control. Smooth-skin neoprene provides more grip and water resistance but can show scratches and may feel sticky against certain surfaces.
Neoprene strap backing helps distribute pressure around bicycle tubes. The foam conforms to curved surfaces and reduces movement. It also acts as a buffer between webbing and frame paint.
Neoprene should not automatically be described as waterproof. The foam structure can resist water penetration, but stitched seams, fabric laminations, cut edges, and zipper openings may still allow moisture to enter. For bags carrying electronics, neoprene works best as a protective layer inside a stronger water-resistant outer construction.
Useful neoprene bike products include:
- Frame tube pouches
- Compact tool bags
- Water bottle sleeves
- Energy gel holders
- Phone protectors
- Chainstay guards
- Soft handlebar accessories
- E-bike battery covers
- Padded strap systems
- Medical or sports support accessories matched to cycling collections
The material also supports detailed printing, embossed logos, woven labels, rubber patches, and heat-transfer branding. Logo method should be selected after checking surface stretch and lamination temperature limits.
Waterproof Construction
Water-resistant and waterproof are different product levels. A coated fabric may block rain through the panel, but water can still enter through sewing holes, zipper teeth, folded corners, or unsealed binding.
Water-resistant construction suits brief rain and wheel spray. It may include PU-coated fabric, reverse-coil zippers, protective flaps, and internal lining. Waterproof construction requires stronger control of seams and openings.
Three common construction levels are:
| Protection Level | Construction | Suitable Conditions |
|---|---|---|
| Splash resistant | Coated fabric, standard seams, covered zipper | Light rain and daily commuting |
| High water resistance | Coated shell, sealed seam tape, water-resistant zipper | Long rain and wet gravel riding |
| Waterproof dry-bag level | TPU/PVC laminated fabric, welded seams, roll-top closure | Heavy rain and exposed touring |
Welded seams use heat or high-frequency energy to join compatible laminated materials without needle holes. The process can produce a clean, strong water barrier. Fabric type, coating thickness, welding temperature, pressure, and dwell time must be controlled.
Roll-top closures remain one of the most dependable options for large waterproof compartments. The upper section should provide enough material for at least three secure rolls under normal packing. Buckles and webbing must maintain tension after repeated wet use.
Waterproof zippers offer faster access but increase cost and require careful sewing or welding. Tight bends should be avoided because the zipper may become difficult to operate. Lubrication and maintenance instructions may also be needed.
Water testing can include:
- Spray testing
- Shower exposure
- Water-column pressure
- Seam leakage inspection
- Wet-content checks
- Repeated opening after contamination
- Rain testing with the bag mounted on a moving bicycle
No bag opening should be described beyond the tested level. Honest protection claims build stronger long-term product credibility.
Zipper Choices
Zippers influence access, appearance, water control, and product life. Coil zippers are flexible and work well around curved panels. Molded-tooth zippers offer a stronger visual profile and resist dirt, but they require more space and are less flexible.
Reverse-coil zippers place the coil toward the inside, creating a cleaner outer surface. A PU-coated reverse zipper improves rain protection for frame, top tube, handlebar, and commuter bags.
Zipper size should match the bag and expected load:
- Size 3: very small pockets and lightweight accessories
- Size 5: top tube, saddle, frame, and handlebar bags
- Size 8: panniers, rack bags, and larger compartments
- Size 10: heavy utility and delivery bags
A larger zipper is not always better. Oversized teeth add weight and stiffness. Small bags with curved openings often operate more smoothly with a quality size 5 coil zipper.
Development details include:
- One-way or two-way opening
- Slider locking strength
- Pull-tab length
- Glove operation
- Zipper garage at the closed end
- Water-shedding flap
- Curve radius
- Replaceability
- Noise during vibration
The zipper should not carry the full pressure of an overfilled bag. Compression straps or structured side panels should manage the load. Seam allowances around the zipper also need reinforcement, particularly at the opening ends where pulling forces concentrate.
Reinforcement and Wear Control
Bike bags fail most often at contact points and attachment areas rather than across the center of a fabric panel. Reinforcement should be placed where forces enter the product.
High-stress areas include:
- Strap anchors
- Saddle-rail connections
- Rack hook panels
- Bag bases
- Fork cage contact areas
- Zipper ends
- Carry handles
- Compression buckle points
- Corners near the wheel
- Frame-contact surfaces
Reinforcement options include additional fabric layers, bar-tack stitching, box-and-cross stitching, webbing bridges, hypalon patches, TPU panels, molded sheets, and internal backing plates.
Bar tacks provide concentrated strength but can perforate waterproof materials. For welded products, reinforcement patches may need to be welded before hardware is attached. Sewing and welding processes should be planned together rather than added separately.
Closed-cell foam supports shape and protects contents. Common thicknesses range from 2 to 8 millimeters. Thin foam suits top tube and frame bags, while thicker foam may be used around laptops, cameras, or e-bike chargers.
PE or PP boards provide greater stiffness in bag bases and back panels. The board should have rounded corners to prevent cutting through the fabric. Removable boards simplify cleaning and replacement.
Abrasion panels should be tested against actual bicycle surfaces. Frame tubes, rack rails, fork cages, and tire spray create different wear conditions. A smooth fabric may perform well against flat abrasion equipment but still wear quickly under repeated edge contact.
Reflective Details
Reflective elements improve recognition under vehicle headlights, especially during early-morning commuting, evening riding, and poor weather. Their position matters more than adding a large decorative area.
Useful locations include:
- Rear-facing pannier panels
- Side panels visible at intersections
- Handlebar bag edges
- Seat pack rear sections
- Moving zipper pulls
- Shoulder straps used off the bicycle
Reflective piping creates a clear outline around the bag. Reflective print allows logos, geometric patterns, and directional graphics. Reflective webbing combines structure with visibility. Heat-transfer films provide strong brightness but require suitable fabric and accurate application temperature.
Visibility details should remain visible after the bag is packed and mounted. A reflective logo hidden behind the rider’s leg or under a rack provides little value.
Reflective materials should be checked after:
- Repeated bending
- Surface abrasion
- Rain exposure
- Cleaning
- Heat and cold cycling
- UV exposure
- Lamination and sewing
Bright fabric colors can support daytime visibility, while reflective materials work mainly under directed light at night. Combining both approaches creates stronger all-day recognition.
Cycling brands can also develop a consistent visual system across the range. The same reflective line, printed pattern, zipper pull, or rubber badge can appear on frame bags, panniers, saddle bags, and handlebar products, giving the collection a recognizable identity without using identical shapes.
How Can Cycling Brands Choose the Right Bags?
Cycling brands should select bike bags according to riding purpose, bicycle geometry, carrying volume, load weight, weather exposure, and mounting position. A focused collection usually performs better than a large group of similar bags. Each model should solve a clear storage problem, fit its intended bicycle, remain stable under load, and share a consistent material and visual system with the rest of the range.
Product development should start with riding conditions rather than outer appearance. A commuter pannier, gravel frame bag, and road saddle pouch may share colors and logo treatments, but their structures should remain different. Each position on the bicycle creates separate requirements for reinforcement, access, clearance, water control, and load distribution.
Product Collection
A complete bike bag range does not need twenty nearly identical styles. A smaller group of well-positioned products can cover more riding situations and simplify production, inventory, photography, packaging, and material purchasing.
A practical entry collection may include:
| Product | Suggested Capacity | Main Riding Use | Main Selling Function |
|---|---|---|---|
| Saddle pouch | 0.5–1 L | Road and daily riding | Repair tool storage |
| Top tube bag | 0.8–1.2 L | Road, gravel, e-bike | Fast-access essentials |
| Frame bag | 3–5 L | Gravel and bikepacking | Centered cargo storage |
| Handlebar pouch | 3–5 L | Commuting and leisure | Jacket, camera, daily items |
| Seat pack | 8–12 L | Bikepacking | Rackless clothing storage |
| Commuter pannier | 15–22 L | Work and city travel | Laptop and daily equipment |
Six distinct models can serve road cyclists, commuters, gravel riders, and weekend tourers without creating excessive product overlap.
A larger range can be divided into clear groups:
- Road collection: compact saddle pouch, narrow top tube bag, small handlebar pouch
- Gravel collection: half-frame bag, bolt-on top tube bag, stem bag, handlebar roll
- Bikepacking collection: full-frame bag, seat pack, fork bags, accessory pouch
- Commuter collection: pannier, rack bag, convertible backpack, laptop handlebar bag
- E-bike collection: charger pouch, reinforced pannier, rack-top bag, battery cover
Each group should have a distinct purpose. Changing only the color or adding one pocket does not create a meaningful new model. Capacity, mounting method, internal organization, and structural support should match a defined riding scenario.
Material sharing can control development complexity. One shell fabric, lining, webbing width, zipper family, reflective trim, and logo method may support several models. Structural layers can then be adjusted according to function. A small top tube bag may use 2-millimeter foam, while a commuter pannier may require 5-millimeter padding and a reinforced back panel.
A coordinated range should also establish visual rules:
- Consistent logo position
- Shared zipper-pull design
- Matching webbing and buckle colors
- Repeated reflective graphic
- Standard label placement
- Common lining color
- Related seam and panel shapes
Such details make separate products look like one collection without forcing every bag into the same silhouette.
Sizes and Capacities
Size planning should combine internal volume with bicycle fit. A bag may offer useful storage yet fail because its body is too wide, too tall, or too long for the intended mounting area.
For frame bags, sizing should rely on actual triangle dimensions. General bicycle labels such as small, medium, and large are not precise enough because frame geometry varies between manufacturers.
A frame bag measurement sheet should include:
- Top edge length
- Down tube edge length
- Seat tube edge length
- Front bag height
- Rear bag height
- Maximum body width
- Tube circumference at every strap
- Bottle-cage clearance
- Cable-routing position
- Shock or suspension clearance
Three frame-bag sizes can cover a basic range, while four or five sizes provide more accurate fitting. Another approach uses separate patterns for road, gravel, and mountain bicycle geometry.
Top tube bags require control of width more than overall volume. Finished width commonly stays around 45–65 millimeters, depending on the bicycle and target rider. Wider bags may hold more but are more likely to contact the knees.
Handlebar bags should be sized according to handlebar type:
- Drop-bar compact pouch: approximately 200–320 millimeters wide
- Flat-bar daily pouch: approximately 250–400 millimeters wide
- Bikepacking roll: approximately 350–500 millimeters wide
- Large touring bag: sized around cable, light, and lever clearance
Seat packs require both capacity and vertical-clearance checks. An eight-liter bag may fit a small bicycle more safely than a long sixteen-liter version. Product information should state the minimum distance needed between saddle rails and rear tire.
Pannier sizing should consider heel clearance as well as liters. A long rectangular bag may carry more but can be struck by the rider’s heel. Tapering the lower front corner can improve pedaling clearance without removing much usable space.
Capacity should be measured through a repeatable method. A factory can use standardized filling material or measured water-filled inner bags to verify volume. Finished measurements should be taken after foam, lining, dividers, and closures are installed.
Useful specification fields include:
| Specification | Why It Matters |
|---|---|
| External dimensions | Bicycle clearance and packaging |
| Usable internal dimensions | Real item fit |
| Measured capacity | Product comparison |
| Empty product weight | Riding and shipping weight |
| Suggested load | Mounting and seam protection |
| Maximum tested load | Quality validation |
| Minimum mounting clearance | Compatibility |
| Strap adjustment range | Tube and rack fit |
Clear measurements reduce product returns and help riders select the correct model before ordering.
Colors and Logos
Color and branding choices should work with the fabric, riding environment, printing process, and production quantity. A design that looks strong on a computer screen may lose detail on textured fabric or stretch unevenly on neoprene.
Common color approaches include:
- Solid stock fabric colors
- Custom-dyed fabric
- Full-surface printed panels
- Contrast webbing and zipper tape
- Reflective graphic accents
- Color-coded product categories
- Limited seasonal color releases
Stock colors usually support faster sampling and smaller production runs. Custom dyeing provides greater control but may require higher fabric quantities and additional color approval. Color matching should use physical references such as Pantone codes and approved fabric swatches rather than screen images alone.
Logo methods should be chosen according to the surface and expected wear.
| Logo Method | Suitable Surfaces | Main Advantages | Main Considerations |
|---|---|---|---|
| Screen printing | Polyester, nylon, neoprene | Clear color and controlled cost | Limited detail on rough fabric |
| Heat transfer | Smooth woven fabric | Fine graphics and multiple colors | Temperature must suit coating |
| Embroidery | Woven outer panels | Durable and raised appearance | Needle holes affect water control |
| Woven label | Seams and exterior panels | Detailed and consistent | Less suitable for large branding |
| Rubber patch | Nylon, polyester, neoprene | Strong outdoor appearance | Mold cost and minimum quantity |
| Reflective print | Outer visible panels | Branding plus night visibility | Requires adhesion testing |
| Embossed neoprene | Neoprene panels | Subtle and durable | Best for simple artwork |
Large logos should not occupy areas exposed to constant frame rubbing. Printed branding near strap anchors may crack or become hidden after installation. Logo position should be reviewed on a fully mounted sample, not only on a flat pattern.
Cycling products often benefit from restrained branding. Riders may prefer a clean bag with one visible logo, a reflective mark, and a small woven label rather than several oversized graphics. Strong panel design and consistent trims can carry brand identity without covering every surface.
Custom zipper pulls, webbing patterns, lining prints, hardware marks, and interior labels can create a more complete identity. Such elements are especially useful when the outer appearance needs to remain minimal.
Performance Testing
A bike bag should be tested in the same condition in which it will be used: mounted, filled, tightened, exposed to movement, and opened repeatedly. Material certificates alone cannot confirm complete product performance.
A practical test plan can include the following areas.
Mounting strength:
- Fill the bag to its stated working load
- Suspend or mount it for 24–48 hours
- Check strap elongation and seam movement
- Inspect buckles, hooks, and bolt points
- Repeat after vibration exposure
Vibration performance:
- Mount the filled bag on a test frame
- Apply repeated vertical and lateral movement
- Check rotation, loosening, noise, and cargo movement
- Inspect fabric where it touches the bicycle
- Retighten only according to normal user instructions
Closure durability:
- Open and close zippers repeatedly
- Test sliders after dust and water exposure
- Inspect roll-top webbing and buckles
- Check drawcord grip after repeated pulling
- Confirm zipper ends remain reinforced
Abrasion resistance:
- Test shell fabrics against flat abrasion
- Inspect webbing contact areas
- Check rack-facing and frame-facing panels
- Test corners and bag bases separately
- Evaluate printed areas after rubbing
Water performance:
- Expose the mounted product to controlled spray
- Inspect seams, zipper ends, corners, and closures
- Place absorbent material inside to identify leakage
- Test the bag in both upright and riding positions
- Repeat after opening and closing cycles
Load testing:
- Test the recommended working load
- Test a controlled higher load for safety margin
- Measure deformation and strap movement
- Inspect stitches, reinforcement, and hardware
- Confirm no part reaches the tire or moving components
Temperature and aging:
- Check coatings under heat and cold
- Inspect buckle strength at lower temperatures
- Test neoprene recovery after compression
- Evaluate reflective film after heat exposure
- Check adhesive layers for separation
A bag may pass a pull-strength test and still perform poorly on a bicycle. Riding tests are needed to reveal knee contact, saddle interference, rattling hardware, unstable steering, strap loosening, and difficult access.
Inspection criteria should be measurable wherever possible. Instead of writing “zipper works well,” a specification can require smooth operation over a defined number of cycles with no slider separation, tape damage, or excessive resistance.
Production inspection should also cover appearance:
- Bag dimensions within approved tolerance
- Logo position and size
- Stitch density
- Thread color
- Symmetry
- Strap length
- Hardware direction
- Lining cleanliness
- Loose-thread removal
- Packaging accuracy
A pre-production sample should remain available at the factory as a comparison standard during sewing, assembly, and final inspection.
Sample Development
Sampling converts a concept into a product that can be mounted, packed, tested, photographed, and corrected. A successful sample process begins with complete information, but an experienced development team can also assist when only sketches, reference images, or target functions are available.
A useful development package may include:
- Product sketch or reference image
- Target dimensions
- Intended capacity
- Bicycle type
- Mounting position
- Expected contents
- Suggested working load
- Fabric preference
- Color references
- Logo artwork
- Waterproofing requirement
- Packaging plan
- Target market
- Required test standard
The first pattern should focus on fit and function before decorative details. A plain development sample can confirm size, shape, access, and mounting. Branding and final colors can be added after the structure is approved.
A clear sampling sequence may follow these steps:
- Product use and target bicycle are confirmed.
- Dimensions and mounting points are reviewed.
- Materials and structural layers are selected.
- A pattern or three-dimensional mock-up is prepared.
- The first sample is sewn or welded.
- The bag is mounted and filled with intended contents.
- Fit, access, movement, and clearance are checked.
- Corrections are recorded with measurements.
- A revised sample is produced.
- A final pre-production sample is approved.
Sample comments should remain specific. “Make it smaller” can be interpreted in several ways. “Reduce finished width from 70 to 58 millimeters while keeping the zipper opening length unchanged” gives the development team a clear instruction.
Photographs should show:
- Front, rear, left, and right sides
- Top and base
- Interior compartments
- Closure details
- Strap routing
- Bag mounted on the bicycle
- Bag filled to intended capacity
- Clearance from knees, tires, cables, and lights
For custom frame bags, paper or fabric templates may be sent before the finished sample. Such templates allow early fit confirmation and reduce unnecessary sample revisions.
Material approval is equally important. Outer fabric, lining, foam, neoprene thickness, zipper type, webbing, buckles, labels, and logo colors should be listed in the approved specification. Replacing one layer can change stiffness, weight, sewing behavior, and finished dimensions.
Manufacturing Partner
A suitable manufacturing partner should understand fabric construction, sewing, welding, reinforcement, bicycle fit, and product testing. Low pricing alone does not protect a cycling collection from unstable straps, inaccurate sizing, leaking seams, or weak attachment points.
Questions worth discussing before production include:
- Has the factory produced frame, saddle, handlebar, or rack bags?
- Can patterns be developed from sketches or physical references?
- Can the team advise on fit and mounting?
- Are neoprene, nylon, polyester, TPU, and coated fabrics available?
- Can sewn and welded construction be supported?
- Are custom straps, buckles, hooks, and logo parts available?
- How are finished dimensions controlled?
- How are water resistance and load performance tested?
- Can each production stage be inspected?
- Are material and logo samples approved before mass production?
- Can packaging, labels, and carton marks be customized?
- How are production changes documented?
A factory should be able to explain why a reinforcement layer, zipper size, strap width, or seam position is selected. Product engineering becomes more reliable when decisions are based on use conditions rather than habit.
Production planning should cover:
- Material lead time
- Sample approval
- Cutting and printing schedule
- Logo application
- Sewing or welding sequence
- In-line inspection
- Finished-product testing
- Packing
- Carton dimensions
- Shipping schedule
For a multi-product collection, shared materials should be planned together. Ordering the same shell fabric, lining, webbing, and hardware across several models can improve color consistency and reduce purchasing complexity.
Quality records should follow the approved product specification. Each model needs a clear list of dimensions, tolerances, materials, stitch requirements, reinforcement positions, logo placement, packaging, and inspection points.
Final inspection should include randomly selected finished bags mounted or loaded where practical. A visually correct bag can still have a reversed strap, weak hook, blocked pocket, or insufficient clearance.
Start Your Custom Bike Bag Project With Szoneier
A strong bike bag collection begins with clear riding needs and careful product engineering. Frame fit, strap placement, usable capacity, material selection, reinforcement, water protection, and mounting stability all influence how the bag performs after hundreds of kilometers.
Szoneier has more than 18 years of experience in neoprene material development and custom product manufacturing. Our team develops custom bike bags, neoprene pouches, bottle sleeves, protective cases, sports supports, medical supports, wetsuits, koozies, and related sewn products for overseas cycling labels, outdoor companies, distributors, and established product lines.
Custom bike bag services can include:
- Product design from sketches, photos, or reference samples
- Frame, top tube, handlebar, saddle, pannier, and rack bag development
- Neoprene, polyester, nylon, Oxford, TPU, and coated-fabric options
- Custom dimensions, capacities, compartments, and mounting systems
- Waterproof and water-resistant construction
- Screen printing, heat transfer, embroidery, woven labels, and rubber patches
- Custom buckles, webbing, zipper pulls, reflective details, and packaging
- Fast sample development
- Flexible order quantities
- Production inspection and shipment support
Send Szoneier your target bag type, size, bicycle application, reference images, expected quantity, logo artwork, and required features. Our team can review the structure, recommend suitable materials, prepare a custom design, and develop a sample for testing before production.
Contact Szoneier to develop a bike bag collection built around real riding conditions, reliable manufacturing, and your own product identity.