Skip to content
There’s something timeless about a tote bag. Maybe it’s the way it hangs casually on your shoulder, or how it holds everything — from books and groceries to weekend essentials — without complaint. But have you ever thought about making one yourself? Sewing a tote bag by hand isn’t just a creative weekend project; it’s your first step into the rewarding world of DIY sewing.
Beginners can easily sew a tote bag by cutting two fabric rectangles, sewing the sides and bottom, adding handles, and finishing the seams. The process requires basic materials — fabric, thread, and a sewing machine — and can be completed in a few hours. It’s a simple, practical project that builds sewing confidence while creating a reusable, eco-friendly bag.
Making your own tote bag means creating something truly yours — choosing the fabric texture, colors, and design that match your style. You’ll learn how to measure, cut, and stitch, but more importantly, you’ll discover how satisfying it feels to turn a flat piece of fabric into something useful and personal.
So grab your scissors, thread, and imagination — we’re about to walk through every step of sewing your first tote bag, from fabric selection to the finishing press, with all the beginner-friendly guidance you’ll need.
What Is a Tote Bag and Why Make One Yourself?
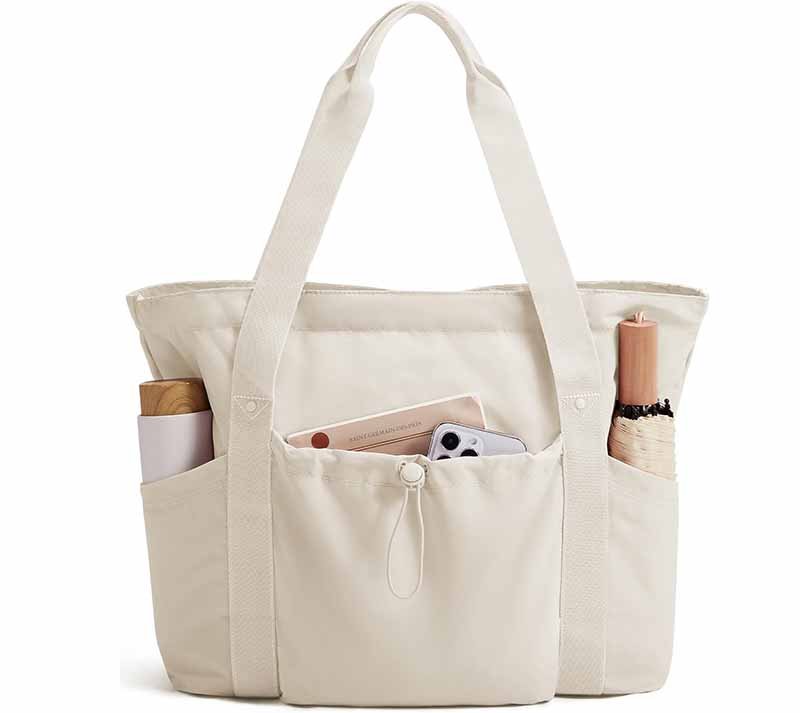
A tote bag is a simple, open-top carryall with two handles, usually made from durable fabric such as cotton, canvas, or polyester. It’s designed to be lightweight yet strong enough for daily use. Sewing your own tote bag gives you full creative control over the design, teaches essential sewing techniques, and helps you make a reusable, eco-friendly alternative to plastic bags.
What Makes a Tote Bag Different from Other Bags?
A tote bag’s beauty lies in its simplicity and versatility. Unlike backpacks or purses filled with zippers, flaps, or compartments, a tote is a one-piece construction: two flat panels of fabric joined along the sides and bottom, with straps attached at the top. This makes it one of the easiest bag types to sew — perfect for anyone just starting to use a sewing machine.
What defines a tote bag:
- Shape: Rectangular or square body, usually 14–18 inches wide and 12–16 inches high.
- Handles: Two parallel straps, typically 20–26 inches long, for shoulder or hand carry.
- Opening: Unfastened top for quick access.
- Structure: Often unlined, but can be lined for added strength or style.
| Bag Type | Main Purpose | Complexity to Sew | Key Feature |
|---|---|---|---|
| Tote Bag | Everyday carry, shopping | Very easy | Simple, flat design |
| Backpack | Travel, school | Hard | Multi-compartment structure |
| Drawstring Bag | Gym, gifts | Easy | Quick-closure cords |
| Handbag | Fashion accessory | Intermediate | Shaped, lined, decorative |
| Messenger Bag | Work or laptop use | Hard | Adjustable strap, flap |
Tote bags are universal — they fit seamlessly into any lifestyle. College students use them for books, professionals carry laptops in them, and eco-conscious shoppers prefer them over disposable bags. For sewing beginners, that simplicity also means fewer mistakes and faster results — a confidence-boosting first project that looks great and functions perfectly.
Why Sewing Your Own Tote Bag Is a Great Beginner Project
If you’re learning to sew, the tote bag is your gateway project. It doesn’t require advanced patterns, expensive tools, or perfect precision — yet you’ll practice almost every foundational sewing technique:
- Straight seams
- Seam finishing (zigzag or serger)
- Turning fabric right side out
- Topstitching for neat edges
- Attaching handles securely
It’s an ideal balance of easy and educational. In just an afternoon, you can make something functional and stylish, then use it immediately — a level of satisfaction most beginners crave.
Beyond sewing skills, tote bags teach you about fabric behavior. You’ll learn how thick canvas feels under the machine, how cotton stretches slightly when pressed, and how polyester resists fraying. These small lessons lay the groundwork for bigger sewing challenges later, like lined bags or clothing projects.
Another reason beginners love tote bags: low cost, high payoff. You can often make one from:
- ½ to 1 yard of fabric
- Thread and a few pins
- Simple tools you already own
The total cost averages under $10, yet the finished bag looks like something sold in stores for three times that.
Creativity, Customization, and Sustainability
Making your own tote isn’t just about saving money — it’s about creating something unique. You control every detail:
- Choose printed cotton for a playful look, or neutral canvas for a minimalist vibe.
- Add a pocket, change handle length, or mix two fabrics for contrast.
- Embroider your initials or logo for personalization.
From a sustainability perspective, sewing your own tote bag also means taking action against disposable culture. Each handmade bag can replace hundreds of single-use plastic bags in its lifetime. For example, if you use one tote twice a week instead of plastic bags, that’s over 100 fewer plastic bags a year — a small change with a big environmental impact.
The Emotional Reward of Making It Yourself
There’s a quiet pride in carrying something you made with your own hands. Every stitch tells a story — maybe your first straight seam, your first time threading a machine, or your first successful project.
Unlike store-bought bags, a handmade tote has meaning: it’s a reflection of your effort and creativity.
Many sewing beginners say their first tote bag becomes their “confidence project.” Once they realize they can cut, stitch, and finish something useful, they move on to other crafts — pouches, aprons, or even clothing. That’s why tote bags are often featured in beginner sewing workshops: they offer instant gratification and long-term learning value.
What Materials and Tools Do You Need to Sew a Tote Bag?
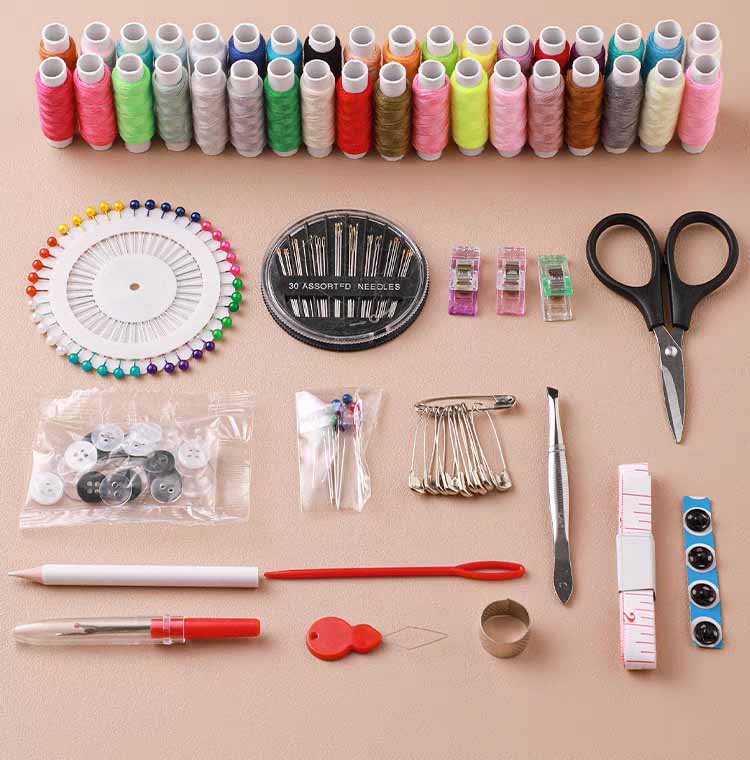
To sew a tote bag, you’ll need medium-weight fabric like cotton or canvas, matching thread, scissors, pins, measuring tape, handles or straps, and a sewing machine. A simple tote bag requires about one yard of fabric, depending on size. Beginners can also add optional materials like interfacing for structure and lining for a cleaner finish.
The Fabric — Your Bag’s Foundation
The first and most important decision is what kind of fabric to use. The right material should be easy to sew, durable enough to carry weight, and have the texture or style you like.
What Is the Best Fabric to Use for a Tote Bag?
The “best” fabric depends on how you’ll use the tote — for groceries, travel, or daily carry. Here’s a quick comparison table to help you decide:
| Fabric Type | Composition | Durability | Ease of Sewing | Recommended Use |
|---|---|---|---|---|
| Cotton | Natural fiber | Moderate | Very easy | Everyday totes, casual carry |
| Canvas (8–16 oz) | Cotton or cotton/poly blend | Very strong | Easy–medium | Shopping or heavy-duty totes |
| Denim | Cotton twill weave | Very strong | Medium | Stylish or structured bags |
| Polyester (210D–900D) | Synthetic | High | Easy | Water-resistant or travel bags |
| Linen | Natural fiber | Light | Medium | Summer or minimalist totes |
| Nonwoven Polypropylene (NWPP) | Synthetic | Moderate | Easy | Promotional or eco totes |
| RPET (Recycled Polyester) | Synthetic (recycled plastic) | High | Easy | Sustainable brands |
Best for beginners:
Cotton or canvas — they’re forgiving, machine-washable, and easy to cut and sew straight.
If you want a more eco-conscious option, RPET or organic cotton canvas is a great alternative. It’s slightly denser but offers the same soft touch and excellent durability with reduced environmental impact.
How Much Fabric Do You Need to Sew a Tote Bag?
This depends on the tote’s size, design, and whether you’ll add a lining or boxed bottom. Here’s a helpful guide:
| Bag Size | Unlined Tote | Lined Tote | Strap Length | Suggested Fabric Width |
|---|---|---|---|---|
| Small (12” x 10”) | ½ yard | 1 yard total | 18–20 inches | 44–45” (standard width) |
| Medium (15” x 14”) | ¾ yard | 1½ yards total | 20–22 inches | 44–54” |
| Large (18” x 16”) | 1 yard | 2 yards total | 22–26 inches | 54–60” |
Tip:
Always wash and press your fabric before cutting. Natural fibers like cotton and canvas shrink up to 5–7% after the first wash, which could affect your bag’s final measurements.
If you plan to make several tote bags (for gifts or small business), buy fabric in bulk rolls — this saves cost per yard and ensures consistent color. (Professional factories like Szoneier often do this when producing custom tote orders.)
Thread — The Invisible Strength
Don’t underestimate your thread choice! It holds your entire bag together.
| Thread Type | Material | Strength | Best Use |
|---|---|---|---|
| Polyester Thread | Synthetic | High | Everyday and heavy fabrics |
| Cotton Thread | Natural | Medium | Light fabrics, vintage look |
| Nylon Thread | Synthetic | Very high | Outdoor or waterproof bags |
| Heavy-Duty Thread | Poly or nylon | Very high | Thick canvas or denim |
For most tote bags, polyester all-purpose thread is ideal — it’s slightly stretchy, durable, and resists breaking even with heavy loads. Match your thread color to the fabric, or choose a contrast shade for a decorative look.
Handles or Straps
Tote handles can be made from fabric, cotton webbing, or leather — depending on your design preference and experience level.
| Handle Material | Width | Strength | Sewing Difficulty | Style Tip |
|---|---|---|---|---|
| Cotton Webbing | 1–1.5 in | Strong | Easy | Classic and sturdy |
| Fabric Straps | 1–2 in | Medium | Easy | Match with body fabric |
| Leather Straps | ¾–1 in | High | Hard | Stylish but advanced |
| Rope or Cord Handles | ½–¾ in | Medium | Easy | Beach or summer style |
Beginner recommendation: Start with cotton webbing straps. They’re easy to attach and handle more weight than self-made fabric straps. If you want a clean, professional look, double-stitch each handle in a square-with-an-X pattern for extra reinforcement.
Optional Materials: Lining, Interfacing, and Accessories
While not mandatory, these materials make your tote look more finished and durable.
- Lining fabric: Choose lightweight cotton or polyester lining to hide raw seams and add visual contrast.
- Interfacing: A layer of fusible material that adds stiffness to soft fabrics. Perfect for lightweight cotton totes that need shape.
- Magnetic buttons or snaps: Optional closures that keep contents secure.
- Pockets: Great for small items like keys or phones. You can sew a simple patch pocket onto the lining or outer panel.
Essential Sewing Tools Every Beginner Should Have
You don’t need a professional sewing studio — just a few key tools will do.
| Tool | Purpose | Beginner Tip |
|---|---|---|
| Sewing Machine | Stitches fabric quickly | Use straight-stitch setting |
| Fabric Scissors / Rotary Cutter | Cuts fabric cleanly | Never use on paper |
| Pins or Fabric Clips | Hold pieces in place | Clips are safer for thick fabrics |
| Measuring Tape & Ruler | Ensures accuracy | Always double-check |
| Tailor’s Chalk or Fabric Marker | Marks cutting lines | Choose washable type |
| Iron & Ironing Board | Press seams flat | Ironing improves sewing precision |
| Seam Ripper | Removes mistakes | Every beginner needs one! |
| Needles (Size 14/90) | Heavy fabric sewing | Change often to prevent skipped stitches |
If you’re sewing by hand (no machine yet), it’s still possible — just use backstitching for strength, though it takes longer.
Preparing Your Workspace
Before you begin cutting or stitching, set up your space properly. A well-organized sewing area saves time and frustration.
- Work on a flat, clean surface with good lighting.
- Keep your iron nearby — pressing as you go ensures crisp seams.
- Arrange tools in small trays or containers to avoid losing pins.
- Have a trash bin ready for fabric scraps and threads.
Tip:
Always test your stitches on a scrap piece of fabric before starting the real project. This helps adjust the stitch length, tension, and needle type — especially if you’re sewing thick canvas or denim.
How to Cut and Prepare the Fabric Before Sewing
Before sewing a tote bag, pre-wash and iron your fabric, then measure and mark two equal rectangles for the front and back. Add ½ inch seam allowances on all sides and cut carefully along the grain for even edges. Preparing fabric correctly — including pressing, stabilizing with interfacing, and aligning patterns — ensures clean seams, accurate proportions, and a professional-looking tote bag.
1. Pre-Wash and Press Your Fabric
This is a step most beginners overlook, but it’s critical. Natural fibers such as cotton, linen, and canvas tend to shrink and wrinkle after the first wash. If you skip pre-washing, your finished tote may end up smaller, misshapen, or twisted after cleaning.
How to pre-shrink properly:
- Wash your fabric in warm water (the same way you’ll wash the finished tote).
- Tumble-dry on low or hang dry naturally.
- Press the fabric with an iron while it’s still slightly damp to remove wrinkles and restore its flat surface.
Tip:
Pressing before cutting helps the fabric lie perfectly flat — preventing uneven panels or warped edges later.
2. Determine Your Tote Size and Measurements
Decide how big you want your tote to be. For most beginners, 15″ wide × 14″ high is a practical starting size — roomy but easy to handle.
| Bag Size | Width (in) | Height (in) | Gusset/Depth (optional) | Purpose |
|---|---|---|---|---|
| Small | 12 | 10 | 2 | Kids or light carry |
| Medium | 15 | 14 | 3 | Everyday use |
| Large | 18 | 16 | 4 | Shopping or travel |
Next, add ½ inch seam allowance on all four sides for sewing.
If you plan to add a boxed bottom, include an extra 2–3 inches in height for the fold-under gusset.
3. Align the Fabric Grain Correctly
Every woven fabric has a grain — the direction of its threads. Cutting along the correct grain makes your bag hang straight and prevents twisting after washing.
How to identify the grain:
- The lengthwise grain runs parallel to the fabric’s selvage edge (the finished edge).
- The crosswise grain runs perpendicular to it.
Always position your tote pattern so the length aligns with the lengthwise grain. If your fabric has printed motifs, make sure they face upright before cutting.
Misaligned grain = uneven shape and puckered seams.
4. Measure and Mark Accurately
Use tailor’s chalk, a washable fabric marker, or a soft pencil to mark your pattern lines.
Lay your fabric on a large, flat surface (like a cutting mat or table).
- Draw a rectangle for the front panel (e.g., 16″ × 15″ including seam allowance).
- Draw an identical one for the back panel.
- Mark handle positions at the top — about 3 inches from each side seam.
- Double-check symmetry by folding one panel in half; the sides should match perfectly.
Beginner tip:
If you’re nervous about cutting directly, make a paper or cardboard template first and trace around it.
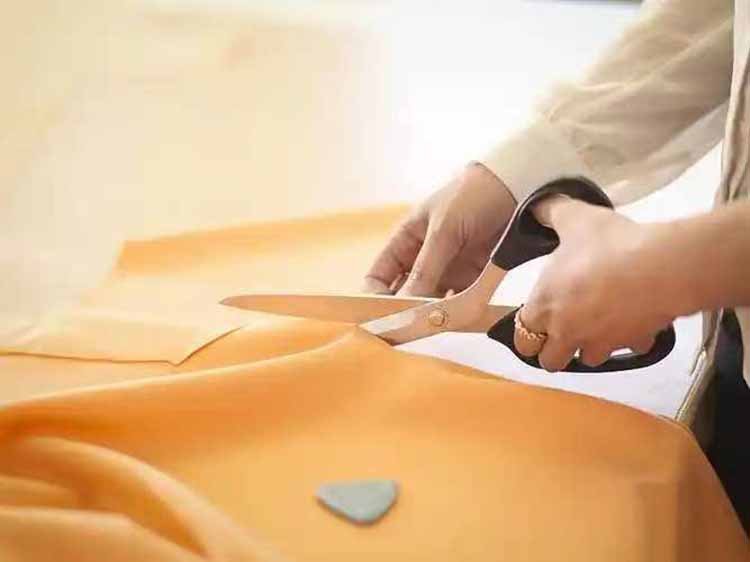
5. Cut the Fabric Cleanly
Use sharp fabric scissors or a rotary cutter with a ruler for precise lines. Dull blades can fray edges or stretch your fabric, making sewing harder later.
Cut slowly, following the marked lines exactly. Keep the scissors perpendicular to the table — not angled — for cleaner edges.
If your fabric has a printed pattern, match the prints between front and back panels for a professional look.
| Cutting Tool | Ideal For | Beginner Tip |
|---|---|---|
| Fabric Scissors (8–10”) | Thick fabrics like canvas, denim | Use only for fabric to keep sharp |
| Rotary Cutter (45mm) | Cotton, linen, small patterns | Always use with a cutting mat |
| Pinking Shears | Fray-prone fabrics | Great for decorative or raw edges |
6. Prepare and Cut the Lining (Optional)
If you plan to line your tote, cut two additional panels from your lining fabric using the same pattern. The lining gives a polished finish and hides raw seams. Choose lightweight cotton or polyester so it doesn’t make the bag bulky.
To add a small inner pocket:
- Cut a piece of fabric about 7″ × 8″.
- Fold the top edge ½ inch and hem it.
- Stitch the pocket to one lining panel before assembling the bag.
7. Apply Interfacing for Structure
Some fabrics — especially light cotton or linen — may feel too soft to hold shape. Interfacing adds stiffness and durability.
Types of interfacing:
- Fusible interfacing: Iron-on type with adhesive backing; easy for beginners.
- Sew-in interfacing: No adhesive, stitched between layers (used for thick canvas).
Application Steps:
- Cut the interfacing slightly smaller than your main fabric pieces (about ¼ inch less on each side).
- Place it on the wrong side of your fabric.
- Cover with a pressing cloth and apply the iron for 10–15 seconds with steam.
After cooling, your fabric should feel noticeably sturdier — ready for smooth, clean sewing.
8. Press and Stack Your Fabric Panels
Once both panels are cut and reinforced:
- Iron them one more time to flatten wrinkles.
- Stack them with right sides facing each other (the sides you want visible on the finished bag).
- Align edges carefully and secure with pins or fabric clips.
This preparation step ensures that when you start sewing, the panels stay perfectly aligned — no slipping, no mismatched edges.
9. Quick Checklist Before You Start Sewing
Before turning on the sewing machine, review this simple checklist:
| Pre-Sewing Checklist | Why It Matters |
|---|---|
| Fabric washed and ironed | Prevents shrinkage and wrinkles |
| Pattern pieces cut evenly | Keeps sides symmetrical |
| Handles measured and pinned | Ensures balance when carried |
| Interfacing applied (if needed) | Adds stability |
| Seams marked with chalk | Guides straight sewing |
| Tools ready (scissors, pins, thread) | Avoids interruptions |
Once everything is prepped, take a moment to admire your organized workspace — it’s the calm before the creative storm! Good preparation is what separates a rushed project from one that looks neat, balanced, and store-quality.
10. Professional Insight — From DIY to Factory Precision
Even at the factory level, professionals follow almost identical preparation steps — just scaled up with industrial cutters and fabric alignment tables.
At Szoneier, for example, fabric rolls are:
- Pre-checked for shrinkage and color consistency
- Cut with precision CNC equipment
- Reinforced with interlining to meet specific thickness or structure requirements
This attention to cutting accuracy ensures that every tote bag — whether handmade or mass-produced — maintains perfect proportions and durability.
So when you prepare your fabric carefully, you’re not just doing “beginner work” — you’re practicing the same craftsmanship standard that professional manufacturers use every day.
How to Sew a Tote Bag Step by Step
To sew a tote bag, place two fabric rectangles right sides together, sew the sides and bottom, create a boxed bottom if desired, hem the top edge, and securely attach two handles. Use a straight stitch with a ½ inch seam allowance and reinforce handle areas with extra stitching. Pressing seams as you go helps your tote look neat, durable, and professional, even if it’s your very first sewing project.
Stitching the Sides, Base, and Corners Correctly
Think of this step as building the “shell” of your tote bag. Start by placing your two main fabric pieces right sides together (the pretty sides facing in). Align all edges and pin or clip around the sides and bottom. Set your sewing machine to a straight stitch and sew down one side, across the bottom, and up the other side, using a ½ inch seam allowance. Backstitch at the beginning and end to lock the threads.
If you want a flat, boxy bottom (so your bag stands up better), you’ll shape the corners. Keep the bag inside out, pinch one bottom corner and pull it open so the side seam and bottom seam line up, forming a triangle. Measure in 1–2 inches from the tip of the triangle (depending on how wide you want the base), draw a line straight across, and sew along that line. Repeat on the other corner. Trim off the triangle points, leaving about ½ inch of fabric beyond the seam. This simple trick instantly gives your tote depth and volume.
After stitching, press the seams with an iron, pressing them open or to one side. This reduces bulk and helps the bag hang straight. Turn the bag right side out to check the shape — you should see a clean, rectangular body with neatly formed corners and a stable base.

How to Attach and Reinforce Handles Securely
Handles take the most stress, so this step is all about strength and comfort. First, decide whether your tote will be hand-carry or shoulder-carry:
- Hand carry: handles around 18–20 inches long
- Shoulder carry: handles around 22–26 inches long
If you’re using webbing straps, cut two equal lengths. If you’re sewing fabric straps, fold each long strip right sides together, sew down the long edge, turn right side out with a safety pin, then press flat and topstitch along both sides.
With your bag right side out, fold the top edge down ½ inch, press, then fold again 1 inch to form a clean hem. This double-fold hides the raw edge and adds strength along the top opening. Pin the hem in place all the way around.
Now position the handles: measure about 3 inches in from each side seam on the front and back. Slide the end of each strap under the folded hem so that 2–3 inches of the strap sits inside the bag, and the rest extends upward. Make sure the handles aren’t twisted and that both sides are the same length and spacing.
Sew around the entire top edge of the bag, close to the lower fold of the hem. Then, for each handle end, sew a rectangle with an “X” inside (box-X stitching) where the strap meets the bag. This reinforcement spreads the tension and keeps the handles from ripping out when the tote is loaded with books, groceries, or laptops.
How to Sew Clean Seams and Prevent Fraying Edges
Neat seams are what make your tote look “store-bought” instead of “first attempt.” After sewing the side and bottom seams, you’ll want to finish the raw edges to prevent fraying over time — especially if you’re using cotton, canvas, or linen.
If you have a serger (overlock machine), simply run the seam allowances through it to encase the edges. If you’re using a regular sewing machine, switch to a zigzag stitch and sew along the raw edge of each seam, just inside the edge, so the zigzag catches the fabric and wraps it. Another option is to sew a second straight stitch close to the edge and trim off excess fabric.
Pressing is just as important as stitching. After every major seam, take a moment to press with your iron — first the seam allowance, then the outer side of the fabric. For the top hem, press before and after stitching so the edge looks crisp and lies flat. You can also add a line of topstitching around the top of the bag (⅛–¼ inch from the edge). This not only looks professional but also helps keep the hem in place and adds strength.
As a final touch, trim any loose threads, give the entire tote a last press, and inspect your seams:
- Are the sides straight?
- Are the corners even?
- Are the handles firmly attached with no wobbling or gaps?
If the answer is yes, you’ve just sewn a tote bag that’s ready for everyday use — and you’ve built core sewing skills that will carry into your next projects.
How to Customize Your Tote Bag Design
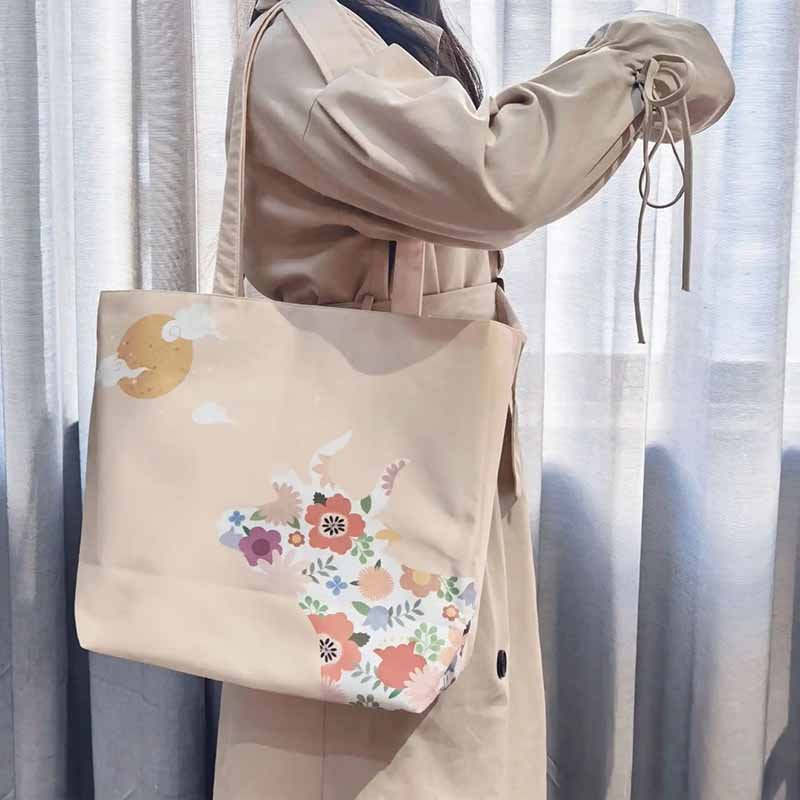
Customizing your tote bag is where the project really becomes yours. The basic sewing steps give you a solid, functional bag — but design details turn it into something stylish, practical, and unique. Even small changes like adding a contrasting lining, a simple pocket, or a printed logo can transform a plain tote into a favorite daily carry or even a product you’re proud to sell.
Let’s break customization into three big areas: surface design (print/embroidery), functional upgrades (pockets, zippers, lining), and visual details (labels, trims, color-blocking) — all beginner-friendly but with a professional feel.
Which Printing or Embroidery Methods Work Best for Beginners
There are many ways to put designs, words, or logos onto your tote bag, and some are much easier than others when you’re just starting out.
1. Iron-On Vinyl and Heat Transfer Paper
For home crafters, iron-on vinyl (HTV) or heat transfer paper is one of the simplest ways to add text, shapes, or logos.
- Cut designs with a craft cutter (like Cricut) or buy pre-made iron-on patches.
- Place the design on your tote, cover with a pressing cloth, and press with a hot iron or heat press.
- Peel the backing once cooled — and your design is permanently fused.
Best for:
- Simple logos, quotes, and graphic shapes
- Beginners who want clean, sharp designs without painting or screen printing
2. Fabric Paint, Stencils, and Markers
If you enjoy drawing or want a more artistic look, fabric paint and markers are a great option.
- Use stencils for clean shapes and letters, or freehand your own art.
- Always slide cardboard inside the bag to prevent paint seeping through.
- Let it dry completely and then heat-set (with an iron, if recommended by the paint brand).
Best for:
- Kids projects
- One-of-a-kind designs
- Casual, creative totes with a handmade feel
3. Basic Hand Embroidery
Embroidery adds texture and a premium vibe, even if it’s just a small detail.
- Draw a simple shape or initials on the fabric.
- Use backstitch, satin stitch, or running stitch to outline and fill.
- Use embroidery floss in 2–3 strands for better control.
Best for:
- Names or monograms
- Small icons (hearts, stars, flowers)
- Minimalist, handmade brand style
4. When to Consider Professional Printing or Embroidery
If you’re planning to make many bags (for a shop, brand, or event), doing each one by hand gets time-consuming. That’s when brands often turn to manufacturers like Szoneier for:
- Screen printing (bold, flat graphics)
- Sublimation printing (full-color prints on polyester or RPET)
- Machine embroidery (logos, monograms, patches)
You can still start with DIY customization at home, then upgrade to factory-level printing once your designs are proven and you’re ready to scale.
How to Add Inner Pockets, Zippers, or Contrasting Lining
Customization isn’t only about looks — it’s also about making your tote more functional and organized.
1. Adding a Simple Inner Pocket
An inner pocket is one of the easiest upgrades and perfect for keys, phones, or cards.
Steps:
- Cut a rectangle (for example, 7″ × 8″) from your main or lining fabric.
- Fold the top edge down ½ inch, press, and sew a straight seam to hem the pocket opening.
- Fold and press the remaining three sides ½ inch to the back.
- Place the pocket on one lining panel where you want it (usually a few inches below the top).
- Pin and sew along the sides and bottom, close to the folded edge, leaving the top open.
Now, when you assemble the lining and outer bag together, your pocket is perfectly integrated and hidden inside.
2. Adding a Zipper Closure
A zipper helps keep items from falling out and adds a more polished look.
Basic method (top zipper panel):
- Cut two narrow strips of fabric the same width as the bag (for example, 15″ wide × 3–4″ high).
- Place the zipper face down along the top edge of one strip, align edges, and sew with a zipper foot.
- Repeat with the other side of the zipper and the second strip.
- Press the fabric away from the zipper and topstitch for neatness.
- Attach this zipper panel between the outer bag and lining at the top before sewing the top hem.
This creates a floating or fixed zipper inside the opening. It’s slightly more advanced, but once you’ve done it once, you’ll repeat it easily.
3. Adding a Contrasting Lining
A lining not only hides raw seams — it gives you a chance to add personality.
- Choose a lining fabric with a pattern or color that contrasts with the outer fabric (e.g., navy outer + striped inner, or plain canvas outer + floral lining).
- Sew the lining just like the main bag (two panels together).
- Insert it inside the outer bag (wrong sides together or right sides together depending on your method), align top edges, and sew them together with the top hem and handles.
Every time you open the bag, the lining adds a “wow” moment — and this small detail can make your tote feel much more premium.
Simple Decoration Ideas — Labels, Trims, Color-Block Panels
You don’t have to go crazy to make your tote look special. Small design touches can add a lot of character.
1. Labels and Tags
Adding a label instantly makes your bag feel branded and finished.
- You can buy woven labels with your name or brand logo online.
- Sew the label into a side seam or onto the top edge of the lining.
- For a minimalist look, use a small rectangular woven label in neutral colors.
If you’re treating this as a long-term project or small business idea, consistent labeling is what turns a simple tote into a recognizable product.
2. Trims, Piping, and Decorative Stitching
Trims are great for adding visual interest to your tote.
- Piping in the side seams or top edge adds structure and a tailored look.
- Lace or ribbon can be sewn along the bottom of the bag or across the front as a border.
- Use contrast topstitching (for example, white thread on navy canvas) to highlight edges and seams.
Even if you stick to the same basic pattern, these small trim changes make each bag feel unique.
3. Color-Block Panels and Fabric Mixing
Color-blocking is one of the easiest ways to make a tote look more modern and stylish.
- Cut your front panel in two pieces horizontally — for example, a 10″ high bottom piece and a 5″ high top piece.
- Use two different fabrics (e.g., solid canvas on top, printed cotton on bottom).
- Sew them together along the long edge, press, and treat them as one panel.
You can also use different fabric for handles vs body — like natural canvas with black webbing straps for a clean, chic look.
From Personalized DIY to Custom Branded Production
The more you customize, the more your tote bag reflects your personality — or, if you’re a small brand, your visual identity. Many people start with one or two DIY tote designs at home and later realize there’s demand from friends, local customers, or online buyers.
When you reach that point, it often makes sense to move from “one-by-one handmade” to professional custom production. That’s where a specialized manufacturer like Szoneier comes in:
- Matching your preferred fabrics, colors, and sizes
- Reproducing your print or embroidery designs with professional techniques
- Adding woven labels, hang tags, and packaging to create a full product experience
So, every time you experiment with a new pocket, print, or trim, you’re not just decorating a bag — you’re quietly building your own design language that could later scale into a real collection.
What Common Mistakes Do Beginners Make
Learning to sew is exciting, but it’s also normal to make small errors in your early projects. These mistakes don’t mean failure — they’re part of the learning curve. The key is to understand why they happen and how to fix them before they ruin your tote. Below, we’ll explore the most common beginner sewing issues, how they affect your bag’s appearance or structure, and easy ways to prevent them next time.
Uneven or Crooked Seams
This is the number-one beginner challenge — your stitches wander off course, leaving wavy or slanted seams. It happens because the fabric isn’t fed evenly through the sewing machine or the seam allowance isn’t marked clearly.
How to avoid it:
- Always mark your seam line using fabric chalk or a seam guide on the machine.
- Keep your eyes on the edge of the fabric, not the needle, while sewing — this maintains straight feeding.
- Don’t pull the fabric; let the machine feed it naturally.
- Use fabric clips or pins to hold layers together before sewing.
Tip:
Practice straight stitching on scrap fabric before you start your tote. Even five minutes of practice will help you control the pace and direction.
Misaligned Corners and Bottom Seams
When you turn your tote right-side out, the corners don’t line up, or the bottom looks lopsided. This happens when one panel shifts slightly during sewing or when your seam allowance is inconsistent.
How to fix and prevent it:
- Pin or clip the panels carefully, especially near the corners.
- Always start and stop sewing at exactly the same distance from the fabric edge.
- Use a walking foot if your machine tends to shift layers (especially for thick fabrics).
- Double-check both side seams before boxing the bottom — they should match perfectly when folded.
A correctly aligned base helps your tote stand flat and symmetrical, giving it that clean, professional shape.
Twisted or Uneven Handles
A tote’s handles are its most visible feature — and one of the easiest parts to mess up. Handles may twist during sewing, end up at uneven lengths, or tear out because they weren’t reinforced enough.
How to avoid handle issues:
- Measure twice before sewing to ensure both straps are exactly the same length.
- Pin handles in place on both sides before stitching the top hem.
- Always sew a box with an “X” through the handle base to reinforce it.
- Press fabric handles flat before attaching — creased or twisted straps are harder to sew straight.
Fraying Edges and Weak Seams
Frayed edges inside your bag not only look messy but can cause the seams to unravel over time — especially if the bag carries weight. This often happens when you don’t finish the seam allowances properly.
How to prevent fraying:
- Use a zigzag stitch or serger to finish all raw edges.
- Trim excess seam allowance after finishing, but don’t cut too close to the stitches.
- If you don’t have a serger, use pinking shears (scissors with zigzag blades) to reduce fraying.
- For delicate fabrics, apply a little fray-check liquid along the seams.
Remember, seam finishing is what separates a homemade tote from a professional-quality one.
Incorrect Stitch Length, Tension, or Needle Size
Technical settings on your machine can make or break your project. If your stitches are too tight, the fabric puckers; too loose, and the seams fall apart.
| Fabric Type | Recommended Stitch Length | Needle Size (U.S.) | Tension Setting |
|---|---|---|---|
| Cotton | 2.5 mm | 12/80 | Medium |
| Canvas/Denim | 3.0–3.5 mm | 14/90 or 16/100 | Medium-High |
| Polyester | 2.5–3.0 mm | 12/80 | Medium |
| Linen | 2.0–2.5 mm | 11/75 | Low-Medium |
Tips:
- Always test on scrap fabric first to check tension and stitch balance.
- Change your needle regularly — a dull needle skips stitches and damages fabric.
- Listen to your machine. If it sounds strained, the tension or needle is wrong.
Forgetting to Press as You Sew
Pressing may seem tedious, but it’s what makes your bag look crisp and professional. Beginners often skip this step, leaving bulky seams and uneven hems.
How to fix it:
- Keep your iron nearby and press every seam after sewing it.
- Use the “press, don’t iron” rule: lower the iron, hold, lift — don’t slide back and forth.
- Pressing the hem before topstitching keeps the edge sharp and straight.
Tip:
Use a small spray bottle to lightly mist your fabric before pressing. It sets the seams more effectively and avoids shine marks on cotton.
Not Measuring or Cutting Accurately
Even the best sewing can’t fix wrong measurements. If your panels differ by even half an inch, you’ll end up with crooked edges or uneven bottoms.
Avoid this by:
- Using a clear quilting ruler or grid cutting mat.
- Double-checking your chalk markings before cutting.
- Keeping the fabric grain aligned with the bag’s length.
- Taking your time — cutting carefully saves you hours of frustration later.
Using the Wrong Fabric or Thread
Choosing materials that are too thick, too slippery, or too thin makes sewing unnecessarily difficult. Many beginners try to use old clothes or cheap fabrics that fray or stretch easily.
Best beginner-friendly combinations:
- 8–12 oz cotton canvas + polyester thread
- Medium-weight denim + heavy-duty thread
- Polyester oxford fabric + nylon thread
Avoid lightweight fabrics like silk or sheer cotton until you’re comfortable with fabric handling.
Skipping Reinforcement in Key Stress Points
The top corners of your tote and the base of the handles take the most strain. Without reinforcement, even strong fabric can tear over time.
How to strengthen key areas:
- Backstitch at the start and end of every seam.
- Double-stitch along the bag’s top hem.
- Add an extra row of stitches along the bottom seam for heavy loads.
- Use interfacing on the top edge to support handle attachment zones.
These little reinforcements add durability that truly lasts.
Ignoring Final Finishing and Quality Check
After sewing, it’s easy to declare “finished!” — but a true craftsperson takes one last look.
Before you celebrate:
- Trim every loose thread.
- Check inside seams for gaps.
- Ensure the bag is evenly pressed and symmetrical.
- Test the handles by gently pulling — they should feel solid.
Tip:
Keep a small notebook for sewing notes: fabric types, thread used, or settings that worked well. Next time, you’ll save hours troubleshooting.
How Can You Scale Up — From DIY to Custom Tote Bag Production?
Turning your first handmade tote into a custom-branded product line is one of the most exciting stages in any maker’s journey. You’ve learned how to design, measure, and stitch — now it’s time to think bigger. Whether you want to sell your bags online, promote your brand, or supply local retailers, moving from DIY to factory production requires organization, documentation, and the right partner.
Below, we’ll walk through the essential steps that transform your personal craft into a professional tote bag business.
1. Define Your Product Identity
Before contacting any manufacturer, you need to know exactly what your product stands for. Ask yourself:
- What makes your tote bags unique? (Eco materials, design, story?)
- Who are you designing for — fashion buyers, corporate giveaways, or everyday shoppers?
- What size, color palette, and style best fit your target audience?
This clarity will shape every production decision later — from fabric choice to packaging. A clearly defined brand identity helps your supplier produce with precision and purpose instead of guesswork.
Example:
If your tote brand emphasizes sustainability, you might focus on organic cotton, RPET recycled polyester, or plant-dyed canvas. If your niche is corporate gifting, you’ll prioritize clean design, durable handles, and logo printing options.
2. Create a Factory-Ready Tech Pack
A tech pack (technical package) is like your tote’s blueprint. It includes all the specifications a factory needs to reproduce your design consistently.
| Tech Pack Component | Description | Example |
|---|---|---|
| Bag Dimensions | Width, height, gusset, strap length | 15″W × 14″H × 3″D |
| Fabric Type | Material and weight | 12oz cotton canvas |
| Color & Finish | Pantone color, dyeing method | Pantone 7500C matte finish |
| Logo Placement | Printed, embroidered, or woven label | Center front, 5″ wide screen print |
| Stitching Details | Seams, reinforcement, thread color | Double-stitch top edge, white thread |
| Packaging | Polybag, box, or custom wrap | Individual kraft box with tag |
Even if you’re a beginner, you can make a simple tech pack using a drawing or digital template (in Canva, Illustrator, or even PowerPoint).
Professional manufacturers like Szoneier often assist new clients by refining or creating tech packs from rough sketches, ensuring every detail is production-ready.
3. Choose the Right Manufacturer
Not all factories are the same. When scaling up, you want a partner who understands small-batch production, customization flexibility, and quality assurance.
Here’s what to look for:
| Criteria | What It Means | Why It Matters |
|---|---|---|
| Experience | Years in bag manufacturing | Ensures skill and reliability |
| Material Range | Cotton, canvas, jute, RPET, nylon | Matches your brand’s sustainability or style |
| Customization Services | Printing, embroidery, dyeing | Gives creative freedom |
| MOQ (Minimum Order Quantity) | Smallest quantity per design | Low MOQ helps you start small |
| Sampling Process | Speed, accuracy, revision policy | Saves time before mass production |
| Certifications | ISO, OEKO-TEX®, REACH | Confirms product safety and quality |
4. Standardize and Test Your Design
Before full production, consistency is key. Your handmade tote may vary slightly each time, but a factory version must be identical from the first unit to the 1,000th.
Steps to standardize your design:
- Choose your final measurements (e.g., 15″ × 14″ × 3″).
- Specify all material types and thickness (e.g., 12oz canvas with 1.5” cotton webbing).
- Define logo size and exact print location.
- Confirm thread color and stitch density (e.g., 3mm stitch length).
Once you’ve locked these specs, order a pre-production sample (often called a golden sample). Use it to check every detail — stitching, print color, handle strength, and finishing.
Testing checklist:
- Load the tote with 5–10 kg (groceries, books) and check seam durability.
- Wash it once to test colorfastness and shrinkage.
- Verify that the print or embroidery resists fading and peeling.
When you approve the sample, it becomes your production standard — the reference for quality control during manufacturing.
5. Plan for Small-Batch or Bulk Production
As a beginner brand, you don’t have to jump straight to thousands of units. Start with small-batch production — usually 100–300 pieces per style — to test your market response and brand positioning.
| Production Scale | Quantity Range | Best For | Advantages |
|---|---|---|---|
| Sample/Prototype | 1–10 pcs | Testing design, photography | Quick turnaround |
| Small Batch | 100–300 pcs | Online shops, local markets | Affordable entry point |
| Medium Batch | 500–1,000 pcs | Growing retail brands | Better unit cost |
| Bulk Production | 2,000+ pcs | Established distributors | Economies of scale |
Tip:
Factories like Szoneier allow you to order small quantities for your first run, then scale up easily once you confirm demand. This approach minimizes risk while maintaining full professional quality.
6. Branding and Packaging — The Finishing Touch
When scaling up, branding becomes just as important as sewing quality. Your tote should communicate your brand identity from the moment customers touch it.
Elements to consider:
- Woven labels: stitched on the side or inside seam
- Hang tags: describe materials or brand story
- Custom packaging: kraft boxes, paper wraps, or biodegradable polybags
- Color consistency: use Pantone Matching System (PMS) for fabrics and prints
Szoneier’s design team can help integrate your logo, label, and packaging into the manufacturing process so your final product arrives ready to sell — saving you time and coordination costs.
7. Manage Quality Control and Communication
Production success depends on clear communication between you and your supplier. Always request progress updates, photos, or sample checks during production, especially for your first few orders.
Quality control checklist during production:
- Material inspection before cutting
- Stitch accuracy and alignment checks
- Handle tension and reinforcement testing
- Print or embroidery color consistency
- Final cleaning and packaging before shipment
Factories like Szoneier typically conduct three QC stages (pre-production, mid-production, and final inspection) to ensure every piece matches your approved sample.
8. Scaling Your Brand Beyond Production
Once your totes are professionally made, it’s time to expand your reach.
Start selling through:
- Your own website or Shopify store
- Marketplaces like Etsy, Amazon Handmade, or Faire
- Local craft fairs or eco shops
- Corporate bulk buyers seeking branded reusable bags
9. From Hobby to Partnership — How Szoneier Supports Your Growth
At Szoneier, we’ve seen countless DIY creators evolve into professional brands. The key to that transition is partnership.
Instead of starting over with new designs, Szoneier helps you refine what already works and scale it efficiently:
| Szoneier Advantage | Description |
|---|---|
| Free design consultation | Our R&D team reviews your tote sketches or samples |
| Low MOQ & flexible orders | Start small, grow sustainably |
| Pantone color matching | Exact brand colors for fabric & print |
| Custom logo & packaging | Screen print, heat transfer, embroidery, woven label |
| Fast prototyping | Samples ready within days for approval |
| Global logistics | Fast delivery to U.S., EU, and global buyers |
When you’re ready to expand your creative vision, Szoneier becomes your behind-the-scenes production partner — ensuring your handmade designs scale into high-quality, export-ready tote collections.
Conclusion — Start Sewing, Start Creating
Learning how to sew a tote bag is more than just a craft project — it’s a small step toward self-reliance, creativity, and sustainability. With just fabric, thread, and a sewing machine, you can make something practical, personal, and planet-friendly.
And if your passion grows beyond a few DIY projects, there’s a world of opportunity waiting. Whether you dream of launching your own eco tote brand or need reliable production support, Szoneier can help you bring your ideas to life.
Contact Szoneier today for professional customization, OEM/ODM solutions, or private-label tote bag manufacturing. Get free design consultation, quick sampling, and global shipping support — from hobby creation to full-scale production.