 Skip to content
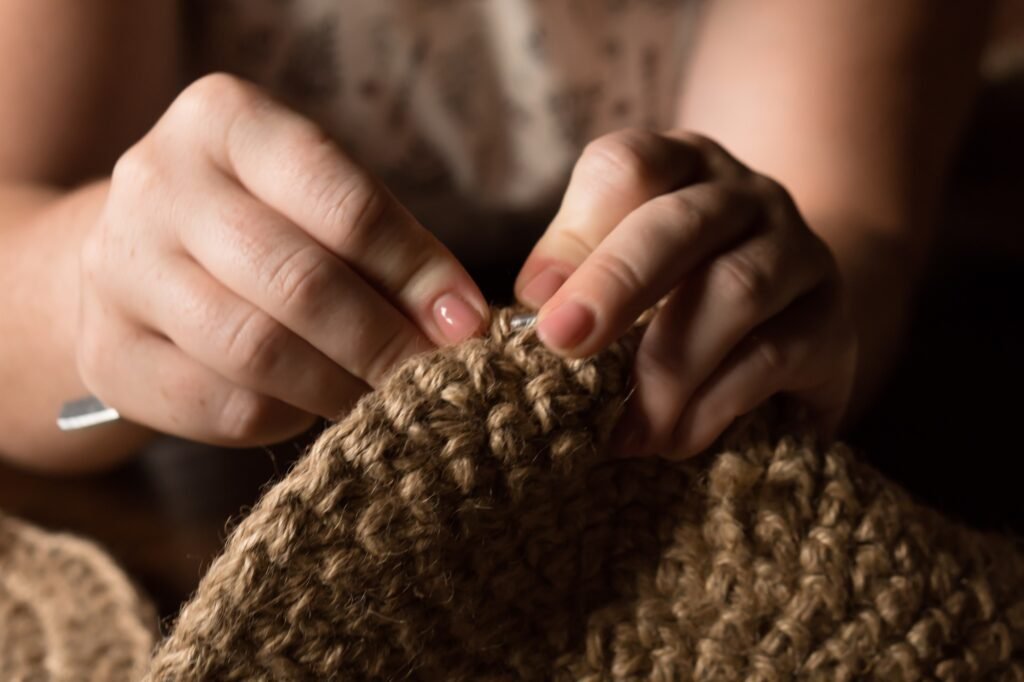
Crocheting a bag isn’t just a fun weekend project—it’s a practical way to create a personalized, eco-friendly accessory that reflects your style. From choosing the right yarn to finishing the last stitch, every step matters. Whether you’re eyeing a chic market tote or a cozy beach bag, understanding the fundamentals will save you time, frustration, and unraveling seams down the road.
To crochet a beginner’s bag, start by gathering sturdy yarn (worsted weight or cotton), a matching hook (4.5–5.5 mm), scissors, and stitch markers. Learn basic stitches—chain (ch), single crochet (sc), and half double crochet (hdc)—then create a sturdy foundation chain for the base. Build the sides with consistent stitch tension, shape the bag by increasing or skipping stitches as needed, and finish with a neat edge, handles, and optional lining. Blocking and shaping finalize your durable, stylish bag.
What Materials and Tools Do You Need to Crochet a Beginner’s Bag?
To crochet your first bag, you need a sturdy yarn (worsted weight or cotton cord), a corresponding crochet hook (usually between 4.5 mm and 6.5 mm), a pair of sharp scissors, a yarn needle for weaving ends, stitch markers to track rounds, and a measuring tape. For added structure, consider base inserts (plastic or cardboard) and a magnetic snap or button closure. Quality tools and materials set the foundation for a durable, professional-looking bag.
Yarn Selection: Durability vs. Aesthetic
Worsted Weight vs. Bulky Yarn:
- Worsted Weight (4): Most common for beginner bags—balances flexibility, sturdiness, and availability. Yarn thickness around 2.0–2.2 mm before blocking.
- Example: Brand A’s 100% cotton worsted at $8 per skein; ideal for a 10″×12″ tote requiring 3–4 skeins ($24–$32 total).
- Bulky Yarn (5): Creates a chunkier, more rigid bag quickly but uses more yarn—often cotton blends or roving. Thickness ~3.5–4.0 mm.
- Example: A 200 g skein of bulky cotton priced $15; one skein yields a small pouch.
- Worsted Weight (4): Most common for beginner bags—balances flexibility, sturdiness, and availability. Yarn thickness around 2.0–2.2 mm before blocking.
Fiber Choices: Cotton, Acrylic, and Blends:
Fiber Type Durability Machine Washable Recommended For 100% Cotton High Yes (Delicate) Summer totes, market bags Cotton Blend Medium Yes Color variety, softness Acrylic Medium Yes Budget-friendly, indoor use Nylon Cord Very High Yes Rigid shapes, structured handles Eco-Friendly Options:
- Recycled Cotton Yarn: Made from waste cotton, lower environmental impact.
- Bamboo/Cotton Blends: Soft drape, slight sheen, cost $12–$16 per skein, ideal for slouchy bags.
Crochet Hook Sizing and Material
Hook Sizes (mm and US):
Metric (mm) US Size Recommended Yarn Weight 4.5 (G-7) G-7 Light Worsted (3) 5.0 (H-8) H-8 Worsted (4) 5.5 (I-9) I-9 Worsted (4) 6.0 (J-10) J-10 Bulky (5) 6.5 (K-10.5) K-10.5 Bulky (5) Materials: Aluminum, Plastic, Bamboo
- Aluminum Hooks: Smooth, durable; yarn glides easily—preferred for faster crocheting.
- Bamboo Hooks: Slightly grippy, ideal for slippery yarns; lightweight, comfortable for long sessions.
- Ergonomic Hooks: Plastic handles molded for comfort; help prevent hand fatigue.
Essential Notions and Accessories
- Scissors: Sharp embroidery or craft scissors for clean yarn cuts—replace every 6 months if used heavily.
- Yarn Needle (Tapestry Needle): Large eye, blunt tip, typically size #13 or #14—used to weave ends into the bag’s inside.
- Stitch Markers: Plastic or locking ring markers to mark round beginnings or stitch counts—pack of 20 costs $3–$5.
- Measuring Tape: Flexible, shows inches and centimeters—ensures accurate dimensions (e.g., base 8″ × 10″).
Optional Reinforcement and Finishing Tools
- Base Inserts: Plastic or cork bottom circles (5–8 mm thick) to keep bag upright—purchased cheaply ($2–$5).
- Magnetic Snaps or Buttons: For closures—magnetic snap sets cost $1–$2 each; sew-on buttons come in $0.50–$1 range.
- Lining Materials: Fabric (cotton or polyester) and basic sewing supplies if you want a fabric interior—adds durability and hides inside stitches.
- Blocking Mats and Pins: Foam blocking mats and rust-proof pins for shaping the bag after finishing.
Creating a Work Space
- Good Lighting: Natural light or daylight LED lamp to see stitch detail and prevent mistakes.
- Comfortable Seating: Ergonomic chair to reduce strain during the potentially multi-hour project.
- Storage Bins or Project Bags: Keep yarn tangle-free; project bag with multiple pockets for hooks, scissors, and markers—cost $15–$30.
Which Yarn, Hook Size, and Basic Stitches Are Best for Crochet Bags?
For sturdy, beginner-friendly bags, choose worsted weight cotton or cotton blends with a hook size between 5.0 mm and 5.5 mm. Basic stitches include chain (ch) for foundation, single crochet (sc) for tight, dense fabric, and half double crochet (hdc) for a slightly looser yet durable texture. These combinations balance structure, ease of working, and a polished look.
Basic Stitches (Chain, Single Crochet, Half Double Crochet)
Chain Stitch (ch):
- Foundation of most projects; creates a base row.
- To make: Yarn over (yo), pull through loop on hook.
Single Crochet (sc):
- Tight, dense stitch; ideal for bag walls that need structure.
- To make: Insert hook into stitch, yo, pull up a loop (2 loops on hook), yo, pull through both loops.
Half Double Crochet (hdc):
- Slightly taller than sc, creating a bit of flexibility; optimal for sides that need slight give.
- To make: yo, insert hook into stitch, yo, pull up loop (3 loops), yo, pull through all 3 loops.
Comparative Table: Stitch Density & Gauge
Stitch Type Stitches per 4″ (10 cm) Rows per 4″ Fabric Characteristics sc 18–20 st 20–22 rs Very dense, structured hdc 12–14 st 14–16 rs Moderately dense, slight drape Swatching for Gauge:
- Make a 4″×4″ square in sc or hdc; measure number of stitches and rows to match pattern gauge (e.g., 16 sc × 18 rows).
- Adjust hook up or down (±0.5 mm) to achieve correct gauge—critical for base circumference matching pattern.
What Crochet Stitch Is Best for a Bag?
Single Crochet (sc):
- Strength: Creates thick, almost non-stretch fabric—resists sagging under weight.
- Stability: Minimal holes, ideal for small items not falling through.
- Best For: Utility totes, market bags carrying groceries.
Half Double Crochet (hdc):
- Balance: Slightly less dense than sc—lighter, faster to work, while still sturdy.
- Appearance: Subtler vertical ridges add subtle texture and aesthetic appeal.
- Best For: Fashion bags, beach totes, slouchy styles.
Double Crochet (dc) and Variations:
- Looser Fabric: Too open for most bags; consider combining with slip stitches or back loops only to tighten.
- Use Cases: Decorative mesh pockets on bag exterior, not main structure.
Alternate Textured Stitches:
- Herringbone Half Double Crochet: Produces dense, diagonal ribbing—excellent for structured bag walls.
- Moss Stitch (Granite Stitch): Alternating sc and chain spaces; yields thick, reversible fabric with small holes—good for accent panels but requires lining.
Comparative Stitch Properties Table:
Stitch Density Speed (st/min) Recommended Use Single Crochet (sc) High ~30–35 Bag body, base Half Double Crochet (hdc) Medium ~25–30 Slouchy bags, side panels Herringbone hdc High ~20–25 Textured panels, bottom Moss Stitch Medium ~18–22 Lined accents, pouches
How Do You Start Your Crochet Bag: Creating the Foundation Chain and Base?
Begin by chaining the required number of stitches for the bag’s width—often 30–50 ch for a medium tote. Join in the round if making a circular base (magic ring or chaining and slip-stitch join), or work back-and-forth if a flat rectangular base. For circular bases, increase evenly each round (e.g., 6 sc in MR, then 12 sc, then 18 sc, etc.) until desired diameter. Ensure base size matches the pattern before building up the sides.
Forming an Even Foundation Chain and Joining in the Round
- Choosing Chain Length:
- Guided by desired bag dimensions: e.g., 36 ch yields ~12″ base width when gauge is 3 ch = 1″.
- Swatch Example: If gauge is 16 sc = 4″, then 4 sc = 1″. For a 12″ wide base, chain 48, then use sc foundation rows or turn and sc back.
- Chain Tension and Avoiding Twists:
- Maintain an even tension—not too tight, or base will pucker; not too loose, or bag flops.
- Lay chain flat and visually inspect before working first row. If twisted, rip back until untwisted.
- Joining Methods for Circular Bases:
- Magic Ring (Adjustable Ring):
- Wrap yarn around two fingers, insert hook into center, yo and pull up loop—5–6 loops on hook.
- Yo and pull through all loops, leaving a small center hole.
- Work 6 sc into ring, tighten ring by pulling yarn tail; subsequent rounds increase.
- Benefit: No hole in center.
- Chain and Slip-Stitch Join:
- Chain 2–3, then sc into first chain–2 space to create initial circle (e.g., 6 sc).
- Slip stitch to join each round, marking round start with stitch marker.
- Example: For 6″ base, pattern: Round 1: 6 sc in MR; Round 2: 2 sc in each stitch (12 st); Round 3: (Sc in next, 2 sc in next) × 6 (18 st); etc.
- Magic Ring (Adjustable Ring):
- Rectangular or Oval Bases (Optional):
- Follow pattern to chain desired length (e.g., 40 ch), sc in 2nd ch from hook to end, sc in each side of chain—turn, sc across bottom, sc along starting side.
- Increase 1 sc at each corner to keep base flat; continue until base measures target dimensions.
How to Make a Simple Tote Bag Crochet?
- Step-by-Step Example: Basic Crochet Tote (sc Base & Hdc Sides)
- Foundation Chain: Chain 42 (for a base ~14″ width).
- Joining and First Round: Slip-stitch to join, being careful not to twist. Chain 1 (does not count as sc), sc 42 around. Slip-stitch to first sc. (42 sc)
- Base Expansion (Round 2): 2 sc in first st, sc in next 20 st, 2 sc in next st, sc in next 20 st to maintain oval shape. Slip-stitch join. (44 sc)
- Continued Rounds: Increase evenly on long sides: sc in next 10, 2 sc in next × 4, sc in next 10, 2 sc in next × 4. Adjust counts until base is 14″ × 10″ (approx. 8 rounds total).
- Transition to Sides (Round 9 onward): Switch to hdc for lighter texture: hdc in each stitch around for 20 rounds (bag height ~10″).
- Handles: On next round, hdc in next 10 st, 20 ch, skip 20 st, hdc in next 10 st; slip-stitch join. Next round: hdc in each st and ch loop. Repeat another round.
- Finishing Edge: Round of sc around entire top to reinforce. Fasten off, weave in ends.
- Gauge Note: Always check gauge: 16 sc = 4″ in worsted cotton, 14 hdc = 4″ in second portion.
- Variations & Tips:
- Reinforcing the Base: After base crochet, cut a 12″×10″ plastic canvas or heavy interfacing and slide it inside to keep shape under weight.
- Seamless Round Transitions: Carry yarn inside to change hook size seamlessly from base to sides—no visible color change.
- Adjusting Dimensions: Use formula: (Target width in inches) × (Stitches per inch) = # of stitches. Similarly for height: (Desired height) × (Rows per inch).
What Techniques Are Used to Build the Sides and Shape of the Bag?
To shape the sides, work even rounds or rows without increases once the base is sized. Use half double crochets or single crochets to maintain structure. For tapered or gusseted designs, strategically increase or decrease stitches at corners (e.g., sc2tog at each end of rows). Box corners by working 1 sc, ch 2, 1 sc in corner; skip one st. For flare or cinched tops, include front loop back loop stitches or elastic drawstring rows.
Maintaining Even Sides
- Working in the Round vs. Back-and-Forth:
- Rounds: Prevent visible seams; maintain consistent circular or oval shaping.
- Rows: Ideal for rectangular or square bases; require turning chains and careful stitch counts to avoid shifting.
- Stitch Choice Impact:
- Single Crochet (sc): Most stable—minimal stretch. Useful for heavy-duty bags carrying groceries or tools.
- Half Double Crochet (hdc): Slightly taller; allows faster build-up of height with moderate structure.
- Double Crochet (dc) with Tension Adjustments: Works for lighter market bags but may require lining to prevent sag.
Shaping Through Increasing and Decreasing
- Creating Gussets (Square Corners):
- At a base’s corner (if square), after working corner sc, ch 2, sc again, skip the next two stitches; this creates a slight inward fold.
- Continue working next side, repeating at each corner. Results in four distinct sides rising from a flat base.
- Tapered Sides (Narrower Top):
- Method: On every side round, decrease 1–2 stitches evenly around base perimeter (e.g., sc in next 3 st, sc2tog, repeat).
- Use Case: Creates a trapezoidal profile—ideal for bucket bags or satchels.
- Flared Sides (Wider Top):
- Method: Increase on each side round (e.g., sc in next 3 st, 2 sc in next, repeat) to create a bell-shaped silhouette for market totes.
- Calculation: Balance increases to avoid wobbling; aim for 4–6 increases per 40–50 base stitches.
- Structured Cylindrical Sides:
- No Increases/Decreases: Simply stack even rounds of the same stitch count; achieves upright, cylindrical buckets—perfect for beach or utility bags.
Textural and Decorative Techniques
- Front Loop Only (FLO) and Back Loop Only (BLO) Stitches:
- FLO: Creates a ridge on the front, ideal for adding mesh panels or decorative bands.
- BLO: Results in ribbing on outside, slightly looser fabric; can add stretch for drawstring top.
- Popcorn and Bobble Stitches for Accents (Optional):
- Usage: Add small bobbles as decorative motifs on sides—best limited to one or two rows to avoid bulking.
- Care: Bobbles protrude, so avoid exposing to snagging.
- Surface Slip Stitch & Overlay Crochet:
- Additions: Overlay stitches in contrasting colors create logos, stripes, or floral patterns on flat sides.
- Example: Single-row overlay of slip stitches in red on a black bag spells out initials—no change in underlying fabric density.
Handling Stitch Tension and Gauge on Sides
- Consistency Is Key:
- Erratic tension leads to wavy or lopsided sides. Practice uniform tension on small swatches before committing to full bag.
- Row Count Tracking:
- Use stitch markers at side seams or base join points to track rounds—useful when shaping.
- Row Gauge Considerations:
- If pattern specifies 14 hdc rows = 6″, but your tension yields 12 rows for 6″, switch to a smaller hook (e.g., from 5.5 mm to 5 mm) or tighten tension.
Integrating Functional Features During Construction
- Inner Pockets and Dividers:
- Before closing top edge, attach pre-crocheted pocket panels (4″ × 6″) by slip-stitching along designated side.
- Use whip stitch or corset-like single crochet to secure edges.
- Mesh or Ventilation Panels:
- Insert mesh created by chain spaces (e.g., sc in next st, ch 2, skip 2 st) for breathable compartments—common in beach bags.
- Handles Integrated into Sides:
- Crochet handles directly by chaining across a gap on side rounds (e.g., dc in next 10 st, chain xxx, skip xxx, dc in next 10 st)—reinforce on subsequent round.
How Do You Finish the Top Edge, Add Handles, and Include Decorative Details?
To finish your bag, work a round of slip stitches or single crochets along the top to create a neat edge. For handles, chain to desired length (24–30 ch for shoulder straps), then attach with single crochets on opposite sides—reinforce with extra rows. Decorative details like scalloped edges, fringe, or tassels can be added on the last round. Weave in ends, sew on lining if desired, and block to shape.
Finishing the Top Edge
- Single Crochet Edge:
- Work 1 sc in each stitch around; creates sturdy rim to prevent stretching.
- Example: For a bag with 80 stitches around, work 80 sc, join with slip stitch—ensures uniform top diameter.
- Slip Stitch Edge:
- Insert hook in next st, yo, pull through both loops; creates a flat, subtle border.
- Best for minimal bulk when adding a fabric lining.
- Scalloped or Shell Edgings (Decorative):
- Shell Pattern: Skip 2 st, 5 dc in next st, skip 2 st, sc in next st, repeat.
- Adds a feminine touch—ideal for market or beach totes.
Creating and Attaching Handles
- Chain-and-Sc Handles (Integrated):
- Decide handle placement: typically 6″ apart on top edge. Use markers to mark st positions.
- From top-round, chain desired length (e.g., 30 ch for 24″ drop), skip same number of st across, sc in next st; repeat for second handle.
- Next round: work sc in each ch across to reinforce handle.
- Separate Crochet Straps (Reinforced):
- Crochet two rectangular straps (length ~24″, width ~1.5″) using sc or hdc.
- Sew ends onto bag top with whip stitch or single crochet, adding extra rows around attachment points to distribute weight.
- Leather or Fabric Handles (Mixed Media):
- Purchase pre-made leather handles ($3–$6 per pair).
- Use whip stitch to attach with matching yarn or nylon thread.
- Example: Poke holes with a leather needle in the bag’s edge (through bag lining if present), then sew leather handle ends on securely.
Decorative Details and Embellishments
Tassels and Fringe:
- Make tassels by wrapping yarn around cardboard (4″ length), tie at top, cut bottom loops, and attach to bag’s side seams or bottom corners.
- Fringe: Cut multiple 8″ yarn strands, fold in half, pull loop through bag edge and tighten—repeat every 1″ for a 4″ fringe.
Appliqués and Patches:
- Crochet flowers, leaves, or geometric shapes (e.g., granny squares) and sew onto bag exterior with yarn needle.
- For a boho vibe, attach 3–5 appliqués cluster in one corner.
Colorwork (Striping, Gradient, or Mosaic):
Technique Description Difficulty Level Simple Stripes Alternate 2–3 rows of contrasting colors (e.g., red/white) Easy Ombre/Gradient Yarn Use yarn that transitions color; no changing needed Easy Mosaic Crochet Use two colors in one row, slip-stitch technique creates pattern Medium Intarsia Blocks Work separate small sections with different colors, weaving yarn behind Hard Beads and Sequins:
- String beads onto yarn before crocheting; slide bead into place on designated stitch.
- Sew sequins onto finished fabric for sparkle—use a small sewing needle and matching thread.
Adding a Lining (Optional but Recommended for Bags)
- Lining Benefits:
- Prevents small items from poking through stitches.
- Provides a clean interior finish; can add pockets.
- Basic Lining Steps:
- Measure bag’s interior: height, width, depth.
- Cut fabric accordingly (add 0.5″ seam allowances).
- Sew side seams and bottom seam of lining.
- Insert lining into bag, fold top edge of crochet over lining’s top edge, whip-stitch together discreetly.
- Pocket Inclusion:
- Sew 1–2 pockets (4″ × 6″) onto one lining panel before assembly; position at 6″ from top for easy phone access.
Finishing Touches: Blocking and Shaping
- Wet Blocking:
- Dampen bag with spray bottle or submerge in lukewarm water (if yarn allows), gently shape, and insert base form (plastic canvas or cardboard).
- Pin handles to desired orientation on blocking mat; let air-dry 24–48 hours.
- Steam Blocking (Acrylic or Synthetic Yarns):
- Hold iron 1″ above fabric, steam lightly, shape to form, allow to cool in place.
- Be cautious: too much heat can melt synthetic fibers.
- Final Weaving in Ends:
- Use yarn needle to weave ends into back loops or hidden rows—avoid interior-side weaving that creates lumps.
Is Following a Crochet Pattern Necessary, and Where Can You Find Beginner-Friendly Designs?
While experienced crocheters might freestyle, beginners benefit significantly from patterns to ensure accurate gauge, stitch counts, and shaping instructions. Free patterns are available on platforms like Ravelry, AllFreeCrochet, and YouTube tutorials. For step-by-step visual guidance, search “beginner crochet tote pattern” or “easy crochet bag PDF.” Patterns from well-known designers often include detailed photos, gauge swatches, and yarn recommendations, reducing guesswork.
Benefits of Using a Pattern
- Accurate Stitch Counts & Dimensions: Patterns specify exactly how many stitches to start and how many rounds to achieve target measurements—avoids guesswork.
- Gauge Assurance: Patterns provide gauge indicators (e.g., “16 sc × 18 rows = 4″”), helping you choose correct hook size and yarn.
- Learn Terminology & Abbreviations: Familiarize with standard crochet abbreviations—ch, sc, hdc, inc, dec, sl st—critical for reading patterns anywhere.
- Time Efficiency: Minimizes trial-and-error; patterns guide you from start to finish, often with troubleshooting tips.
Free vs. Paid Patterns
| Source | Cost | Pros | Cons |
|---|---|---|---|
| AllFreeCrochet | Free | Extensive library, user ratings, project photos | Quality varies, may lack detailed instructions |
| Ravelry | Free/Paid | Comprehensive search filters, community support | Many paid patterns; free patterns still require downloads |
| YouTube (e.g., Bella Coco) | Free | Video tutorials show exact techniques | Harder to follow for written reference |
| Etsy/Designer Websites | $3–$10 | Professionally tested, detailed instructions | Upfront cost, licensing restrictions |
| Craftsy/Bluprint | Subscription | High-production-value patterns, classes | Requires ongoing subscription |
Evaluating Pattern Difficulty
- Beginner-Friendly Indicators:
- Uses only basic stitches (sc, hdc), minimal shaping (straight sides).
- Includes photos or diagrams for each step.
- Clear gauge instructions and yarn recommendations.
- Pattern Grading:
- Easy: One or two stitch types, no shaping or simple increases. Estimated time: 2–4 hours.
- Intermediate: Mix of stitches (sc, hdc, maybe bobbles), simple shaping or mesh. Estimated: 4–8 hours.
- Advanced: Colorwork, mosaic, multiple textures, lining, and appliqués. Estimated: 10+ hours.
Top Beginner Patterns to Consider
- “Simple Crochet Market Bag” by Lion Brand: Free PDF with sc base, hdc sides, chain handles. 2 skeins of worsted cotton, hook 5.5 mm.
- “Easy Tote” by AllFreeCrochet: Uses sc throughout; no shaping—ideal first project. 1200–1500 yards of cotton-blend yarn.
- “Beginner Crochet Beach Bag” by Moogly (YouTube Tutorial): Video walkthrough; mesh sides for beach sand drainage. Recommended yarn: T-shirt yarn or bulky cotton.
- “Textured Herringbone Bucket Bag” by Bella Coco: Slightly advanced for beginners wanting texture; uses herringbone hdc for strength.
Creating Your Own Pattern (For Intermediate Beginners)
- Measure and Plan Dimensions: Decide bag width, height, and base shape (oval vs. rectangular).
- Calculate Stitch Counts: Using gauge, apply formula: (Desired width in inches) × (stitches per inch) = total stitches for foundation chain.
- Sketch Diagram: Draw a basic outline of bag—mark handles, pockets, and accents.
- Write Instructions in Phases: Compose steps for base, sides, handles, and finishing. Test crocheting small swatches to verify shaping.
- Note Challenges: Identify potential sagging or bulging areas and plan for reinforcement or changes in stitch type.
How Do You Care for, Block, and Maintain Your Finished Crochet Bag?
To keep your crochet bag looking fresh, empty contents and shake out debris after each use. Spot clean stains with mild detergent and a damp cloth. For full laundering, handwash in lukewarm water, reshape while wet, then air-dry flat. Block the bag—pin it gently to exact dimensions—to ensure handles and edges remain straight. Store loosely folded or hung to maintain shape and prevent mildew.
Daily and Weekly Upkeep
- Empty and Inspect:
- Remove all items—dust, wallet, keys—to clear out crumbs or debris. Brush interior gently with a soft brush.
- Spot Cleaning Basics:
- Mix mild liquid soap (pH-neutral) with water (1:10 ratio). Dip a soft cloth or sponge, wring out excess water, and dab gently on stained areas.
- Rinse cloth, wipe away soap residue, and let bag air-dry completely before use.
- Handling Odors:
- Sprinkle baking soda inside bag, let sit overnight, then shake out to neutralize mild odors (e.g., perfume, food smells).
Periodic Deep Cleaning
- Handwashing Instructions:
- Fill basin with lukewarm water (85–90°F). Submerge bag partially, swirl gently for 2–3 minutes—avoid scrubbing vigorously to prevent stitch distortion.
- Drain soapy water, refill with clean water to rinse; repeat until soap is fully rinsed.
- Gently press (don’t wring) to remove excess water; lay flat on a clean towel, roll towel to absorb water, then reshape on a drying rack.
- Machine Washing (If Yarn Allows):
- Only use if pattern’s yarn label states “machine washable.” Use cold water, gentle cycle, place bag inside mesh laundry bag. Air-dry flat.
- Avoid dryer—high heat can shrink or warp acrylic blends.
Blocking Techniques
- Wet Blocking:
- Soak bag or parts (handles, flaps) in lukewarm water for 5–10 minutes. Gently squeeze out excess water without twisting.
- Pin bag to blocking mat or foam board using rust-proof T-pins. Shape to exact target dimensions (e.g., base 12″ × 10″, height 10″).
- Allow to air-dry 24–48 hours.
- Steam Blocking (Synthetic or Blended Yarns):
- Lay bag flat on ironing board. Hold a steam iron 1″ above fabric, gently steam while pulling edges into shape.
- Avoid pressing iron onto yarn—steam only. Use cotton pressing cloth as buffer.
- Importance of Blocking:
- Aligns stitches, ensures bag stands straight, prevents warping of handles, and gives professional finish.
Structural Reinforcement and Repairs
- Reinforcing Handles:
- If handles begin stretching under weight, insert thin plastic or rope inside handle tube (if crocheted in the round).
- Use whip stitch to secure reinforcement—choose thread similar in color to yarn.
- Repairing Loose Seams:
- Identify snagged or loose loops early. Use a crochet hook to pull loop back into place, tighten surrounding stitches.
- If seam starts splitting, use matching yarn to sew it back with a whip stitch or slip-stitch.
Long-Term Storage Tips
- Preventing Mildew and Mold:
- Ensure bag is completely dry; moisture trapped in yarn fibers promotes mold.
- Store in breathable fabric bag—avoid plastic bins that trap humidity.
- Shape Preservation:
- Stuff bag lightly with acid-free tissue paper or old cotton t-shirts.
- Use padded hangers or lay flat; avoid folding edges in unnatural creases.
- Avoid Direct Sunlight:
- Prolonged UV exposure can fade colors, weaken fibers—store in shaded closet or cabinet.
Cost of Care Over Time
| Care Item | Cost (USD/year) | Notes |
|---|---|---|
| Mild Detergent & Cloth | $5 | Spot cleaning, routine washes |
| Blocking Mats & Pins | $15 (one-time) | Reusable for multiple projects |
| Yarn Needle Replacement | $5 (annual) | Woven-in ends; replace if blunted |
| Total Annual Care Cost | $10–$15 | Extends bag lifespan by 2–3 years |
Conclusion
Crocheting a bag from scratch offers a rewarding mix of creativity and utility. By gathering the right materials, mastering basic stitches, following a reliable pattern, and applying careful finishing techniques, even beginners can produce a sturdy, stylish bag that lasts. From selecting the ideal stitch—whether sc for a rigid base or hdc for a bit of drape—to choosing between cotton and acrylic based on desired care, each decision shapes your finished piece.
Once your creation is complete, proper maintenance—thorough cleaning, blocking, and careful storage—ensures it remains a faithful companion for years. Whether you design a simple tote for daily errands or a textured bucket bag for weekend outings, a little practice and patience go a long way.
Interested in crafting custom crochet-friendly bag molds or designing high-quality base inserts for your crochet projects?
manufacturer Categories
- Custom Tote Bags Manufacturer
- custom backpacks Manufacturer
- custom travel bags& Duffle bags manufacturer
- custom makeup bags & toiletry bags manufacturer
- custom cooler bags manufacturer
- custom drawstring bags manufacturer
- custom makeup bags & toiletry bags manufacturer
- custom golf bags manufacturer
- custom fireproof bags manufacturer
- custom dry bags manufacturer
- custom ski bags manufacturer
- custom gym & sports bags manufacturer
- custom laptop bags manufacturer
- custom tactical bags manufacturer
- custom beach bags manufacturer
- custom medical bags manufacturer
- custom camera bags manufacturer
- custom wetsuits manufacturer
- custom leather goods manufacturer
- more personalized products
Can't find the answers?
No worries, please contact us and we will answer all the questions you have during the whole process of bag customization.
Make A Sample First?
If you have your own artwork, logo design files, or just an idea,please provide details about your project requirements, including preferred fabric, color, and customization options,we’re excited to assist you in bringing your bespoke bag designs to life through our sample production process.